HOLA COMUNIDAD!👩🍳
HELLO COMMUNITY!👩🍳
Today technology is part of our lives and we all know that person who is a voodoo when it comes to technology, in my family nucleus we have my partner, he is the person we ask for help whenever we have a technical problem with our PC; so I had the creativity to surprise him on his birthday with this homemade cake, with a design of a technical piece, specifically the motherboard.
Join me for this electrifying recipe!👩💻
ESP
El día de hoy la tecnología forma parte de nuestra vida y todos conocemos a esa persona que es un vudú cuando se trata de tecnología, en mi núcleo familiar tenemos a mi pareja, él es la persona que pedimos ayuda siempre que tenemos un problema técnico con nuestra PC; así que tuve la creatividad de sorprenderlo en su cumpleaños con este pastel casero, con diseño de una pieza técnica, específicamente la tarjeta madre.
¡Acompáñame a esta electrifícante receta!👩💻

INGREDIENTS:🥚
| 250g sugar. | 250g pastry flour. |
|---|---|
| 200g condensed milk. | 50ml of milk. |
| 5 eggs. | 1 tbsp vanilla. |
| 25 ml sunflower oil. | 150 g strawberries. |
| 1 lemon. | Meringue or other filling. |
ESP
INGREDIENTES:🥚
| 250 g azúcar. | 250 g harina repostera. |
|---|---|
| 200 g leche condensada. | 50 ml de leche. |
| 5 huevos. | 1 cda vainilla. |
| 25 ml aceite girasol. | 150 g fresas. |
| 1 limón. | Merengue u otro relleno. |

PREPARATION.🥣
- First step.
We will begin by making the sponge cake for our cake. First we are going to separate the 5 eggs, the white and the yolk; then we are going to place in a bowl the white together with half of the sugar. Then, with the mixer without pausing, we will mix until we get to make a figure at the time of passing, as shown in the photo.
ESP
PREPARACIÓN.🥣
- Primer paso.
Comenzaremos haciendo el bizcocho esponjoso para nuestro pastel. Primero vamos a separar los 5 huevos, la clara y la yema; después vamos a colocar en un recipiente la clara junto a la mitad del azúcar. Luego, con la batidora sin pausar, mezclaremos hasta que logremos hacer una figura al momento de pasar, como aparece en la foto.

- Second step.
In another bowl place the egg yolks, the remaining half of the sugar, together with the rest of the ingredients: vanilla, lemon zest, milk and oil. Then we will mix with the mixer or whisk to unify the ingredients taking care not to leave lumps.
ESP
- Segundo paso.
En otro recipiente vamos a colocar las yemas, la mitad restante del azúcar, junto con el resto de ingredientes: vainilla, ralladura de limón, leche y el aceite. Luego mezclaremos con la batidora o varilla para unificar los ingredientes con atención de no dejar grumos.

- Third step.
It is time to place the flour pastry, in case you have regular flour simply add a small spoonful of baking powder, when adding flour has to be sifted way, since flour is easy to form lumps so you have to add it so pause and mixing with the whisk or rod at the time of adding.
ESP
- Tercer paso.
Es momento de colocar la harina repostera, en caso de que tengas harina común simplemente agrega una cucharada pequeña de polvo de hornear, al momento de agregar harina tiene que ser de manera tamizada, ya que la harina es fácil de formarse grumos por lo cual tienes que agregarlo de manera pausa y mezclando con la batidora o varilla al momento de agregar.

- Fourth step.
Then we will join with a pastry paddle or spoon both mixtures that we have separated, at the time of adding it has to be slowly and with enveloping movements to avoid losing the air that we created for the cake to be fluffy; you can be guided with the photos, I show the correct way to mix. Then we will transfer the mixture to a baking dish, I used a square-shaped one because it was perfect with the technological design. To avoid forming a hole in the middle or deformity in the cake, with a toothpick we will pass in the top, to burst a little bubbles on the surface. Bake with heat up and down with the oven preheated to 180 degrees. Let the cake bake for 30-40 minutes. Before removing the cake with a toothpick, check that it is cooked. If it comes out clean it means it is ready.
ESP
- Cuarto paso.
Luego vamos a unir con una paleta repostera o cuchara ambas mezclas que tenemos separados, al momento de agregar tiene que ser de manera pausada y con movimiento envolventes para evitar que perdamos el aire que creamos para que el pastel quede esponjoso; pueden guiarse con las fotos, muestro la manera correcta de mezclar. Luego pasaremos la mezcla a un recipiente para el horno, utilicé uno de forma cuadrada porque era perfecto con el diseño tecnológico. Para evitar que no se forme un hueco en el medio o deformidad en el pastel, con un palillo pasaremos en el top, para reventar un poco las burbujas de la superficie. Dejaremos hornear con calor arriba y abajo con el horno precalentado a 180 grados. Dejaremos el pastel hornear 30-40 minutos. Antes de retirar el pastel con un palillo, verificamos que él se encuentra cocinado. Si sale limpio significa que está listo.


- Fifth step.
If we want to have a moist cake, you can prepare a broth for the cake. In this case, as we will use strawberry filling, the best broth would be a milk broth, mixing milk and condensed milk.
ESP
- Quinto paso.
Si queremos tener un pastel húmedo, pueden preparar un caldo para el pastel. En este caso, como utilizaremos fresa de relleno, el mejor caldo sería uno de leche, mezclando leche y leche condensada.

FILLING.🍓
I decided to prepare a meringue for this cake, since at the moment of designing it I was not going to have any difficulty with the process, besides it is very easy and quick to prepare. We will need 113 g egg whites, 3 drops of lemon, 75 ml water and 225 g white sugar. We are going to place 200 g white sugar with the water in a pot, mixing them and letting them cook on low heat. In a bowl we are going to place the egg whites, lemon and the rest of sugar, mixing them without stopping with the mixer; when our sugar is cooked until the temperature of 180 degrees, we will add with care of not burning ourselves to the mixture with the mixer at maximum volume for 10 minutes.
Note: In case you do not have the tools to measure the temperature, you can know that it is ready by placing a drop in cold water, if you let it mold, it means that it is ready.
ESP
RELLENO.🍓
Decidí preparar un merengue para este pastel, ya que al momento de diseñar no iba a dificultad el proceso, además de que es muy fácil y rápido de preparar. Necesitaremos 113 g clara de huevos, 3 gotas de limón, 75 ml agua y 225 g azúcar blanca. Vamos a colocar 200 g azúcar blanco con el agua en una olla, mezclándolos y dejándolos cocinar en fuego bajo. En un recipiente vamos a colocar las claras, limón y el resto de azúcar, mezclándolos sin parar con la batidora; cuando nuestra azúcar esté cocinado hasta la temperatura de 180 grados, agregaremos con cuidado de no quemarnos a la mezcla con la batidora a máximo volumen por 10 minutos.
Nota: En caso de no tener las herramientas para medir la temperaturas, pueden saber que esta listo a colocar una gota en agua fria, si se deja moldear, significa que esta listo.


With our meringue ready, we can fill our cake. We will cut half of the sponge cake, spread the broth all over the cake and then place the meringue with the strawberries cut into small pieces. We will cover the cake and place a little more broth on top.
ESP
Con nuestro merengue listo, podemos rellenar nuestro bizcocho. Cortaremos la mitad del bizcocho, esparciremos por todo el pastel, el caldo y luego colocaremos el merengue con las fresas cortadas en pedazos pequeños. Cubriremos el pastel y colocaremos un poco más de caldo en la parte arriba.

DESIGN.🎂
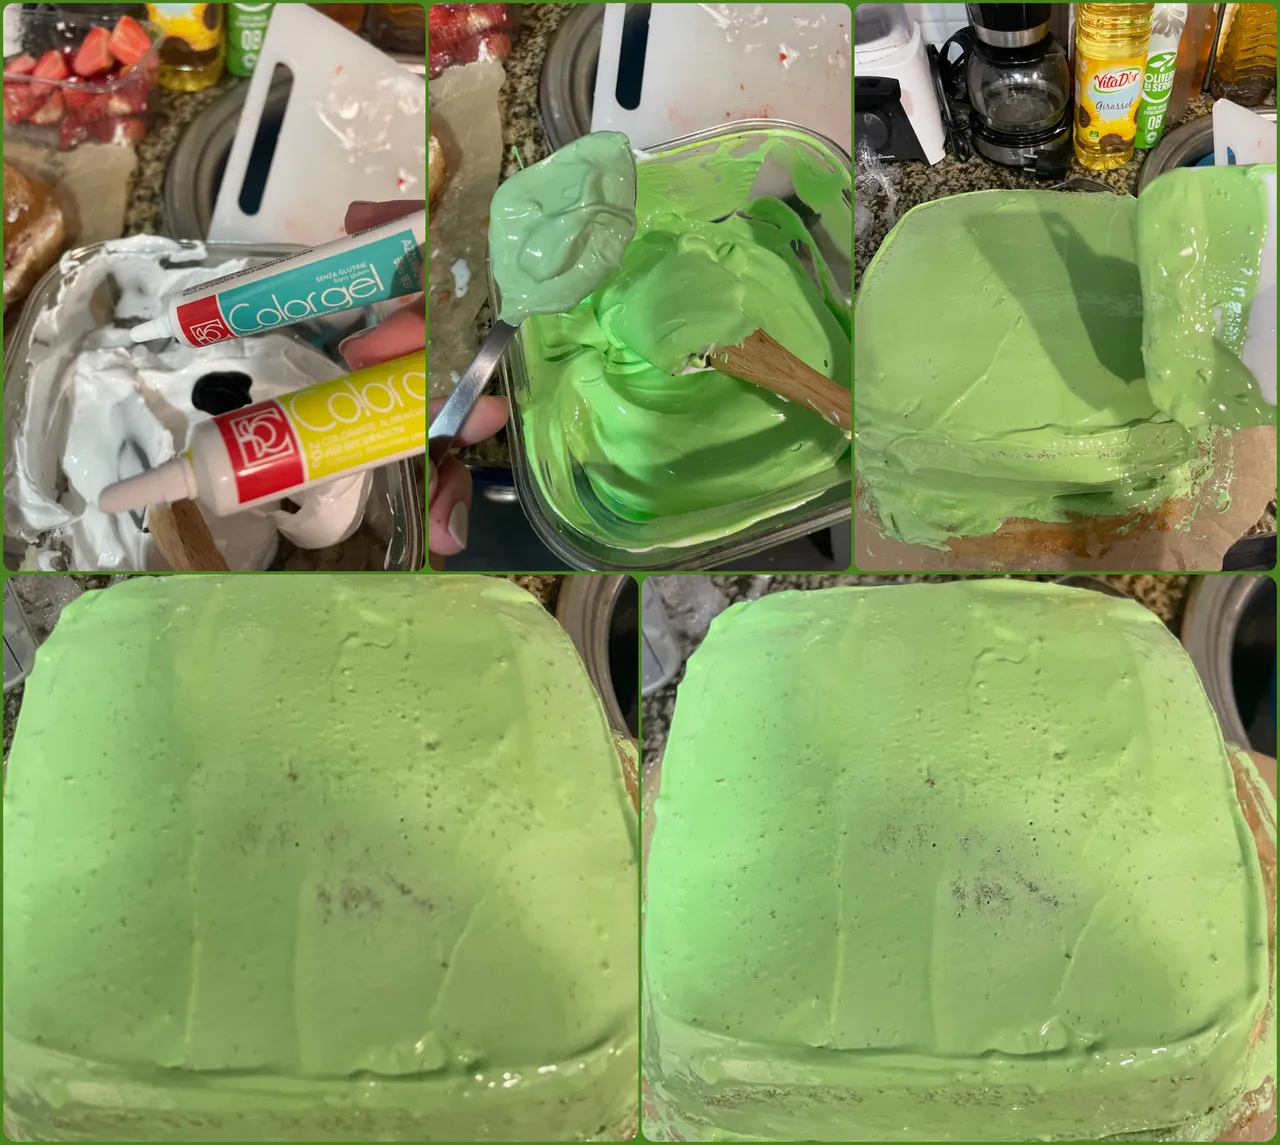
The design for this cake is a motherboard, it is an internal technical part of the tower of our PC, usually they are usually of many colors, blue, black, green, etc., this case I preferred to make it green, because from my point of view it would look better, so with the remaining meringue we will paint it green and place it throughout our cake, as it will be the basis of the design. Then, with 100 g of fondant we will cut in half and make figures for our design. As you can see in the picture, we will make more rectangular and square designs in black color, placing small white pieces around and then we will paint them in gold. The small pillars that you can see in black and white were made by molding them with my hands and then with a rolling pin I flattened black fondant and wrapped the pillars carefully. In the position of the order I helped me with several guide images on the Internet. The ''wiring'' are very thin strips of fondant that were painted some parts with gold. Then I checked that all the motherboards have certain golden or silver dots, so with the coloring I put some dots on certain parts of the cake.
ESP
DISEÑO.🍰
El diseño para este pastel es una tarjeta madre, se trata de una pieza técnica interna de la torre de nuestra PC, normalmente suelen estar de muchos colores, azul, negra, verde, etc., este caso preferí hacerlo de color verde, ya que de mi punto de vista se vería mejor, por lo cual con el merengue restante lo pintaremos de verde y colocaremos en todo nuestro pastel, ya que será la base del diseño. Después, con 100 g de fondant cortaremos la mitad y haremos figuras para nuestro diseño. Como se puede observar en la foto, haremos más diseños rectangulares y cuadrados en color negro, colocando pequeños pedazos blancos alrededor y luego los pintaremos en dorado. Los pilares pequeños que se ven en negro y blanco fueron realizados moldeándolos con las manos y luego con un rodillo aplane fondant negro y envolviendo los pilares con cuidado. En la posición del orden me ayudé con varias imágenes guías en el Internet. El ''cableado'' son tiras muy finas de fondant que fueron pintadas algunas partes con dorada. Luego verifique que todas las tarjetas madres tienen ciertos puntos dorados o plateados, por lo cual con el colorante coloque unos puntos en ciertas partes del pastel.


FINAL RESULT.🎉
After a long work, we have a happy birthday and a fluffy, moist and tasty cake with a unique design of amazement. If you know that person who is a fan of technology, you can surprise him or her by baking this cake with a very creative design.
ESP
RESULTADO FINAL.🎉
Luego de un largo trabajo, tenemos un cumpleaños feliz y un pastel esponjoso, húmedo y sabroso con un diseño único de asombro. Si conoces a esa persona que es fanática de la tecnología, puedes sorprenderlo horneándole este pastel con un diseño muy creativo.


Thank you very much for reading my post. I hope you liked this recipe. I would have liked to take more pictures with the cake already made, but people were crazy to devour it. 😆 I wish you a nice day!🌿
Muchas gracias por leer mi post. Espero que te gustara esta receta. Me hubiera gustado tomarme más fotos con el pastel ya realizado, pero las personas estaban locas por devorarlo. 😆 ¡Te deseo un lindo día!🌿
