As promised, today I bring you the last post to make this fabulous Batman themed tall cake.
Cómo lo prometido es deuda hoy les traigo el último post para elaborar éste fabuloso pastel alto con temática de Batman.

Friday is here and I want to end the week with the last installment of my previous post Let's make a cake. If you couldn't read it here I leave you the link because you will need it since this is the second part of that first post where I teach you how to prepare the delicious vanilla cake that will be the base of our cake and the buttercream to cover it.
Let's make a cake. Part one
So to continue, today we will learn how to color the buttercream, fill, smooth and decorate our cake. I want to tell you that with these same steps you can make any theme you want, just change the color, use the right toppers and decorations and that's it! It is true that mastering the application of the buttercream to make it look neat takes some practice but I will give you some tricks to make your experience very rewarding and leave you wanting more!
Llegó el viernes y quiero terminar la semana con la última entrega de mi post anterior Let's make a cake. Si no lo pudieron leer aquí les dejo el enlace pues lo van a necesitar ya que ésta es la segunda parte de ése primer post en dónde les enseño a preparar el delicioso ponqué de vainilla que será la base de nuestro pastel y la buttercream de mantecado para cubrirlo.
Let's make a cake. Part One
Así que para continuar, el día de hoy aprenderemos a darle color a la buttercream, a rellenar, alisar y decorar nuestro pastel. Quiero contarles que con éstos mismos pasos pueden elaborar cualquier temática que deseen, sólo deben cambiar de color, usar los toppers y decoración adecuados y listo! Es cierto que dominar la aplicación de la buttercream para que quede bien prolija lleva algo de práctica pero les daré algunos trucos para que su experiencia sea muy gratificante y queden con ganas de más!

I confess that I am self-taught, I have not taken any kind of baking courses as such, what I know so far has been watching tutorials on Instagram, watching YouTube videos, reading a lot and practicing! In fact I've been in the world of baking for just two years since our venture started with candy and balloon arrangements but in view of the needs of some customers we decided to launch into a new experience and thank God we have been able to expand the services we offer in Detallitos Dulces offering rich and beautiful cakes.
One of the things I enjoy most about what I do is being able to make use of my creativity and that artistic side that we all have inside and that we don't always exploit. I like to experiment, try new techniques, new flavors and try to reflect in the cake what the client dreamed of, which is absolutely wonderful. This Batman cake as I said in the first post was created to celebrate Alessandro's 11th birthday, his mommy, our client has trusted us since before baby Ale was born to spoil him with our details and now that he is about to turn a year old we decided to work with this super hero that despite the time is still very present in children's birthdays.
Les confieso que soy autodidacta, no he realizado ningún tipo de cursos de repostería como tal, lo que sé hasta ahora ha sido mirando tutoriales en Instagram, viendo vídeos de YouTube, leyendo mucho y practicando! De hecho llevo apenas dos años en el mundo de la repostería pues nuestro emprendimiento inició con arreglos de dulces y globos pero en vista de las necesidades de algunos clientes decidimos lanzarnos a una nueva experiencia y gracias a Dios hemos podido ampliar los servicios que ofrecemos en Detallitos Dulces ofreciendo ricos y hermosos pasteles.
Una de las cosas que más disfruto de lo que hago es poder hacer uso de mi creatividad y de ésa parte artística que todos llevamos dentro y que no siempre explotamos. Me gusta experimentar, probar nuevas técnicas, nuevos sabores y trato de reflejar en el pastel lo que el cliente soñó, lo cual es absolutamente maravilloso. Éste pastel de Batman como lo dije en el primer post fue creado para celebrar el cumple mes número 11 de Alessandro, su mami, nuestra clienta ha confiado en nosotros desde antes de nacer baby Ale para consentirlo con nuestros detalles y ya cerquita de cumplir el año decidimos trabajar con éste súper héroe que a pesar del tiempo sigue muy presente en los cumpleaños infantiles.

As you can see there are many decorations and themes that we can make for our little ones with buttercream, so do not be afraid, dare to create a cake that besides being made with love will look great! Just look at this beautiful Batman cake that you will learn how to make today!
Cómo pueden ver son muchas las decoraciones y temáticas que podemos hacer para nuestros pequeños con la buttercream, así que no tengan miedo, anímense a crear un pastel que además de estar hecho con amor lucirá genial! Sino miren que bello quedó éste pastel de Batman que hoy aprenderán a realizar!

The first thing we are going to do to assemble our cake is to fill it. You can use any filling you want, custard, chocolate, buttercream, arequipe, fruits, cookies and so on. In this case our client's favorite filling is arequipe or dulce de leche so this is the one we are going to work with. There is a very important step before proceeding to the filling and that is to make a ring of buttercream around the cake that will serve as a kind of barrier and our filling will not "escape" and damage our frosting.
Now that we know this, let's get to work! We have at hand our three vanilla cakes (mind you, we can also make one and cut it into three but I find it better this way!) that we made with the recipe from our previous post.
Lo primero que vamos a hacer para armar nuestro pastel es rellenarlo. Pueden usar cualquier relleno que deseen, crema pastelera, chocolate, buttercream, arequipe, frutas, galletas y pare de contar. En éste caso el relleno favorito de nuestra clienta es el arequipe o dulce de leche así que será con el que vamos a trabajar. Hay un paso súper importante antes de proceder a rellenar y es hacer un aro de buttercream al rededor del pastel que nos sirva como especie de barrera y nuestro relleno no se "escape" y dañe nuestra cobertura.
Ya que sabemos ésto, manos a la obra! Tenemos a la mano nuestros tres pasteles de vainilla (ojo, también podemos hacer uno y cortarlo en tres pero a mí me resulta mejor así!) que elaboramos con la receta de nuestro post anterior.

We proceed to fill our pastry bags, one with arequipe and the other with buttercream.
Procedemos a rellenar nuestras mangas pasteleras, una con arequipe y la otra con buttercream.

We place our first layer of cake on the base or disk. For this we place a good amount of buttercream that will help us to fix the cake to it once it is cooled. In this case I am going to work on a ballerina but I tell you that in my beginnings I didn't have one and what I did was to place the disk with the cake on the edge of the table and turn it with my hands. It's a little tedious but it can be done!
Colocamos nuestra primera capa de pastel sobre la base o disco. Para ésto colocamos una buena cantidad de buttercream que nos ayudará a que el pastel se fije a la misma una vez se refrigere. En éste caso voy a trabajar sobre una bailarina pero les cuento que en mis inicios no contaba con una y lo que hacía era colocar el disco con el pastel en el borde de la mesa y lo giraba con las manos. Es un poco tedioso pero si se puede!

Once this first step is done, with the buttercream we proceed to elaborate our ring around the edge of the cake as you can see in the image and then with the arequipe or dulce de leche piping bag we fill it generously.
Listo éste primer paso, con la buttercream procedemos a elaborar nuestro aro por todo el borde del pastel como aprecian en la imagen y luego con la manga de arequipe o dulce de leche rellenamos generosamente.

Then we place the other layer of the cake and perform the same procedure, finishing with the last layer, making sure to place the smoothest part of the edges upwards so that our cake is much neater.
Seguidamente colocamos la otra capa del pastel y realizamos el mismo procedimiento, finalizando con la última capa asegurándonos de colocar hacía arriba la parte más lisa en sus bordes para que nuestro pastel quede mucho más prolijo.


We will make sure to fill with buttercream the spaces that remain between each layer of cake and smooth with a spatula, smoother or a simple school ruler if you do not have the necessary implements. In my beginnings I worked with a ruler for a long time, so you don't have to spend a lot of money at the bakery store, let's improvise a little and use what we have at home.
Nos aseguraremos de rellenar con buttercream los espacios que queden entren cada capa de pastel y alisar con una espátula, alisador o una simple regla escolar si no cuentan con los implementos necesarios. En mis inicios trabaje con una regla por bastante tiempo, así que no tienen que ir a gastar un dineral en la tienda de repostería, improvisemos un poco y utilicemos lo que tenemos en casa.


Once this step is finished comes a very important one and that is to refrigerate our cake for about 20 minutes. This will allow the buttercream to solidify and it will be much easier to decorate (I usually leave it overnight, in fact it is the most recommended). We cover it with cling film of the kind we use in the kitchen, but if we don't have it, a plastic bag will do!
Una vez finalizado éste paso viene uno súper importante y es llevar nuestro pastel a refrigeración por unos 20 minutos. Con ésto lograremos que la buttercream se solidifique y nos resulte mucho más sencillo decorar (yo suelo dejarlo toda la noche, de hecho es lo más recomendable). Lo cubrimos con film transparente de ése que usamos en la cocina, pero si no tenemos, una bolsa plástica servirá!

If you are against the clock with the preparation of your cake you can leave it in the refrigerator for about 20 minutes and it will be enough. So during the waiting time we are going to color our buttercream and for that we are going to use gel coloring (we can use liquid but it will modify a little the texture of our cream). This process is done with the mixer but it can be done manually without any problem. As we are going to cover in gray we will use black color to get it, so we are going to add little by little until we have the desired tone.
Si están contra reloj con la elaboración de su pastel pueden dejarlo unos 20 minutos en el refrigerador y será suficiente. Así que durante la espera vamos a colorear nuestra buttercream y para eso vamos a utilizar colorante en gel (podemos usar líquido pero modificará un poco la textura de nuestra crema). Éste proceso lo hago con la batidora pero se puede hacer manual sin ningún problema. Como vamos a cubrir de gris usaremos color negro para conseguirlo, así que vamos a agregar poco a poco hasta que tengamos el tono deseado.


Once the necessary time has elapsed and the cake is firm, remove it from the refrigerator and proceed to cover it. Place the gray buttercream in a piping bag and surround our cake with it, as you can see in the pictures.
Transcurrido el tiempo necesario y una vez firme nuestro pastel lo retiramos del refrigerador para proceder a cubrirlo. Colocaremos la buttercream gris en una manga y rodearemos todo nuestro pastel con ella, tal cual como pueden apreciar en las imágenes.

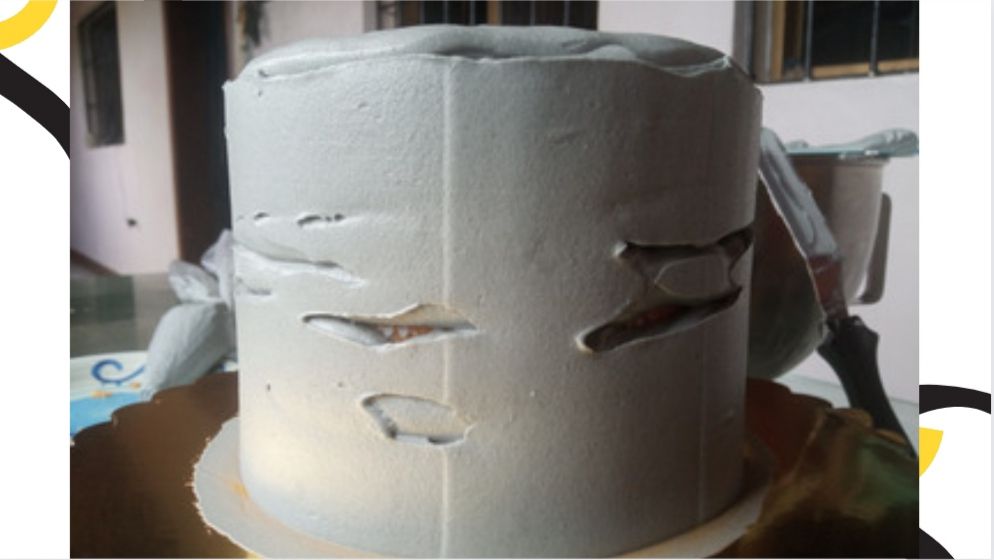
Once all the cake is covered, the smoothing process comes next, which we will do very carefully. For that we need our smoother or ruler and we will place it flush with the cream and we will rotate our dancer until it surrounds the whole cake. This step we will do without much pressure and just above because otherwise we will take all the icing. We give about two turns and stop to fill the empty spaces and continue with the smoothing process until it is completely smooth.
Cubierto todo el pastel viene el proceso de alisado, el cual haremos con mucho cuidado. Para éso necesitamos nuestro alisador o regla y la colocaremos al ras de la crema e iremos girando nuestra bailarina hasta rodear todo el pastel. Éste paso lo haremos sin hacer mucha presión y apenitas por encima pues en caso contrario nos llevaremos todo el glaseado. Damos unas dos vueltas y paramos para rellenar los espacios vacíos y continuamos con el proceso de alisado hasta que esté completamente liso.


At the top I use a spatula but you can also use a ruler or any other element that may be useful to you. Let's use our imagination! To obtain smooth edges we take with the spatula the overhanging cream and bring it to the center and then finish smoothing. In this case, use the spatula to make a spiral. If it is not super neat we can always put some confetti or make some textured and ready! I opt for the spiral, it looks good and does not need to be smooth.
En la parte de arriba Yo utilizo una espátula pero igualmente pueden utilizar la regla o algún elemento que les pueda ser de utilidad. Pongamos en práctica la imaginación! Para obtener bordes lisos tomamos con la espátula la crema que sobresale y la llevamos al centro y luego terminamos de alisar. En éste caso con ayuda de la espátula realice un espiral. Si no les queda super prolijo siempre podemos colocar algún confeti o hacer algún texturizado y listo! Yo opto por el espiral, luce bien y no necesita estar liso.


Once this step is finished, our cake goes once again to the refrigerator so that the cream hardens and we proceed with the next step, which is the yellow stripe at the bottom of the cake. To do this we dye a small amount of buttercream with yellow coloring and proceed to place it in a piping bag. Once our buttercream is firm, we remove the cake from the refrigerator and go around the cake twice with the yellow color and then we proceed to smooth it carefully so as not to damage the gray color. We will have an irregular stripe that I like very much and enhances our cake.
Listo éste paso nuestro pastel va una vez más al refrigerador para que la crema se endurezca y procedamos con el siguiente paso que es la franja amarilla que tiene en la parte inferior del pastel. Para ello teñimos una pequeña cantidad de buttercream con colorante amarillo y procedemos a colocar en una manga. Una vez nuestra crema esté bien firme retiramos el pastel del refrigerador y damos dos vueltas al rededor del pastel con el color amarillo y luego procedemos a alisar con mucho cuidado para no dañar el color gris. Nos quedará una franja irregular que a mí me gusta mucho y realza nuestro pastel.


On the top I wanted to make some details in black since it is one of the colors that identify Batman, so I prepared some black buttercream and with the help of a star-shaped nozzle I made some simple details, just to give it a touch of color.
En la parte superior quise hacer unos detalles en tono negro ya que es uno de los colores que identifican a Batman así que prepare un poco de buttercream negro y con la ayuda de una boquilla en forma de estrella realice algunos detalles sencillos, solo para darle un toque de color.

With this we would have our cake ready and it is right at that moment when we realize how important the use of the Toppers is to make it look really beautiful, besides delicious and neat, just look at the change!
Ya con ésto tendríamos listo nuestro pastel y es justo en ése momento cuando nos damos cuenta lo importante del uso de los Toppers para lograr que aparte de delicioso y prolijo se vea realmente hermoso, sino fíjense el cambio!

Well dear friends, with this we would have our Batman cake ready for the celebration! Now I want to give you some tips on coloring the buttercream since achieving intense colors is not very easy, but there are some tricks that will help us.
Bien queridos amigos ya con ésto tendríamos listo nuestro pastel de Batman para la celebración! Ahora quiero darles algunos tips sobre el coloreado de la buttercream ya que lograr colores intensos no es muy fácil, pero hay algunos trucos que nos ayudarán.

The first thing is to color with time since achieving strong tones requires time and a few steps. One of the things that most people recommend is to let the colored cream sit, some say overnight. I find that if I put it in the freezer I can get the same result faster. I let the cream become very firm and then I remove it, when it softens I mix it and as if by magic the color takes intensity!
Another trick I usually use is to help myself with powdered colorants. I dissolve them in a small amount of essence and add it to the buttercream. If we see that our buttercream becomes too soft we add a few tablespoons of powdered sugar previously sifted and that's it.
For the black color we also have a trick and that is to start with a dark base. It can be chocolate and at that point start adding the black color and that will definitely help us with the process.
On the other hand it is important to know that the colorings tend to change the flavor of our cream, they give it a bitter touch so the more intense the color the more bitter it will be and you have to decide between the flavor and the appearance although there are many people who do not consume the frosting and in that case it would not matter but it is necessary to take it into account when choosing the color of your cake.
With this, dear friends, we end our Let's make a Batman cake! I hope you find it useful!
Kisses and blessings
Lo primero es colorear con tiempo ya que lograr tonos fuertes requiere tiempo y de algunos pasos. Una de las cosas que más crecomiendan es dejar reposar la crema coloreada, algunos dicen toda la noche. Yo descubrí que si la llevo al freezer puedo obtener el mismo resultado más rápido. Dejo que la crema se torne bien firme y luego la retiro, al suavizar mezclo y como por arte de magia el color toma intensidad!
Otro truco que suelo usar es ayudarme con colorantes en polvo. Los disuelvo en una pequeña cantidad de escencia y lo agrego a la buttercream. Si vemos que nuestra crema se torna muy suave agregamos algunas cucharadas de azúcar glas previamente cernidas y listo.
Para el color negro también tenemos un truco y es iniciar con una base oscura. Puede ser de chocolate y en ése punto comenzar a agregar el color negro y definitivamente éso nos ayudará con el proceso.
Por otro lado es importante saber que los colorantes tienden a cambiar el sabor de nuestra crema, le dan un toque amargo así que mientras más intenso el color más amarga será y toca decidir entre el sabor y la apariencia aunque hay muchísimas personas que no consumen la cobertura y en ése caso no importaría pero es necesario que lo tomen en cuenta a la hora de elegir el color de su pastel.
Con ésto queridos amigos finalizamos nuestro Let's make a cake de Batman! Espero les sea de utilidad!
Besitos y bendiciones

Fotografía por:| Photography by:

Edición por:| Edtion by:
Traducido con:| Translated with www.DeepL.com/Translator (free version)