
Hello friends and crochetlovers! I hope you are all doing very well. 😊
It's been a while since I posted anything in this community, I'm really sorry, but I'm going to try to catch up! I'm currently still crocheting my oversized cardigan, the project is progressing little by little, I'll give you an update soon. 😁
But for several weeks, I've been thinking about a new project! Indeed, I want to know how to crochet flowers of all kinds to make beautiful bouquets. 💐 I've already made a few flowers for my mom, but now, I want to make a bouquet for myself, so I watch dozens of tutorials a day.
My goal is to create a bouquet to dress my dining room table.
I made the first flower of my bouquet and I decided to share the tutorial with you! Here is the Youtube video I followed: How to Crochet a Lucifer Flower by Lily's Lyric.
I thought that maybe this could inspire you. And maybe you too would like to make a beautiful bouquet for your home (or as a gift).
So I will try to share a tutorial for each of the flowers that I will make. 😊
You will see, this tutorial is not very complicated. If you know the basics: the slip knot, single crochet, half double crochet, double crochet and slip stitch, you should be able to do it with flying colors!
So, here we go for the little tutorial of this pretty flower 👇
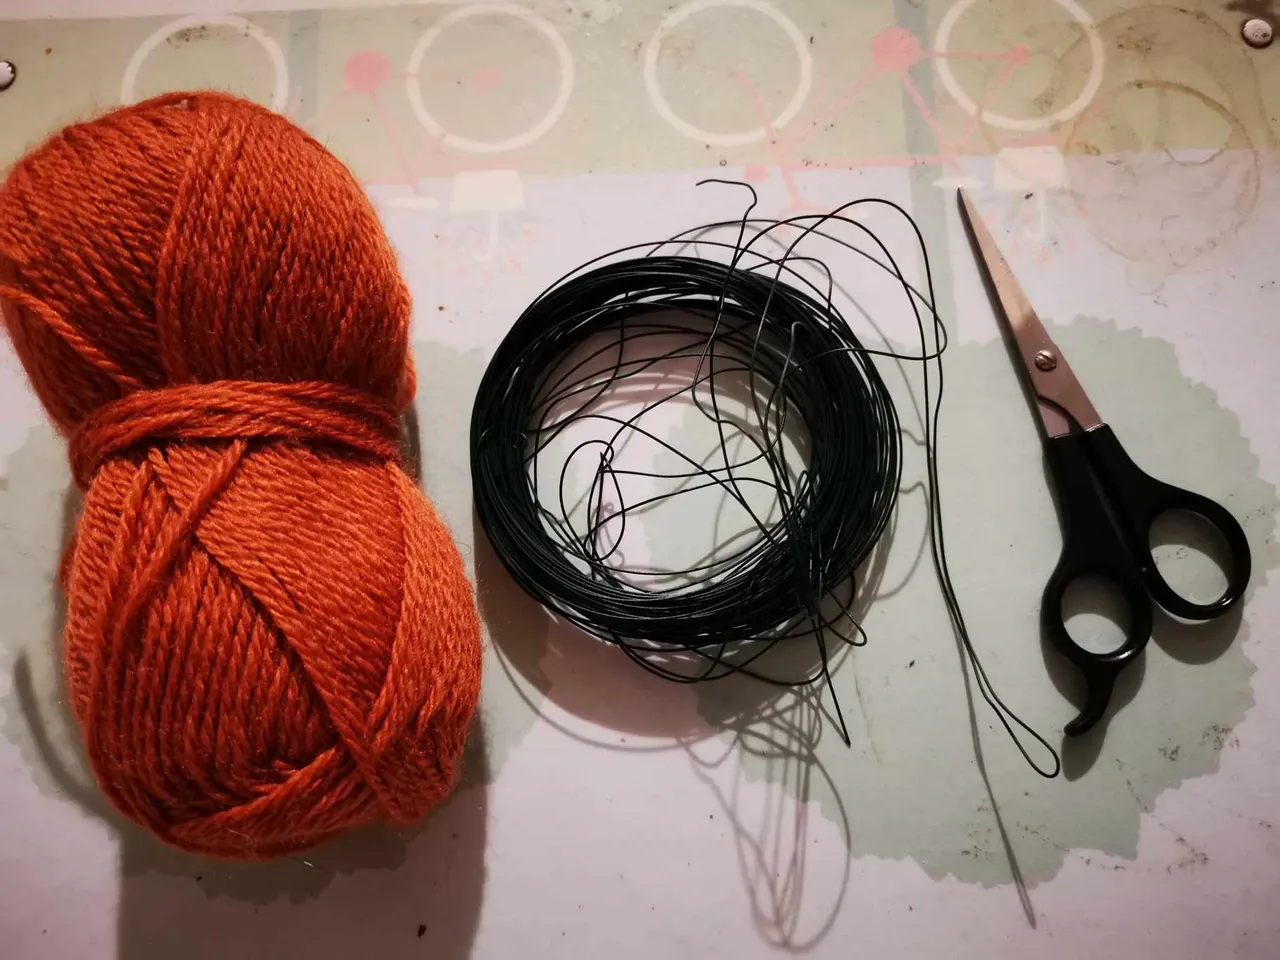
The material you will need

- 3 balls of wool (or cotton): 1 for the petals, 1 for the pistil and 1 for the stem (preferably green),
- A 2.5mm crochet hook (you can also take a 2mm or 3mm crochet hook, it will only change the size of the flower, but the difference will not be that big),
- Thin wire,
- A skewer pick,
- Scissors,
- Glue for crafts,
- A wool needle.
The steps
The petals
For the petals, you will need:

- The ball of wool you have chosen for the petals,
- 6 pieces of wire of 20cm each (for each of the 6 petals),
- A crochet hook,
- Scissors,
- A wool needle.
To start, you will make a slip knot.

Then, you must make a chain of 14 chain stitches.

Then, you must insert your hook into the second stitch of the chain (starting from the hook) and pass the wire into your hand.

You will have to make a first single crochet by including the wire. To do this, your hook must pass under the wire.
You will have to include the wire throughout the row.
After making your first single crochet in the second stitch starting from the hook, you will make 4 more in the following stitches (individual single crochets).

Then, you make a half double crochet in the next stitch.

Then, 5 individual double crochets in the following stitches.

Then, you make a half double crochet in the next stitch.

You are almost at the end of the row.
Here, you will make a single crochet in the next stitch. Then cast on a chain stitch and make a picot. To do this, you have to insert your hook into both strands of the single crochet and make a slip stitch.


Then, you finish with a single crochet in the same stitch.

You have to replace the wire correctly, so that it is halfway. And we will be able to move on to the other side of the leaf, which will be perfectly symmetrical to the existing side.
You will do (while including the wire and the starting wire):
- A half double crochet,
- 5 double crochets,
- A half double crochet,
- 5 single crochets
And you will finish with a slip stitch in the first stitch of the previous row.


Your petal is finished. You can make a chain stitch and cut the thread.

And to make the work neat, you can use a wool needle to weave in the threads.


You must start again until you have your 6 petals.

The pistil
For the pistil, you will need:

- The ball of yarn you have chosen to make the pistil,
- 5 pieces of wire, each 12 cm long,
- A pair of scissors.
First, you will wrap your yarn around the wire 9 times. Be careful to position yourself in the middle.
Then, you must twist the wire once to close the loop.

And then, all that remains is to wrap the yarn around the two lengths of wire.

When you get to 1 cm from the end, you can wedge your yarn between the two pieces of wire and twist them to make sure that it will hold well. Then, you can cut off the excess yarn.
You must make 5 pistils (or more if you want).


The leaf
To make the leaf, you will need:

- The ball of yarn you have chosen (green preferably),
- 1 piece of 25 cm wire,
- A crochet hook,
- A pair of scissors,
- A wool needle.
You will start by making a slip knot.

Then, by making a chain of 21 chain stitches.

Then, you must insert your hook into the second chain stitch (starting from the hook) and pass the wire into your hand and make a single crochet (being careful to include the wire).

In the next stitch, you will make a half double crochet.
And then, you will make 16 individual double crochets in the following stitches.
And a half double crochet.

To finish this row, you will then make a single crochet in the next stitch, then a chain stitch, followed by a picot (you have to prick in both strands of the single crochet and make a slip stitch), then make a single crochet in the same stitch.


You have to replace the wire and make sure that it is in the middle.
Then you can make the second side, which will be a perfect symmetry of the other already crocheted (be careful to include the wire and the starting thread):
- A half double crochet,
- 16 double crochets,
- A half double crochet,
- A single crochet.
And you finish with a slip stitch in the first stitch of the previous row.


You can then make a chain stitch and cut the thread. And to make a nice finish, you can weave the thread in with a wool needle.
Assembly
Now that you have all your elements:
- 6 petals,
- 5 pistils,
- 1 leaf.
You will be able to move on to assembly.
Here is the material you will need:

- The petals, the pistils and the leaf,
- The skewer,
- Green yarn (the same as that used for the leaf),
- Glue,
- Scissors.
To start, you can take your skewer and your 5 pistils. You place them at the top, making sure that they protrude by about 2cm.


Then, you will take your green yarn and you will wrap it around. You have to do about 10 turns and make a knot.

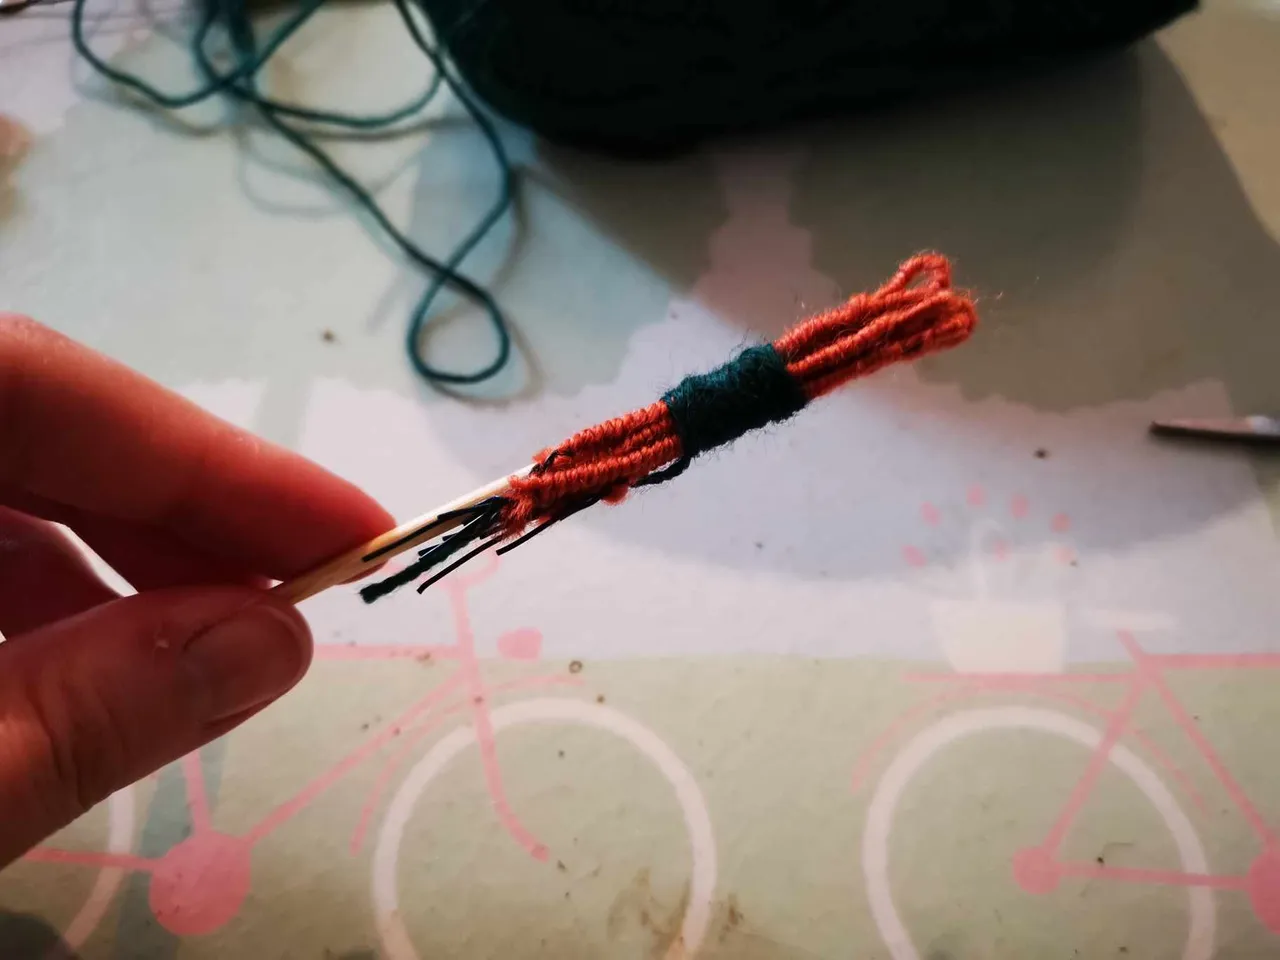
Then, you will take your 6 petals and place them all around the skewer at the height of the pistils. Then, you will continue to wrap the thread around it. And go down to the location where you want to place your leaf.


Once you have reached the location of the leaf, you need to place it, and simply continue to wrap the yarn around it.

Then, you will wrap the yarn around the skewer all the way to the bottom. And 1 cm before the end of your skewer, you can put glue and continue to wrap. Then hold firmly until the glue sets.


And there you have it, your flower is ready!


So, what do you think? Does it make you want to make a whole bouquet of crochet flowers? 💐
As for me, I really loved crocheting this flower, it's very satisfying to succeed in making something so pretty to look at! I can't wait to make the next ones 😁
See you soon,
Johanna
PS: I used Google Translate to translate the English part.
Version en français

Hello les amis et les crochetlovers ! J’espère que vous allez tous très bien. 😊
Cela fait quelque temps que je n’ai rien posté dans cette communauté, j’en suis vraiment désolée, mais je vais essayer de me rattraper ! Je suis actuellement toujours en train de crocheter mon gilet oversize, le projet avance petit à petit, je vous ferai bientôt un update. 😁
Mais depuis plusieurs semaines, je réfléchis à un nouveau projet ! En effet, j’ai envie de savoir crocheter des fleurs de toutes les sortes pour faire de beaux bouquets. 💐 J’ai déjà fait quelques fleurs pour maman, mais là, je veux me faire un bouquet pour moi, donc je regarde des dizaines de tutoriels par jour.
Mon but est de créer un bouquet pour habiller ma table de salle à manger.
J’ai réalisé la première fleur de mon bouquet et j’ai décidé de partager le tutoriel avec vous ! Voici la vidéo Youtube que j’ai suivie : How to Crochet a Lucifer Flower de Lily’s Lyric.
Je me suis dit que peut-être cela pourrait vous inspirer. Et peut-être que vous aussi vous auriez envie de réaliser un beau bouquet pour votre maison (ou pour offrir).
Je vais donc essayer de partager un tutoriel pour chacune des fleurs que je vais réaliser. 😊
Vous allez voir, ce tutoriel n’est pas très compliqué. Si vous connaissez les bases : le nœud coulant, les mailles serrées, les demi-brides, les brides et les mailles coulées, vous devriez pouvoir vous en sortir haut la main !
Alors, c’est parti pour le petit tuto de cette jolie fleur 👇
Le matériel dont vous aurez besoin
- 3 pelotes de laine (ou de coton) : 1 pour les pétales, 1 pour le pistil et 1 pour la tige (du vert de préférence),
- Un crochet 2,5mm (vous pouvez également prendre un crochet 2mm ou 3mm, cela changera seulement la taille de la fleur, mais la différence ne sera pas si grande),
- Du fil de fer fin,
- Un pique à brochette,
- Des ciseaux,
- De la colle pour activité manuelle,
- Une aiguille à laine.
Les étapes
Les pétales
Pour les pétales, vous allez avoir besoin de :
- La pelote que vous avez choisie pour les pétales,
- 6 morceaux de fil de fer de 20cm chacun (pour chacune des 6 pétales),
- Un crochet,
- Des ciseaux,
- Une aiguille à laine.
Pour commencer, vous allez faire un nœud coulant.
Ensuite, vous devez faire une chaînette de 14 mailles en l’air.
Puis, il faut insérer son crochet dans la deuxième maille de la chaînette (en partant du crochet) et passer le fil de fer dans votre main.
Vous allez devoir faire une première maille serrée en englobant le fil de fer. Pour cela, il faut bien que votre crochet passe sous le fil de fer.
Il faudra englober le fil de fer durant tout le rang.
Après avoir fait votre première maille serrée dans la deuxième maille en partant du crochet, vous allez en faire 4 autres dans les mailles suivantes (des mailles serrées individuelles).
Ensuite, vous faites une demi-bride dans la maille suivante.
Puis, 5 brides individuelles dans les mailles suivantes.
Ensuite, vous faites une demi-bride dans la maille suivante.
Vous êtes presque arrivé à la fin du rang.
Ici, vous allez faire une maille serrée dans la maille suivante. Puis monter une maille en l’air et faire un picot. Pour cela, il faut piquer dans les deux brins de la maille serrée et faire une maille coulée.
Puis, vous finissez avec une maille serrée dans la même maille.
Il faut replacer le fil de fer correctement, pour qu’il soit à la moitié. Et nous allons pouvoir passer à l’autre côté de la feuille, qui sera parfaitement symétrique au côté déjà existant.
Vous allez faire (tout en englobant le fil de fer et le fil de départ) :
- Une demi-bride,
- 5 brides,
- Une demi-bride,
- 5 mailles serrées
Et vous finirez par une maille coulée dans la première maille du rang précédent.
Votre pétale est terminé. Vous pouvez faire une maille en l’air et couper le fil.
Et pour que le travail soit propre, vous pouvez utiliser une aiguille à laine pour rentrer les fils.
Vous devez recommencer jusqu’à avoir vos 6 pétales.
Le pistil
Pour le pistil, vous allez avoir besoin de :
- La pelote que vous avez choisi pour faire le pistil,
- 5 morceaux de fil de fer de 12 cm chacun,
- Des ciseaux.
Tout d’abord, vous allez enrouler 9 fois votre fil autour du fil de fer. Attention à bien se placer au milieu.
Puis, il faut torsader une fois le fil de fer pour fermer la boucle.
Et ensuite, il ne reste plus qu’à enrouler le fil autour des deux longueurs de fil de fer.
Arrivé à 1 cm du bout, vous pouvez coincer votre fil entre les deux morceaux de fil de fer et les torsader pour être sûr que cela va bien tenir. Puis, vous pouvez couper l’excédent de fil.
Vous devez faire 5 pistils (ou plus si vous en avez envie).
La feuille
Pour faire la feuille, vous allez avoir besoin de :
- La pelote que vous avez choisie (du vert de préférence),
- 1 morceau de fil de fer de 25 cm,
- Un crochet,
- Un ciseau,
- Une aiguille à laine.
Vous allez commencer par faire un nœud coulant.
Puis, par montrer une chaînette de 21 mailles en l’air.
Ensuite, il faut insérer son crochet dans la deuxième maille de la chaînette (en partant du crochet) et passer le fil de fer dans votre main et faire une maille serrée (en faisant bien attention à englober le fil de fer).
Dans la maille suivante, vous allez faire une demi-bride.
Et ensuite, vous allez faire 16 brides individuelles dans les mailles suivantes.
Et une demi-bride.
Pour finir ce rang, vous allez ensuite faire une maille serrée dans la maille suivante, puis une maille en l’air, suivit d’un picot (il faut piquer dans les deux brins de la maille serrée et faire une maille coulée), puis refaire une maille serrée dans la même maille.
Il faut replacer le fil de fer et faire attention à ce qu’il soit bien au milieu.
Puis vous pouvez faire le deuxième côté, qui sera une parfaite symétrie de l’autre déjà crocheté (attention à bien englober le fil de fer et le fil de départ) :
- Une demi-bride,
- 16 brides,
- Une demi-bride,
- Une maille serrée.
Et vous terminez par une maille coulée dans la première maille du rang précédent.
Vous pouvez ensuite faire une maille en l’air et couper le fil. Et pour faire de belles finitions, vous pouvez rentrer le fil avec une aiguille à laine.
L’assemblage
Maintenant que vous avez tous vos éléments :
- 6 pétales,
- 5 pistils,
- 1 feuille.
Vous allez pouvoir passer à l’assemblage.
Voici le matériel dont vous allez avoir besoin :
- Les pétales, les pistils et la feuille,
- Le pique à brochette,
- Du fil vert (le même que celui utilisé pour la feuille),
- De la colle,
- Des ciseaux.
Pour commencer, vous pouvez prendre votre pique à brochette et vos 5 pistils. Vous les placez en haut, en faisant en sorte qu’ils dépassent d’environ 2cm.
Puis, vous allez prendre votre fil vert et vous allez l’enrouler autour. Il faut faire environ 10 tours et faire un nœud.
Ensuite, vous allez prendre vos 6 pétales et les placer tout autour du pique à brochette à hauteur des pistils. Puis, vous allez continuer d’enrouler le fil autour. Et descendre jusqu’à l'emplacement où vous souhaitez placer votre feuille.
Une fois l’emplacement de la feuille atteint, vous devez la placer, et simplement continuer d’enrouler le fil autour.
Puis, vous allez enrouler le fil autour du pique à brochette jusqu’en bas. Et 1 cm avant le bout de votre pique, vous pouvez mettre de la colle et continuer d’enrouler. Puis tenir fermement le temps que la colle agisse.
Et voilà, votre fleur est prête !
Alors, qu’en pensez-vous ? Est-ce que cela vous donne envie de faire tout un bouquet de fleurs au crochet ? 💐
En ce qui me concerne, j’ai vraiment adoré crocheter cette fleur, c’est très satisfaisant de réussir à faire quelque chose d’aussi joli à regarder ! J’ai hâte de faire les prochaines 😁
À bientôt,
Johanna
PS : J’ai utilisé Google Traduction pour traduire la partie en anglais.