

Hola comunidad costuril🧵✂️./Hello sewing community🧵✂️.
I'm greeting you after several days away from this community. I wanted to let you know that I'm continuing the "10 Sewing Projects Made with Scraps" series. So far, I've shared many of the projects with you—simple things we can make to reuse our scraps. The last one was a pretty, elegant bow. Now I'll show you how to make scrunchies, and this time, they're completely handmade. There's no excuse not to make them, and you don't need to spend money buying them when you can make them with your own hands in the comfort of your own home, recycling those scraps you don't know what to do with. Join me for a few minutes for this simple step-by-step tutorial on making scrunchies.

Materiales: | Materials:
- Haremos uso de nuestros retazos
- Hilo y aguja
- Perlas medianas,o las que tengas disponibles
- Tijera
- Elástico de 1 cm de ancho x 13 cm de largo
- Herramienta pasa cintas
- We will use our scraps of fabric
- Thread and needle
- Medium-sized pearls, or whatever you have available
- Scissors
- 1 cm wide x 13 cm long elastic
- Roller threading tool
Pasos a seguir: | Steps to follow:


Paso 01
Step 01
We'll start by cutting a piece of fabric 50 cm long x 10 cm wide. I folded the fabric in half so that the 25 cm, or half of the scrunchie, would be visible. In this case, I did it this way because I didn't have enough fabric to cut a long piece of 50 cm, but if you have a whole piece, even better. Now, in this case, I've hand-sewn half of my scrunchie, joining both pieces so that the fabric is complete. We're going to open our fabric and place it on top, positioning the pearls where we want to sew them.


Paso 02
Step 02
We're going to be sewing the pearls. I've made three loops first to adjust, then a knot at the top of the door, going upwards. I did this by inserting the needle with the thread between the loops of thread. I don't know if I'm explaining it well, but you can see how to do it much better in the image 😊. We're going to be placing and sewing both pieces. The idea is to sew the pearls to the fabric first so that it's not difficult to sew them later when the scrunchie has been sewn inside.


Paso 03
Step 03
After sewing the pearls, we will fold the fabric upwards corner to corner and sew, leaving 1 cm inwards along the entire edge of the fabric. It is important to note that before sewing, we must leave a 2 cm space at each end; this is necessary to sew those corners later and join the scrunchie.

Paso 04
Step 04
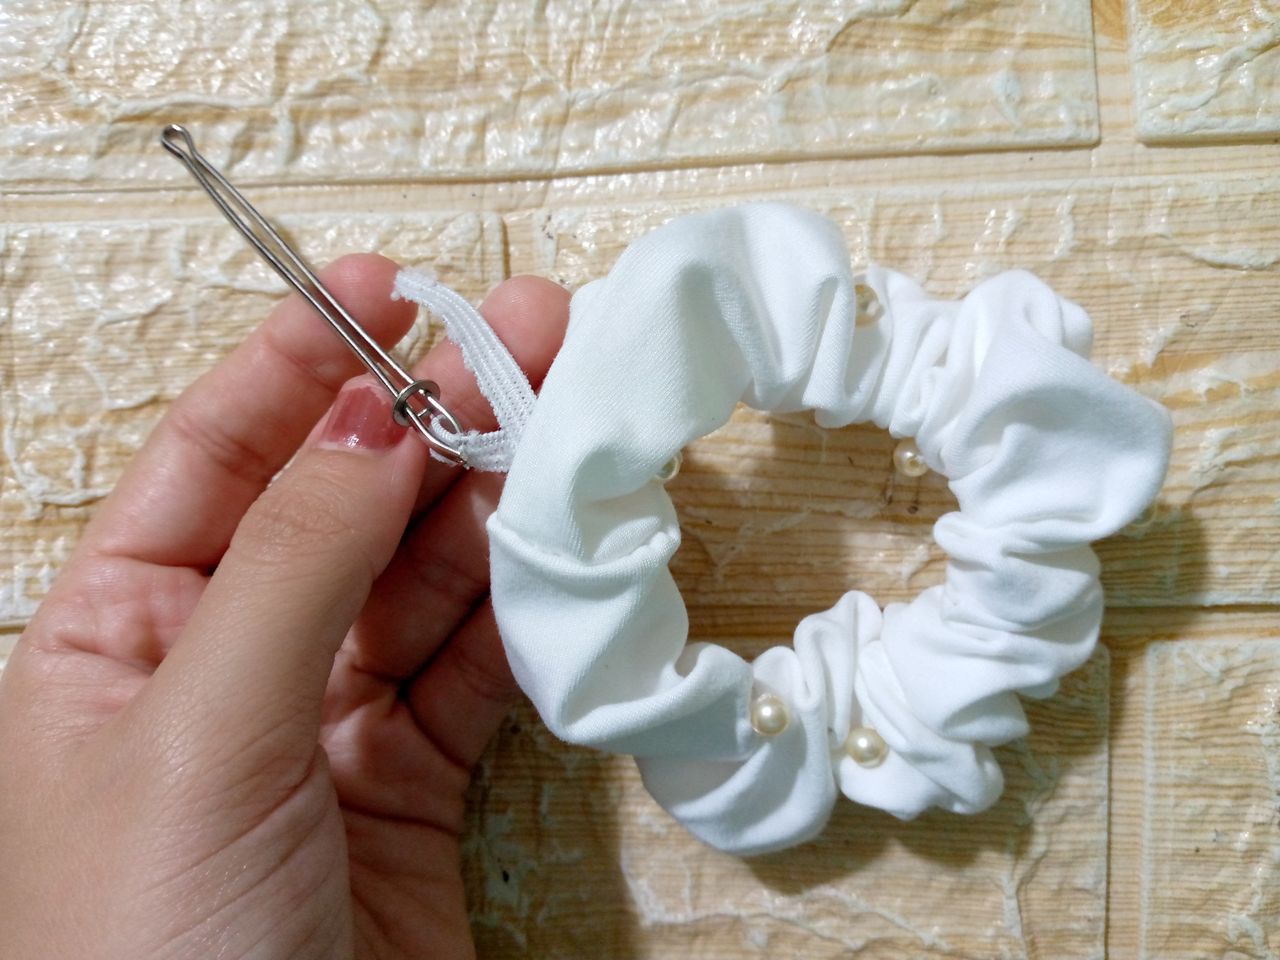
Next, we turn the scrunchie inside out and sew it on the inside so that we can join it. Then we will insert the elastic with the ribbon tool, make a knot, put it inside, and now we will sew the hole that was left with an invisible stitch so that the elastic does not come out.
Resultado: | Result:
And so we finished making our scrunchie, and here are the final results. I made others in different colors with other scraps I had. These can be used for any business venture you have in mind. I've already sold several of these to my friends, and it's definitely a good business to start with. I hope you like the idea of decorating them like this with pearls. You can add other details, of course, whatever you like. I hope you liked it as much as I did.


Greetings, I wish you a nice afternoon. Don't forget to leave your comments if you liked it ❤️.

¡Hola!...Soy Annie
Una chica que le apasiona el diseño,la costura las manualidades y crear cualquier cosa de mucho uso con mis manos,tengo como hobbie diseñar ropa,la música ,el maquillarme,la fotografía,la pintura y el dibujo,expresar mis ideas y sentimientos en un dibujo es algo que me gusta hacer,amo la naturaleza,un atardecer ,la playa y disfrutar con mis familiares de los buenos momentos de la vida.❤️
✨Creando las cosas con amor🧵♥️ | ✨Creating things with love🧵♥️
Images:my own work | Edited by:Canva® and InShot | Translator:Google Translate |Device:TecnoSpark 8C .
