
Saludos estimados amigos de las agujas y las lanas, en esta oportunidad les estaré indicando la realización del cuerpo y la cabecita de la muñeca, para ver la primera parte de la confección de la muñeca te dejo el siguiente link, y allí lo podrás leer.
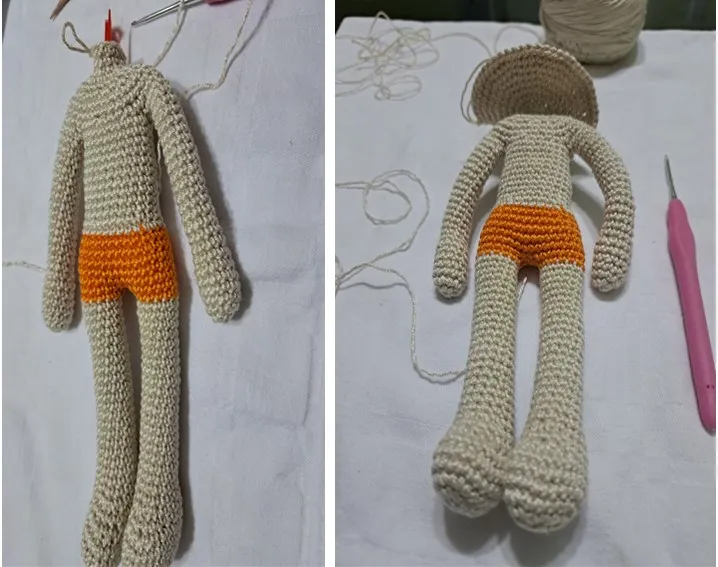
Para esta segunda parte vamos a seguir tejiendo con el mismo hilo con el cual tejimos las piernas, en mi caso utilice un hilo color naranja de la misma marca del que utilice para las piernas, y lo hice así porque la intención es tejer una princesita luego, que requiere que la ropita interior sea color naranja y el resto del cuerpo con el mismo hilo beis; seguimos utilizando la misma aguja y los marcadores para las vueltas, así como el contador de vueltas.
Unión de las piernas
Con el hilo naranja en la segunda pierna tejida, es decir la que no se cortó el hilo vamos a seguir las vueltas que continúan,
31: 9 pb – 2 cadenetas(c) y realizamos la unión con la otra pierna 3 puntos después del punto donde terminamos de tejerla, se continua con los 14 pb de la piernita y en las 2 cadenas se realizan 2pb y en la otra pierna 5 pb, para llegar a 32 puntos en esta vuelta.


32 a la 36: 32 pb
37: (6 pb 1d) x 4
Se cambia al color beis para continuar con el cuerpo
38: 28 pb
39: (5 pb -1d) x 4
40 a la 48: 24 pb


Unión de los brazos
49: 4 pb – se realiza la unión del primer brazo y se tejen 10 pb en el brazo, empezando por donde terminamos de tejer el brazo, luego en el cuerpo se realizan 12 pb y se une el segundo brazo, tejiendo los 10 pb del brazo y luego se finaliza tejiendo los 8 pb que faltan del cuerpo.
50: (2 pb – 1 d) x 11
51 y 52: 33 pb
53: (1 pb – 1d) x 11
54: 22 pb
55: 11 d
56 y 57: 11 pb
58: 10 pb – 1 a
Cabeza
59: 12 a
60: (3 pb – 1 a) x 6
61: (4 pb – 1 a) x 6
62: 2 pb – 1 a – (5 pb – 1 a) x 5 – 3 pb
63: (6 pb 1 a) x 6
64: 3 pb 1 a – (7 pb -1 a) x 5 – 4 pb
65: 54 pb
66: (8 pb -1 d) x 6
67: 4 pb 1 a – (9 pb – 1 a) x 5 – 5 pb
68: (10 pb – 1 a) x 6
69 a la 77: 72 pb

Se marcan las vueltas 73 y 74 porque en medio de ellas se colocan los ojos
78: (10 pb -1 d) x 6
79 a 81: 66 pb
82: (9 pb – 1 d) x 6

83: 3 pb – 1 d – (8 pb -1 d) x 5 – 5 pb
84: (7 pb – 1 d) x 6
85: 3 pb – 1 d - (6 pb – 1 d) x 5 – 3 pb
86: (5 pb – 1 d) x 6
87: (4 pb – 1 d) x 6
88: (3 pb – 1 d) x 6
89: (2pb – 1 d) x 6
90: (1 pb – 1d) x 6
91: 6 d
Cerrar y esconder el hilo.
Con respecto al relleno hay que ir rellenando las partes del cuerpo en la medida que vamos tejiendo para que no se nos dificulte luego cuando el tejido este alto o muy estrecho; de esta manera se termina el cuerpo base, si se va a colocar ojos de seguridad se le colocan cuando vamos por la vuelta 80 para que se haga mas fácil, si es de nuestro gusto le podemos colocar una barra de silicón internamente para darle más firmeza al cuerpo de tal forma que llegue hasta la unión de la piernas y hasta la altura de la cabeza que no nos moleste para cerrar. Quiero hacer notar que a esta muñeca no se la coloque porque quería ver cual es la firmeza del relleno, que lo debemos hacer que quede bien apretadito sin deformar el tejido.
English

Greetings dear friends of the needles and wool, in this opportunity I will be indicating the realization of the body and the head of the doll, to see the first part of the making of the doll I leave the following link, and there you will be able to read it.
For this second part we are going to continue knitting with the same yarn with which we knitted the legs, in my case I used an orange yarn of the same brand that I used for the legs, and I did it this way because the intention is to knit a little princess later, which requires that the inner garment is orange and the rest of the body with the same beige yarn; we continue using the same needle and the markers for the laps, as well as the lap counter.
Joining the legs
With the orange yarn on the second leg knitted, that is, the one where the yarn was not cut, we will continue with the following rows,
31: 9 sts - 2 chains (c) and join the other leg 3 sts after the stitch where we finished knitting, continue with the 14 sts of the leg and in the 2 chains make 2 sts and in the other leg 5 sts, to reach 32 stitches in this row.
32 to 36: 32 sts
37: (6 sts 1d) x 4
Change to beige to continue with the body.
38: 28 sts
39: (5 sts -1d) x 4
40 to 48: 24 sts
Joining the arms
49: 4 sts - join the first arm and knit 10 sts in the arm, starting where we finished knitting the arm, then in the body knit 12 sts and join the second arm, knitting the 10 sts of the arm and then finish knitting the remaining 8 sts of the body.
50: (2 s - 1 d) x 11
51 and 52: 33 sts
53: (1 stitch - 1 d) x 11
54: 22 sts
55: 11 d
56 and 57: 11 bp
58: 10 bp - 1 a
Head
59: 12 a
60: (3 pb - 1 a) x 6
61: (4 bp - 1 a) x 6
62: 2 bp - 1 a - (5 bp - 1 a) x 5 - 3 bp
63: (6 bp 1 a) x 6
64: 3 bp 1 a - (7 bp -1 a) x 5 - 4 bp
65: 54 bp
66: (8 bp -1 d) x 6
67: 4 bp 1 a - (9 bp - 1 a) x 5 - 5 bp
68: (10 bp - 1 a) x 6
69 to 77: 72 sts
The 73rd and 74th rows are marked because the eyes are placed in the middle of them.
78: (10 sts -1 d) x 6
79 to 81: 66 sts
82: (9 bp - 1 d) x 6
83: 3 pb - 1 d - (8 pb -1 d) x 5 - 5 pb
84: (7 bp - 1 d) x 6
85: 3 pb - 1 d - (6 pb - 1 d) x 5 - 3 pb
86: (5 bp - 1 d) x 6
87: (4 bp - 1 d) x 6
88: (3 bp - 1 d) x 6
89: (2 bp - 1 d) x 6
90: (1 bp - 1d) x 6
91: 6 d
Close and hide the yarn.
With respect to the stuffing you have to fill in the parts of the body as we are knitting so that it is not difficult for us later when the fabric is high or very narrow; in this way the base body is finished, if you are going to place security eyes they are placed when we go for the 80th turn to make it easier, if it is to our taste we can place a silicone bar internally to give more firmness to the body so that it reaches the junction of the legs and up to the height of the head that does not bother us to close. I want to point out that I did not put it on this doll because I wanted to see how firm the stuffing is, we must make it very tight without deforming the fabric.
Translated with www.DeepL.com/Translator (free version)


