
Saludando a la comunidad esperando esten bien saludables cada día, con mucho entusiasmo. Hoy les voy a mostrar como hice un bolso de mano, ideal para guardar o llevar lo que más necesitemos trasladar de un lugar a otro.
Puede ser cosmestico, envases de comida, en fin es un bolso multiusos. Y les mostrare los paso a paso que realizé en este diseño.
Greeting the community hoping they are healthy every day, with great enthusiasm. Today I am going to show you how I made a handbag, ideal for storing or carrying what we most need to move from one place to another.
It can be cosmetic, food containers, in short it is a multipurpose bag. And I will show you the step by step that I did in this design.
Utilicé tela estampada y otra unicolor, esta es una tela suave, pero la acolche con una que lleva por dentro, que es de tela de cobija, una que tenia y como no era tan suave la usé para este bolso.
I used printed fabric and another solid color, this is a soft fabric, but I padded it with one that goes inside, which is made of blanket fabric, one that I had and since it was not so soft I used it for this bag.
Mis materiales:
Tela estampada.
Tela unicolor.
Tela para acolchar.
Cierre de 40cm de largo.
Hilos. agujas, alfileres, tijera, cinta métrica, máquina de coser.
My materials:
Printed cloth.
Unicolor fabric.
Quilting fabric.
40cm long closure.
Threads. needles, pins, scissors, tape measure, sewing machine.

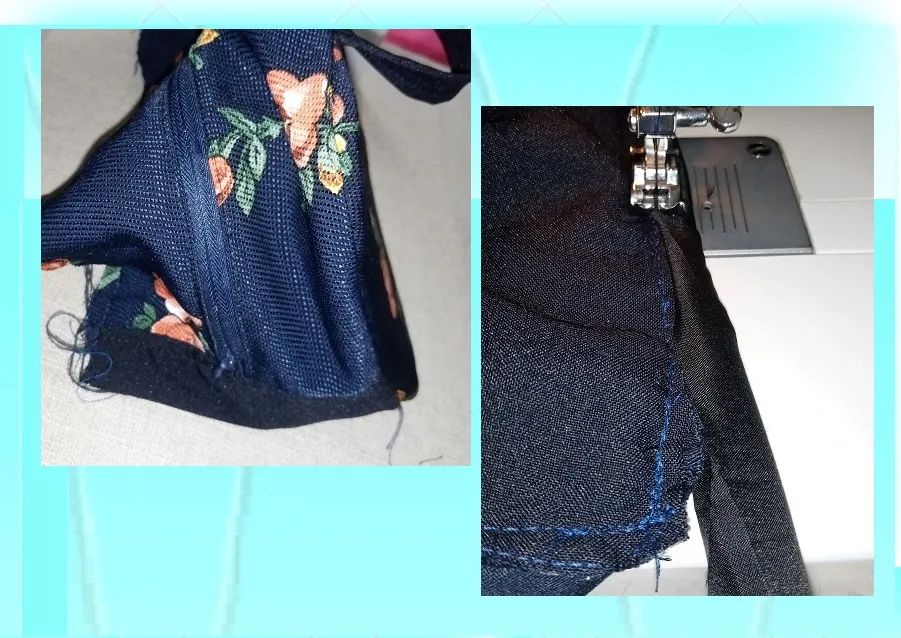
Empiezo cortando unos rectangulos de 18cm de largo, por 24cm de ancho, cortando dos en tela estampada y dos en tela unicolor. Al mismo tiempo corto la tela de cobija con 1cm menos en cada lado, para que cuando la cosa a maquina las partes de la orillas, no sea muy gruesa. En la parte donde voy a coser el cierre, le hago un corte curvo en las dos esquinas. Una vez que la acolcho la tela, le paso una sobre costura como de 4cm de ancho a la orilla de la tela.
I start by cutting some rectangles 18cm long by 24cm wide, cutting two in patterned fabric and two in plain fabric. At the same time I cut the blanket fabric with 1cm less on each side, so that when I machine sew the edge parts, it will not be too thick. In the part where I am going to sew the zipper, I make a curved cut in the two corners. Once I pad the fabric, I pass an overseam about 4cm wide to the edge of the fabric.


En una parte de este cuadro, le cosi una tela, que va por dentro, donde le cosi un sesgo de la tela estampada, en su orilla, luego la pegue como si fuera una bolsillo que quedara por dentro.
In one part of this painting, I sewed a fabric, which goes inside, where I sewed a bias of the printed fabric, on its edge, then I glued it as if it were a pocket that remained inside.

Tambien coloco esta tela de cobija en las tiras donde voy a pegar el cierre.
Una vez cosido el cierre, coloco en cada lado la otra tira larga y la coso a la medida del contorno de los cuadros que son la parte del frente y la de atras del bolso.
I also place this blanket fabric on the strips where I am going to glue the zipper.
Once the closure is sewn, I place the other long strip on each side and sew it to the size of the outline of the squares that are the front and back of the bag.

Antes de cerrar el bolso hice unas tiras de 26cm de largo y 5cm de ancho, la cual doblo y paso la costura por encima, doble costura en cada asa.
La prenso a una separacion 12cm, en cada lado.
Before closing the bag I made some strips 26cm long and 5cm wide, which I folded and passed the seam over, double seam on each handle.
I press it at a 12cm separation, on each side.
Teniendo ya listo todas estas partes, entonces procedo a cuadrar y prensar con los alfileres la tira donde esta el cierre, esta parte del cierre la doblo a la mitad y le hago una marca, igualmente a la parte de los laterales o muy bien la delante y la de atras, tambien le hago su marca justo doblando a la mitad, para que pueda coincidir con la del cierre.
Having all these parts ready, then I proceed to square and press the strip where the closure is with the pins, I fold this part of the closure in half and make a mark, also on the sides or very well the front and the one on the back, I also make its mark just by folding it in half, so that it can coincide with the one on the closure.


Despues de coser estas partes, con otra tira le hice el sesgo que cosi a todo alrededor de las dos partes para dejar las costuras prolijas.
After sewing these parts, with another strip I made the bias that I sewed all around the two parts to leave the seams neat.


Bueno amigos, ya listo este bello bolso de mano, a mi me encanto como quedo, ya que lo usaré mucho para varias ocasiones que lo requiera.
Muchas gracias por visitar mi blog, y ver esta publicación, espero haya sido de su agrado.
Hasta la proxima, chau!
Well friends, this beautiful handbag is ready, I loved how it turned out, since I will use it a lot for
Thank you very much for visiting my blog, and seeing this publication, I hope you liked it.
Until next time, bye!

Las fotos son de mi autoria, con mi celular Tecno Spark go.
Traductor deepl.
Diseño canva.
The photos are my own, with my Tecno Spark go cell phone.
Translator deepl.
Canvas design.