
Hello friends how are you all I hope all are fine I am also fine. so today again I did crochet so this basically is a blossom plant and I saw this on Pinterest and I liked it a lot so then I thought I should make it because it was looking very easy and simple to me but when I started making it so omg it was very time consuming and attaching the flowers with the wire together was very difficult but still I made it and it became very beautiful. And I can say that this was my most favourite crochet project till now I was very excited while making it that how it will turn out and it became extremely beautiful. I will share its full tutorial with you all so if you want to make it then you can easily make it. So let’s start making.


Materials needed
To make this pink blossom plant the things we need are these.
. 2 shades of pink yarn
. marble color yarn
. brown color yarn
. green color yarn
. pearls
. wire
. cotton
. needle
. stitch marker
. UHU glue
. 2.5mm hook
To make this blossom plant we will need these things.


Making the flower pot
So first I made the flower pot so to make this I made a magic ring with marble color yarn then in this magic ring I did 6 single stitches now in row 2 we have to do increases in the whole row. In row 3 do 1 single stitch and 1 increase. Row 4 do 2 single stitch 1 increase. Row 5 do 3 single stitch 1 increase. Row 6 do 4 single stitch 1 increase. Row 7 do 5 single stitch 1 increase. Row 8 do 6 single stitch 1 increase. Row 9 do 7 single stitch 1 increase. Row 10 do 8 single stitch 1 increase. Row 11 do 9 single stitch 1 increase. And now in row 12 do all single stitches but only in back loops now row 13 to row 26 do only single stitches.


Now we make the mud of the pot. To make this work only on the back loops of row 26. So in row 1 do 8 single stitch 1 decrease. Row 2 do 7 single stitch 1 decrease. Row 3 do 6 single stitch 1 decrease. Row 4 do 5 single stitch 1 decrease row 5 do 4 single stitch 1 decrease. Row 6 do 3 single stitch 1 decrease. Now fill it well with cotton. Row 7 do 2 single stitch 1 decrease. Row 8 do 1 single stitch 1 decrease. Row 9 do all decreases. Then in the end close it fully with the help of a needle.


Now do single stitches in the front loops of row 12. And in the front loops of row 26 follow this pattern (single stitch, half double crochet, double crochet, half double crochet, single stitch). So like this our flower pot is ready now it’s time to make the blossom plant.


Making the blossom flowers
Now I made the blossom flower so to make this take 2 shades of pink yarn make 6 flowers with one shade and 6 with the other shade so to make the flower make a magic ring then make 2 chains then inside the magic ring do 2 double crochet then again make 2 chain and slip stitch in the magic ring repeat this pattern 5 times so we will get a flower of 5 petals. So by following this pattern I made 12 flowers and now it’s time to make the leafs.


Making the leafs
To make the leafs take green color yarn then make 25 chains. Now do 24 single stitches. Now around the wire do 1 single stitch, 1 half double crochet, 20 double crochet, 1 half double crochet, 1 single stitch. So this way one side of the leaf will be ready now to make the other side follow the same pattern. So the leaf is also ready now we have to make 4 leafs like this.
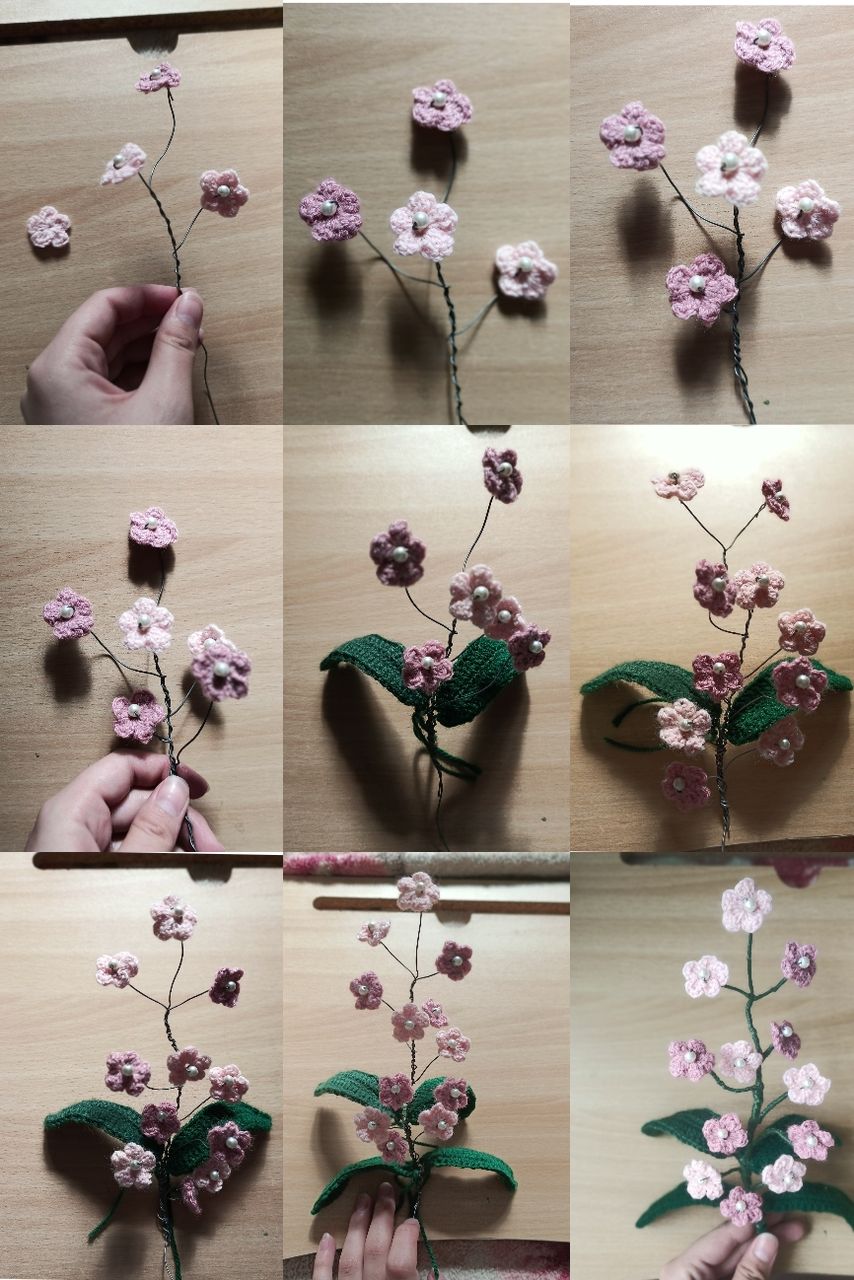
Assembling the blossom plant
Now it is time to assemble them which is the most difficult work it took me a lot of time to assemble this. So cut the wire into small pieces then put pearl on it and put it inside the flower and then attach it one by one in the long wire. After attaching all the flowers then attach the leafs also in the same way then in the end wrap green color yarn around the wire and secure it with UHU glue. Now insert this whole plant inside the pot.


Final result
So like this our pink blossom plant is ready. So how did you like my cute crochet? I hope all liked it I liked it a lot this became my favourite crochet. So if you liked it then do tell me in the comments I will feel very happy and thank you so much for supporting me
That’s all for today. I will be back soon with something new to share. Until then, stay happy and keep supporting.
