
Hola a todos, feliz y bendecido martes.
El día de hoy les enseñaré a elaborar un hermoso brasier de dama tipo top, es muy cómodo, queda muy bien puesto y lo podemos usar a diario ya que queda muy bien tanto con prendas de vestir como deportivas.
Estos son los materiales a utilizar:
Hello everyone, happy and blessed Tuesday.
Today I will show you how to make a beautiful ladies bra top, it is very comfortable, it looks great and we can use it every day because it looks great with both dresses and sportswear.
These are the materials to use:

- Tela de algodón.
- Tela de licra o Charmeuse Elástico.
- Elástico de 1 cm (tira de brasier).
- Morita de 1 cm de ancho.
- Gafetes.
- Aros.
- Pasadores para la tira de brasier.
- Hilos.
- Cinta métrica.
- Tijeras.
- Aguja punta de bola #11.
- Máquina de coser.
- Moldes.
- Cotton fabric.
- Lycra fabric or Charmeuse Elastic.
- 1 cm elastic (bra strap).
- Morita 1 cm wide.
- Waistbands.
- Underwire.
- Bra strap pins.
- Threads.
- Tape measure.
- Scissors.
- Ball point needle #11.
- Sewing machine.
- Molds.


Moldes para talla 34.
Molds for size 34.


Cómo primer paso vamos a colocar los moldes arriba de la tela para recortar cada pieza.
As a first step we are going to place the molds on top of the fabric to cut out each piece.


Vamos a hacerlo con la tela de algodón (forro) y el Charmeuse (Exterior). En total debemos tener 4 piezas de copa de costado, 2 de copa de pecho y 4 de espalda.
We are going to do it with the cotton fabric (lining) and the Charmeuse (Outer). In total we should have 4 pieces of side cup, 2 of breast cup and 4 of back cup.

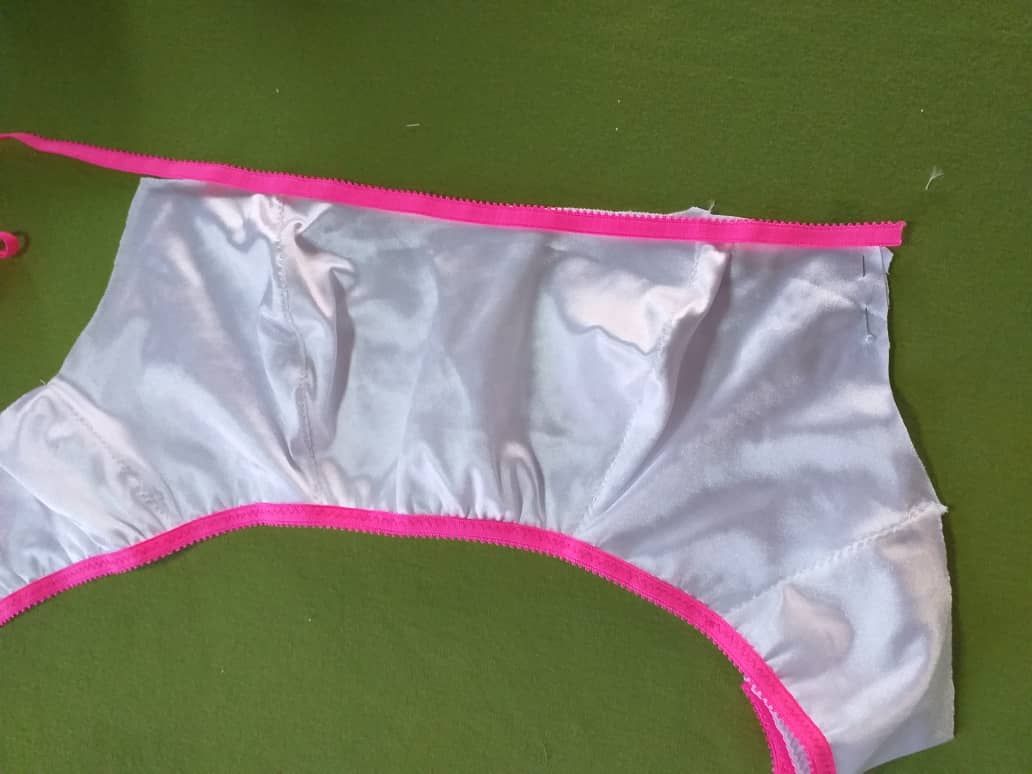
Para que el top nos quede con la forma que deseamos, debemos armarlo de esta manera.
For the top to fit the shape we want, we must assemble it in this way.

No obstante, debemos coser de manera que las costuras se vean bien por el exterior y por el interior del top.
Comenzamos con el lado izquierdo: Tomamos estas cuatro piezas: las dos de copa de pecho (forro y exterior) y dos piezas de copa de costado, (forro y exterior).
However, we must sew in such a way that the seams show well on the outside and inside of the top.
We start with the left side: We take these four pieces: the two chest cup pieces (lining and outside) and two side cup pieces, (lining and outside).

Vamos a colocar una arriba de la otra en este orden:
Copa de costado (forro) luego la copa de pecho (forro), luego la copa de pecho (exterior) y arriba la copa de costado (exterior) luego vamos a unir por la parte de unión de pezón (expresada en cada molde).
We are going to place one on top of the other in this order:
Side cup (liner) then breast cup (liner), then breast cup (outer) and on top the side cup (outer) then we are going to join by the nipple joining part (expressed in each mold).


Al coser y abrirla nos debe de quedar así.
Luego repetir el proceso con el lado derecho.
When sewing and opening it, it should look like this.
Then repeat the process with the right side.


Ahora vamos a coser la espalda, para ello vamos a unir las piezas por los costados.
Now we are going to sew the back, for this we are going to join the pieces by the sides.


Teniendo esto listo procedemos a colocar la morita en la parte inferior, debemos sobreponerlo a la tela y mientras vamos cosiendo debemos estirarlo de 5 a 7.
Having this ready we proceed to place the "morita" elastic at the bottom, we must superimpose it on the fabric and while we are sewing we must stretch it from 5 to 7.


Luego vamos a colocar el elástico "morita" en el Escote de pecho, para ello vamos a sobreponer la morita en la tela y cosemos estirando de 5 a 6.
Then we are going to place the "morita" elastic in the neckline of the chest, for this we are going to superimpose the morita on the fabric and sew stretching from 5 to 6.

Vamos a recortar dos tiras de 4 cm con la morita, estás van a ser las asas de los aros. Las ubicamos a 6 cm del final de la espalda y la ajustamos con alfileres.
We are going to cut two 4 cm strips with the morita, these are going to be the handles of the hoops. We place them 6 cm from the end of the back and adjust them with pins.


Luego colocamos la morita por el costado, empezando desde la espalda y cuando lleguemos al otro extremo colocamos el otro aro.
Then we place the morita on the side, starting from the back and when we reach the other end we place the other ring.


Repetimos en ambos lados y ahora colocamos el gafete en la parte de la espalda. Fijamos con unos alfileres y cosemos.
Repeat on both sides and now place the badge on the back. We fix it with pins and sew.

Por último vamos a hacer la tira del brasier, recortamos dos tiras de 36 centímetros de largo.
Finally we are going to make the bra strap, we cut two strips of 36 centimeters long.

Las pasamos por los aros delanteros y traseros, podemos hacer las tiras simples o de ajustes utilizando los pasadores de tira.
We pass them through the front and rear rings, we can make simple or adjustment strips using the strip pins.


Con esto tendremos listo este lindo bra.
With this we will have ready this nice bra.


Fotos tomadas de mi teléfono Xiaomi Redmi Note 6 Pro y mi teléfono Samsung J4 plus || Photos taken from my Xiaomi Redmi Note 6 Pro pone and my Samsung J4 plus phone.