
Hello friends, a few weeks ago I joined the community contest "Create your wish list". I made a firm resolution that before 3 months I had to finish 10 bees, to offer them in the next Hive Cuba event, well I tell you that I have been a little slow. I have only advanced in 2 bees, plus the first one I made, that's 3, but I am a person that when I commit myself I do it seriously and I always do what I propose. I've been a little busy and hence the delay but I will meet my goal.
As I explained these little bees would be delivered at the next meeting of the Hive Cuba community, but it turns out that they planned a meeting in 4 days, and for that occasion I will not be able to do it because the 3 months of this project have not yet been completed, but when they meet again, after March 15, I will have them by then.
Also as I explained in the first post I do not want to always use the same techniques or the same materials, this time I made them like the first one, that is, amigurumis, but with a different model and for the following ones I have the idea of making them using felt and so we will be making them, using different techniques or combining them until completing the 10 little bees.
Now I will explain the materials I used and how I made them.
Hola amigos, hace unas semanas me uní al concurso de la comunidad "Crea tu lista de deseos". Me hice el firme propósito de que antes de los 3 meses tenía que terminar 10 abejas, para ofrecerlas en el próximo evento de Hive Cuba, pues les cuento que he ido un poco lento. Solo he avanzado en 2 abejas, más la primera que hice, son 3, pero soy una persona que cuando me comprometo lo hago en serio y siempre hago lo que me propongo. He estado un poco liada y de ahí el retraso pero cumpliré mi objetivo.
Como expliqué estas abejitas serian entregadas en la próxima reunión que haría la comunidad Hive Cuba, pero resulta que planificaron una reunión para dentro de 4 días, y para esa ocasión no podré hacerlo porque aún no se han cumplido los 3 meses de este proyecto, pero cuando se vuelvan a reunir, después del 15 de marzo, las tendré para entonces.
También como expliqué en el primer post no quiero usar siempre las mismas técnicas ni los mismos materiales, esta vez los hice como el primero, o sea , amigurumis, pero con un modelo diferente y para los siguientes tengo la idea de hacerlos usando fieltro y así los iremos realizando, empleando diferentes técnicas o combinándolas hasta completar las 10 abejitas.
Ahora explicaré los materiales que utilicé y como los hice.

Yarns: Yellow, Black, white and red.
Red felt
1.75 cm crochet knitting needle
Toothpick
Card stock
Scissors
Hilos: Amarillo, Negro, blanco y rojo
Fieltro rojo
Aguja de tejer a crochet de 1.75 cm
Palillo de dientes
Cartulina
Tijeras
I am going to put the acronyms I am going to use, as I did in the previous post, so as not to repeat too many words.
bp- low stitch or half stitch
aum- increases
dis- decreases
V- rounds
Pondré las siglas que utilizaré, como hice en el anterior post, para no repetir muchas palabras.
pb-punto bajo o medio punto
aum- aumentos
dis- disminuciones
V. Vueltas

I started by making the body of the little bee, for this I took the yellow yarn and made a magic stitch and made 6 half stitches.
V1. I knit 6aunm, ending in 12 stitches.
V2. 1 sc and 1 st, leaving 18 stitches.
V3. 2 sts and 1 st, leaving 24 stitches.
V4. 3 sts and 1 st, remaining 30 stitches
V5. 4 sts and 1 st, remaining 36 stitches.
V6 to V9 , 1 stitch in each stitch is maintained.
Comencé realizando el cuerpo de la abejita, para ello tomé el hilo amarillo y realicé un punto mágico y realicé 6 medios puntos.
V1. Se hacen 6aunm, terminando en 12 puntos
V2. 1 pb y 1 aum, quedando 18 puntos
V3. 2 pb y 1 aum, quedando 24 puntos
V4. 3 pb y 1 aum, quedando 30 puntos
V5. 4 pb y 1 aum, quedando 36 puntos
V6 a la V9 , se mantiene 1pb en cada punto

To begin V10 change the yarn to black and make 2 rows of 36 sts, that is V10 and 11.
V12 and V13. 36 sts yellow yarn
V14 and V15 . 36 sts black yarn
V16 and V17 . 36 bp yellow yarn
V18 and V19 . 36 bp black yarn
V19 to V21 . 36 stitches yellow yarn
Para comenzar la V10 cambio el hilo para negro y realizo 2 vueltas de 36 pb, o sea la V10 y la 11
V12 y V13. 36 pb hilo amarillo
V14 y V15 . 36 pb hilo negro
V16 y V17 . 36 pb hilo amarillo
V18 y V19 . 36 pb hilo negro
V19 a la 21. 36 pb hilo amarillo

Begin to make decreases with the yellow yarn.
V22. 4 sts and 1 dis, remaining 30 stitches.
V23. 3 sc and 1 adis, remaining 24 stitches.
V24. 2 sts and 1 dis, remaining 20 stitches.
V25. 1 sc and 1 dis, remaining 18 stitches
V26. 1 dism in all stitches, remaining 12 stitches
Begin to fill with wadding and finish closing with sewing needle, remaining as you can see.
Se comienzan a hacer las disminuciones con el hilo amarillo.
V22. 4 pb y 1 dis, quedando 30 puntos
V23. 3 pb y 1 adis, quedando 24 puntos
V24. 2 pb y 1 dis, quedando 20 puntos
V25. 1 pb y 1 dis, quedando 18 puntos
V26. 1 dism en todos los puntos, quedando 12 puntos
Se comienza a rellenar con guata y se termina de cerrar con aguja de coser, quedando como ven.

Now we will make the Wings, for this we take the white thread, we make two pieces.
We start by making a magic stitch and put 6 stitches in it.
V1. we make 6 increases, leaving 12 stitches.
V2 1 stitch over each stitch, leaving 12 stitches.
V3. 1pb and 1 st, leaving 18 stitches.
V4 to V6 we put one stitch in each stitch.
V7. 1pb and 1 dis, leaving 12 stitches.
V8 and V9. 1pb over each stitch.
V10. 2 sc and 1 dis, leaving 9 stitches.
Ahora realizaremos las Alas, para ello tomamos el hilo blanco, se hacen dos piezas.
Se inicia realizando un punto mágico y ponemos 6 pb
V1. realizamos 6 aum, quedando 12 puntos
V2 1 pb sobre cada punto , quedando 12 puntos
V3. 1pb y 1 aum, quedando 18 puntos
V4 a la V6 se pone un pb en cada punto
V7. 1pb y 1 dis quedando 12punto
V8 y V9. 1pb sobre cada punto
V10. 2 pb y 1 dis, quedando 9 puntos
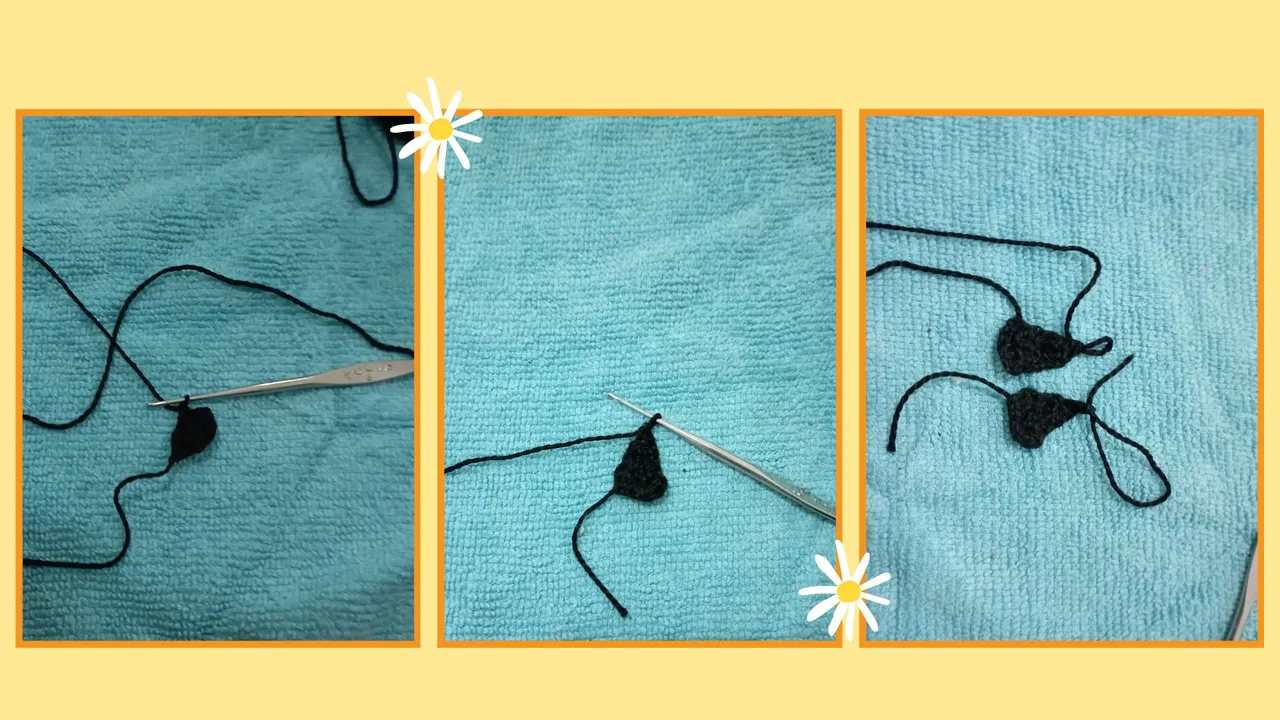
Now we will make the sting of our little bees.
To do this we will make a chain of 5 stitches, on it we make 5 stitches, in the next round we only make 4 stitches and we decrease until we reach 1 stitch making a triangle, which we join at the ends and a cone is left, this being the stinger.
Ahora realizaremos el aguijón de nuestras abejitas
Para ello realizaremos una cadena de 5 puntos, sobre ella realizamos 5 pb, en la próxima vuelta solo realizamos 4pb y vamos disminuyendo hasta llegar a 1 punto realizando un triangulo , el cual unimos por los extremos y queda un conito , siendo este el aguijón.

Here I show you all the parts of the bees to start joining them together.
Aquí les muestro todas las partes realizadas de las abejitas para comenzar a unir.
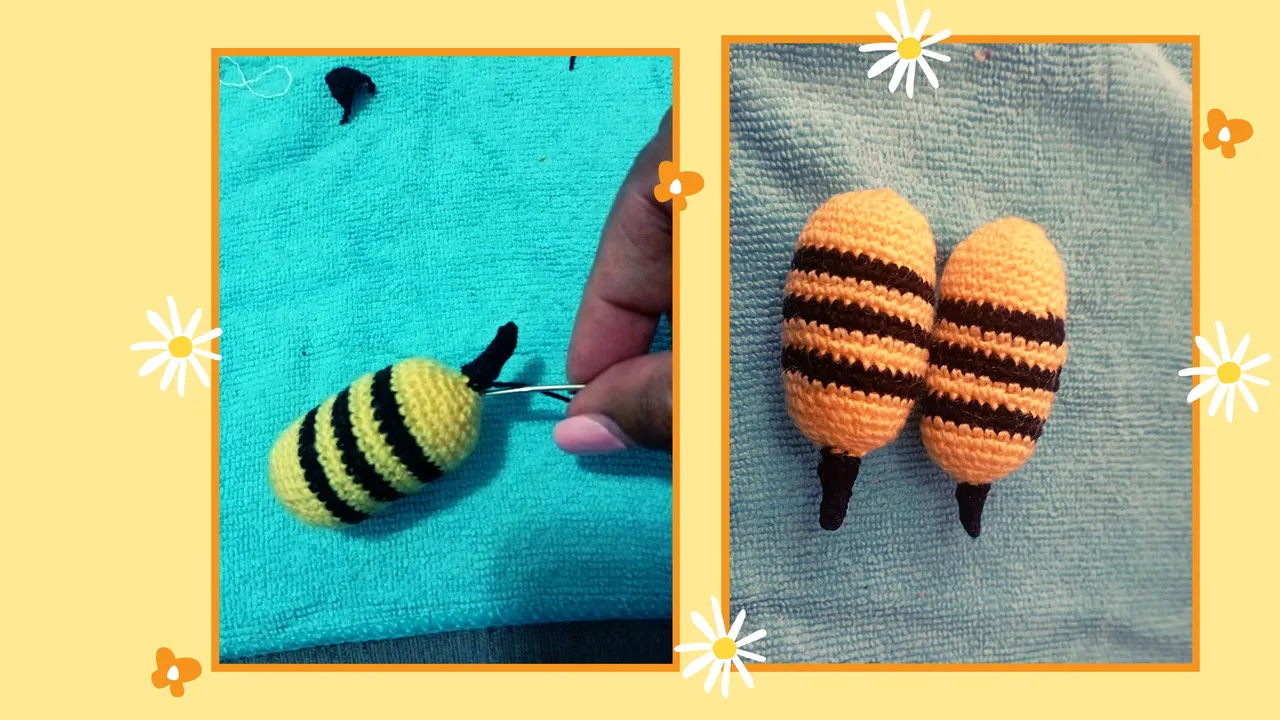
We sew the stinger just where we finish the body of the bee.
Cosemos el aguijón justo donde terminamos el cuerpo de la abeja.

Next, we join the two wings together and sew them to the upper part of the bee's body.
A continuación, unimos las dos alas y las cosemos a la parte superior del cuerpo de la abeja.

Then I embroidered with black thread the eyes, I wanted to make a wink and eyelashes to one of them and with red thread below I made the mouth.
Después bordo con hilo negro los ojitos, le quise hacer un giño y pestañas a una de ellas y con hijo rojo mas abajo le hago la boca.

Thus, the bees are finished.
Quedando así, las abejas concluidas.

The last thing to conclude all the work is to make the logo of the Hive, for this I made a hexagon in cardboard and cut it out to use it as a mold.
Lo último para concluir todo el trabajo es hacer el logo de la Hive, para ello hice un hexágono en cartulina y lo recorté para usarlo como molde.


I cut out the hexagons in the felt, two for each flag that I will place on each bee, on one of the sides I made the two white stripes with thread and then joined them together and put the toothpick on them to serve as a flagpole.
Recorté los hexágonos en el fieltro, dos para cada bandera que colocaré en cada abeja, en uno de los lados hice las dos rayas blancas con hilo y luego las uní y les puse el palillo para que sirviera de asta.

Now these little bees are totally finished, I hope you like them and next week I will show you the ones I am making, I have to finish this project, greetings and good week to all, see you.
Ahora estas abejitas están totalmente terminadas, espero que les gusten y la semana que viene les enseñaré las que estoy haciendo, que tengo que terminar este proyecto, saludos y buena semana para todos, nos vemos.

I got the mold from a program on You Tube here is the link / Tengo el molde de un programa en You Tube aquí está el enlace
Las fotos fueron tomadas con mi teléfono Xiaomi Note 11, unidas y recreadas en canva
Utilice Traductor DeepL