
Esto que ven en la imagen es mi intento desesperado por mejorar mi contenido, me tardo horas en coser cosas muy simples y perder un dia entero de trabajo ya no estaba siendo rentable para mi. Es por eso que compré esto, una maquina de coser de mano, es bastante quisquillosa, aunque antes de mostrarle las pruebas, voy a mostrarles como mejorarla un poco.
What you see in the image is my desperate attempt to improve my content, it took me hours to sew very simple things and losing a whole day of work was no longer being profitable for me. That is why I bought this, a handheld sewing machine, it is quite fussy, although before I show you the tests, I am going to show you how to improve it a bit.
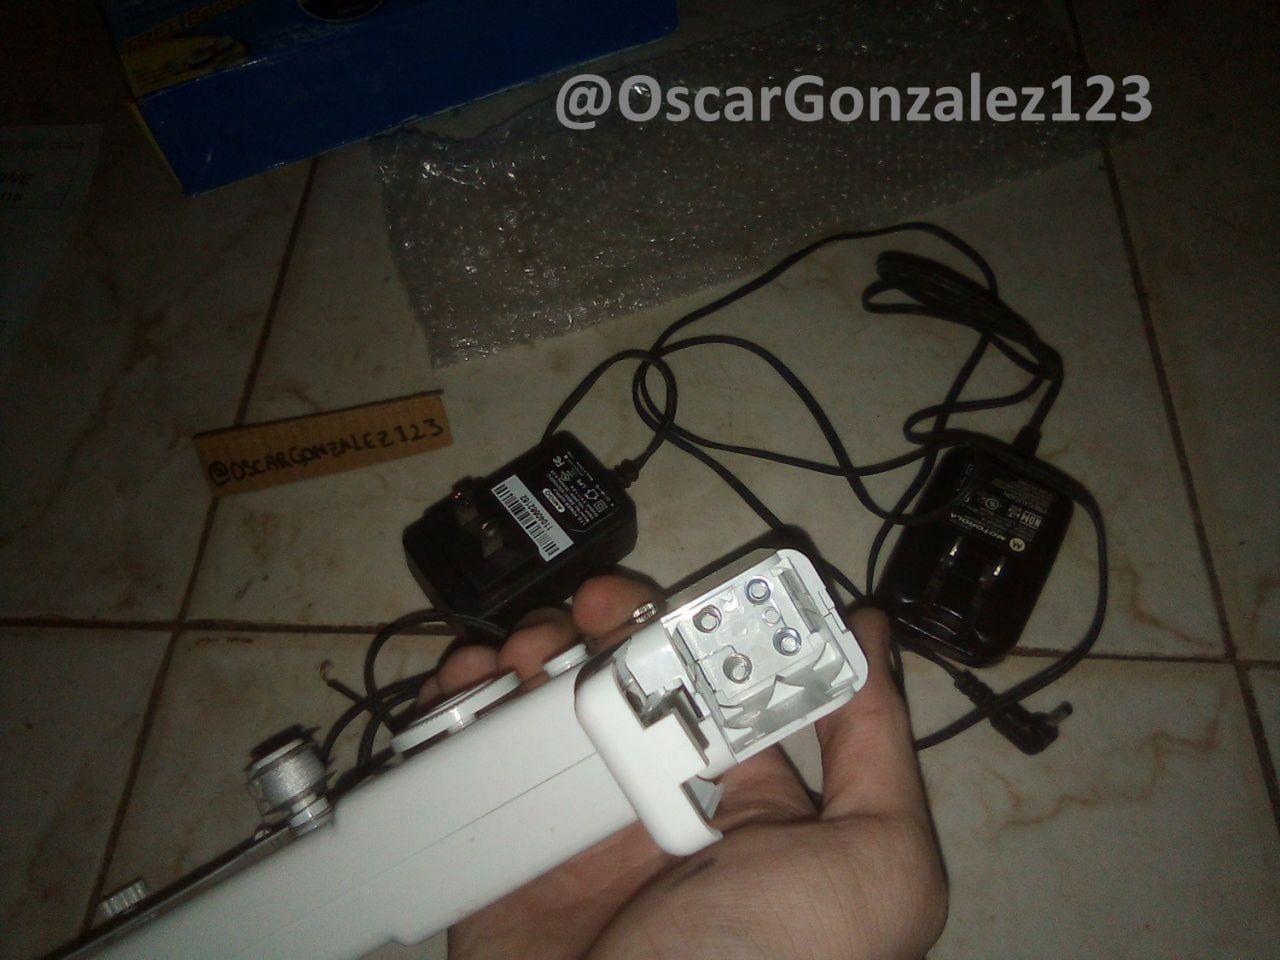
Cuando digo mejorarla me refiero a hacerla mas comoda de usar y sobre todo a hacer que funcione mejor, una de las cosas importantes es que funciona con 4 baterias AA, que por muy buena que sea siempre se estaran gastando y haciendo que la maquina pierda potencia, aunque si tenemos un cargador viejo, todo es posible.
When I say improve it I mean to make it more comfortable to use and above all to make it work better, one of the important things is that it works with 4 AA batteries, that no matter how good it is, they will always be wasting and causing the machine to lose power , although if we have an old charger, anything is possible.
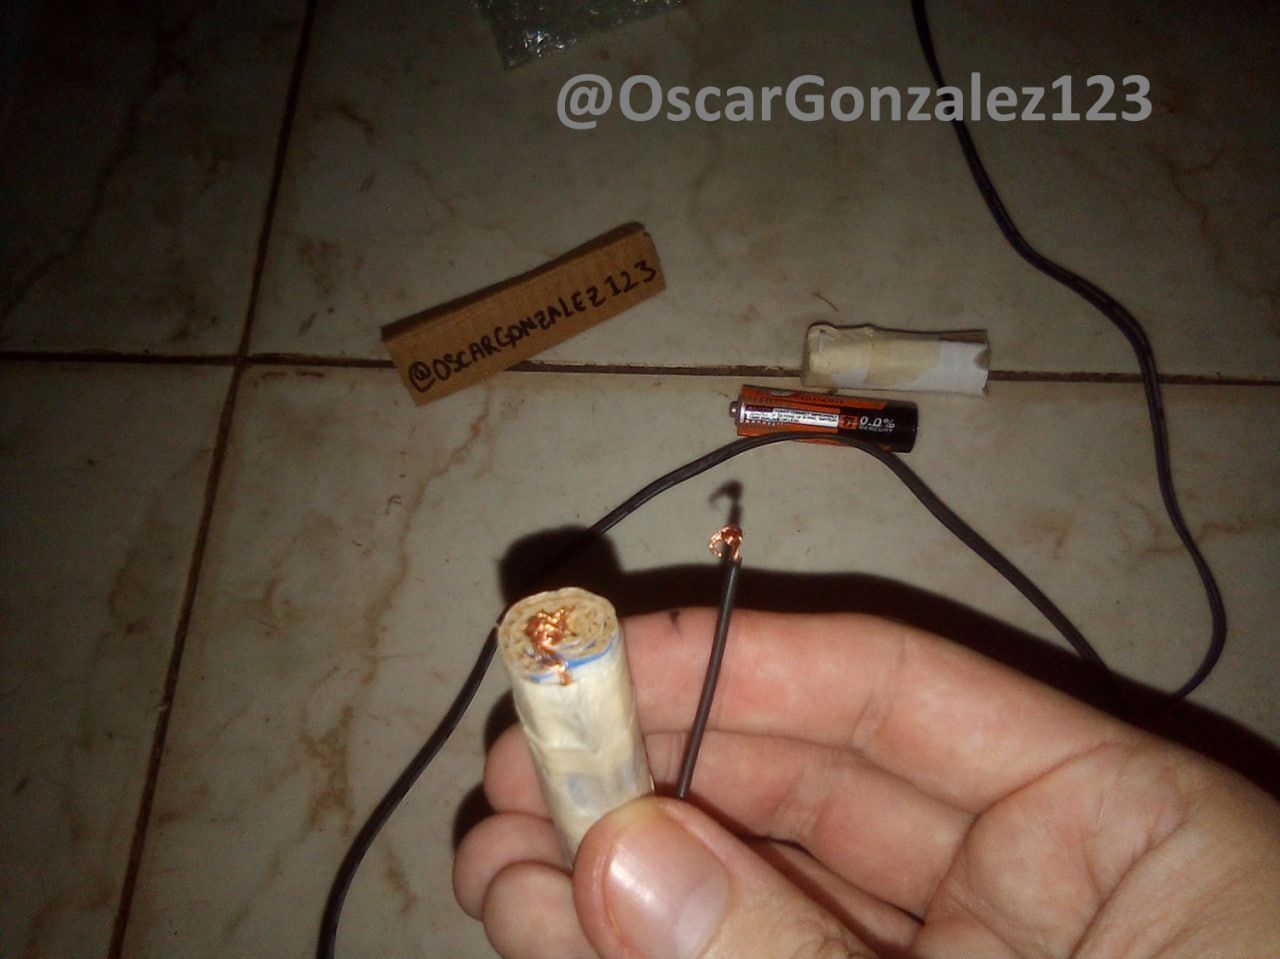
Lo haré lo mas simple posible ya que muchos carecen de conocimientos tecnicos y de electronica para andar soldando piezas, dicho eso, obviamente es un proyecto que puede mejorarse, aunque igualmente sera funcional y una gran alternativa para tener una maquina de soldar por un muy bajo costo. Lo primero que hice fué enrollar carton y cortarlo del largo de una bateria doble AA y colocar la punta del cable en uno de los extremos, podemos usar un poco de silicon frio para sostener el cobre, aunque no mucho para no entorpeser el contacto. Haremos 2 de estas con la punta de uno de los cargadores
I will make it as simple as possible since many lack the technical and electronic knowledge to go about welding parts, that said, obviously it is a project that can be improved, although it will also be functional and a great alternative to have a welding machine for a very low cost. cost. The first thing I did was roll up cardboard and cut it the length of a double AA battery and place the end of the cable at one end, we can use a little cold silicone to hold the copper, although not much so as not to interfere with the contact. We will make 2 of these with the tip of one of the chargers

Luego de haber armado ambas baterias de carton, las colocamos en los dos espacios mas alejados del borde, estos son los que van directamente al motor y al boton de encendido respectivamente, ya lo veremos mas adelante. Otra cosa es hacer una pequeña muesca en la tapa para que el cable no quede colgando y si se lo preguntan, no deben preocuparse por la polaridad, esta maquina funciona igual independientemente donde coloques el positivo.
After having assembled both cardboard batteries, we place them in the two spaces furthest from the edge, these are the ones that go directly to the engine and the ignition button respectively, we will see later. Another thing is to make a small notch in the cover so that the cable is not hanging and if you ask, you should not worry about the polarity, this machine works the same regardless of where you place the positive.

Otra cosa que hice, aunque no es obligatorio, es colocar un cartón debajo del boton de encendido, asi siempre estará conectado y lo encenderemos a traves de un pedal. digo que no es necesario porque facilmente se podria pegar una piedra o algo en la parte superior que haga presion, aunque esto es mas sutil. Ya que estaba tambien coloqué un poco de grasa a los engranajes para un funcionamiento mas suave.
Another thing I did, although it is not mandatory, is to place a cardboard under the power button, so it will always be connected and we will turn it on through a pedal. I say that it is not necessary because you could easily stick a stone or something on the top that makes pressure, although this is more subtle. Since it was there I also put some grease on the gears for a smoother operation

De otro cargador viejo que tengamos guardado vamos a sacar el cable necesario para el pedal, a este punto ya la maquina enciende sola nada mas conectar el cargador donde conectamos las baterias de carton. Asi que la idea es cortar el ciruito y abrirlo y cerrarlo desde el pedal, para ello cortaremos uno de los cables del cargador principal y conectaremos como se ve en la imagen, igualmente mas adelante les dejo un dibujo.
From another old charger that we have stored we are going to remove the necessary cable for the pedal, at this point the machine starts up by itself as soon as we connect the charger where we connect the cardboard batteries. So the idea is to cut the little circuit and open and close it from the pedal, for this we will cut one of the cables from the main charger and connect as seen in the image, also later I will leave a drawing.

Para el pedal vamos a utilizar carton, lo ideal es utilizar algun tipo de plastico o simplemente comprar un pedal generico y nos funcionará perfectamente. Repito, esto es una simple idea para que todos vean las posibilidades, luego que entendamos la ciencia detras del truco podremos ir mejorando los materiales.
For the pedal we are going to use cardboard, the ideal is to use some type of plastic or simply buy a generic pedal and it will work perfectly. I repeat, this is a simple idea for everyone to see the possibilities, after we understand the science behind the trick we can improve the materials.

Como ven no hice gran cosa, simplemente coloqué varios pedazos de carton unidos entre si, los cuales formaran la parte superior e inferior del pedal, es importante colocar en el medio otro trozo de carton, que será el encargado de separar ambas mitades al levantar el pie. Arriba podran ver un pequeño dibujo de como van las conexiones.
As you can see, I did not do much, I simply placed several pieces of cardboard joined together, which will form the upper and lower part of the pedal, it is important to place another piece of cardboard in the middle, which will be in charge of separating both halves when lifting the foot. Above you can see a small drawing of how the connections go.

Recapitulemos, hicimos que la maquina funcione con un cargador viejo de telefono, colocamos un pedal para evitar tener que estar pulsando el boton con la mano a cada momento y ahora coloque algo de cinta en una mesa y con unas pequeñas gotas de silicon caliente la pegué a ella. la idea es poder empujar o jalar la tela sin que la maquina se mueva. tener en cuenta que esta maquina está hecha para sostenerla con la mano derecha y coser un ruedo hacia adelante, asi que debemos pegarla en la posicion que ven en la imagen.
Let's recap, we made the machine work with an old phone charger, we put a pedal to avoid having to press the button with the hand at all times and now I put some tape on a table and with a few small drops of hot silicone I glued it to her. the idea is to be able to push or pull the fabric without the machine moving. Keep in mind that this machine is made to hold it with the right hand and sew a forward hem, so we must stick it in the position that you see in the image.

Una de las cosas que deben de saber es que esta maquina es bastante quisquillosa y amerita cierta practica. La tencion del hiloy la altura de la aguja es lo unico que se puede ajustar, asi que hay que jugar un poco con eso. Esta rueda que señalo con mi dedo traia un resorte y con la vibracion hacia que se saliera, asi que le puse un punto de silicon y lo dejé a una sola presion, presion media. Tambien pueden evitar pasar el hilo por el aro debajo del cabezal, si bien asi lo dicen las intrucciones eso prensa mucho el hilo y si es de mala calidad lo termina partiendo.
One of the things you should know is that this machine is quite fussy and deserves some practice. The thread tension and needle height is the only thing that can be adjusted, so you have to play around with that a bit. This wheel that I pointed with my finger had a spring and with the vibration it made it come out, so I put a point of silicone and left it at a single pressure, medium pressure. They can also avoid passing the thread through the ring under the head, although the instructions say so that it presses the thread a lot and if it is of poor quality it ends up splitting.

Aclarado lo de la presion del hilo, tengo unas cuantas telas para hacer pruebas, honestamente no se exactamente que son, solo espero que por la imagen se puedan dar una idea. Hay que tener en cuenta que de fabrica el tornillo que sostiene la aguja no viene tan ajustado, por lo cual es posible que si directamente la enfrentamos a una tela dura, la aguja suba y deje de coser, asi que hay que ajustarla en la posicion correcta y no dará problema alguno.
Clarified about the thread pressure, I have a few fabrics to test, honestly I don't know exactly what they are, I just hope that you can get an idea from the image. Keep in mind that the factory screw that holds the needle is not so tight, so it is possible that if we directly face a hard fabric, the needle goes up and stops sewing, so you have to adjust it in the position correct and will not give any problem.

Como ven, las telas menos elasticas de la derecha las cosió perfectamente, y la puntada si notan en la tela naranja es muy parecida que la de una maquina normal, aunque por debajo es una cadeneta como la de coser a crochet, cosa a tener en cuenta, hay que hacerle un pequeño nudo al final de cada costura para evitar que se descosa. En cuanto a las telas de la izquierda, las dos primeras son elasticas y muy suaves y en la costura saltaba y en la ultima era entre elastica y gruesa y directamente lo partió. Mi consejo es agarrar el nombre de las telas que cose sin problemas y hacer proyectos con ellas, si bien no es perfecto, puedes coser un metro en menos de 3 minutos y no en las 6 horas que me toma hacerlo a mano.
As you can see, the less elastic fabrics on the right were sewn perfectly, and the stitch if you notice in the orange fabric is very similar to that of a normal machine, although underneath it is a chain like crocheting, something to keep in mind Note, you have to tie a small knot at the end of each seam to prevent it from unraveling. As for the fabrics on the left, the first two are elastic and very soft and in the seam it jumped and in the last it was between elastic and thick and it directly split it. My advice is to take the name of the fabrics that you sew without problems and make projects with them, although it is not perfect, you can sew a meter in less than 3 minutes and not in the 6 hours it takes me to do it by hand.