ENGLISH CONTENT
Hello to everyone in this community and fellow sewing enthusiasts! For a while now, I've been wanting to buy a nice umbrella, but I felt I needed something more practical for those times when the rain isn't too heavy and using an umbrella is inconvenient, like when I'm in a crowded place or when both my hands are full of bags. The annoying thing about light rain is that it can ruin your hairstyle (if you're like me and your hair is straightened), so I always opted for a hat or a bag. Until I finally decided to sew myself a hooded hat that I could carry in my purse—perfect for those sudden showers.

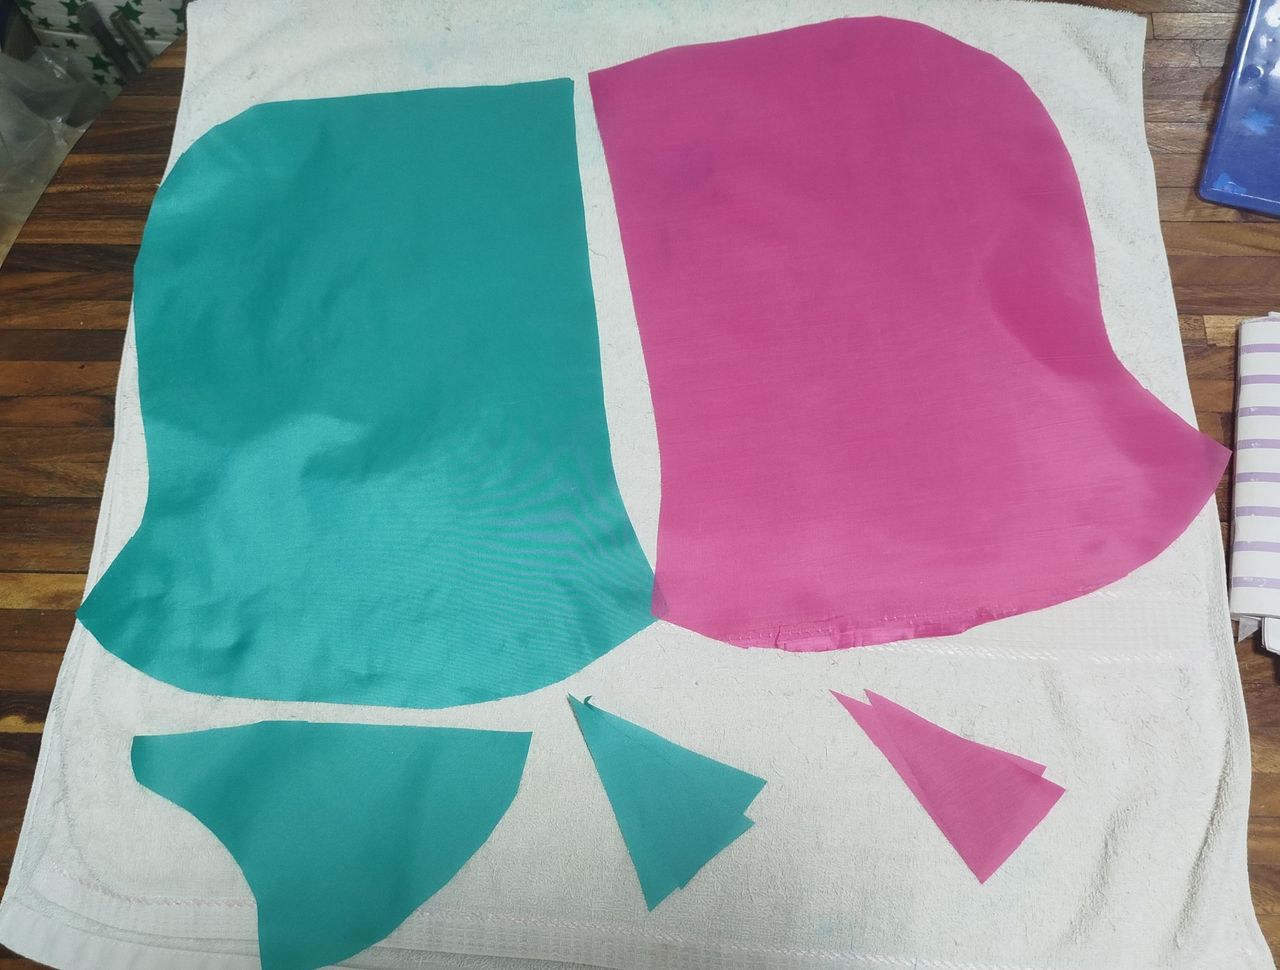
To make this project, I thought about the hoods on raincoats. Since I didn't have enough material to make a raincoat and only wanted something to protect my hair, I thought the best thing to do was use the hood of one of my sweaters as a pattern. I also wanted to add a pocket and some cat ears as decoration. I cut the pieces from waterproof fabric, taking advantage of some leftover scraps: 2 for the hood, 1 for the pocket, and 4 for the ears; all with the appropriate seam allowance.
 |  |
|---|
The first thing I did was sew the ears that I would attach to the hood, sewing along the edge and leaving the bottom open so I could turn them right side out. To pleat the fabric, I sewed a straight stitch.
 |  |  |
|---|

✨☔ Ears ready ☔✨
Next, I sewed the edge of the pocket. I created this piece so I could fold the hood and store it easily, although its shape and location might change in the future. In this case, I made it to sit near the back of the neck. I sewed it to one of the hood pieces, leaving the opening where I hemmed it open so it would function as a pocket.
 |  |
|---|
Once this was done, I proceeded to sew both pieces of the hood along the entire top and side of it, facing each other first on the right side and then, after turning it over, passing a seam to make a kind of hidden seam.
 |  |
|---|
 |  |
|---|
Next, I made a couple of buttonholes with the special machine foot for this purpose, at the height where I wanted the hood drawstring to come out, making sure to leave enough space to make the hem.

Next, I made the hem on the contour that would go on the face, as well as on the bottom of the hood, inserting the cord through the previously made eyelets with a brooch or safety pin.
 |  |
|---|
In this way, we would have the hood ready to use.
 |  |
|---|
But, for this model I decided to make some little ears (which I sewed at the beginning), so, once the hood was sewn, the next thing was to locate where the ears would go, make a small opening and sew them there with a straight stitch.
 |  |  |
|---|
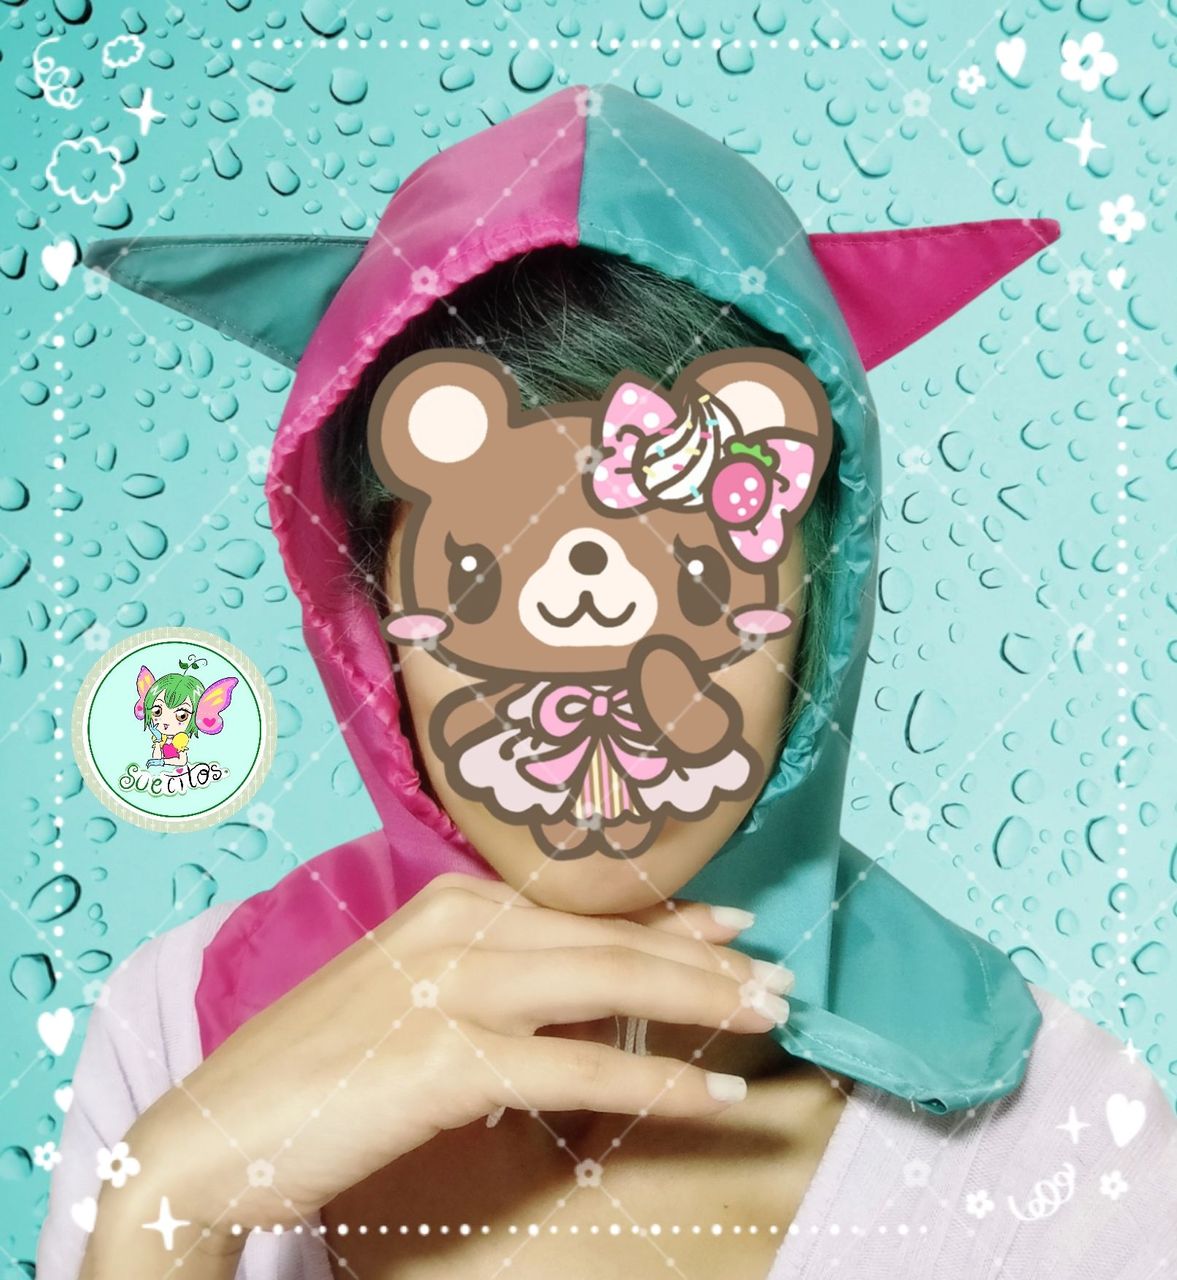
And now we have a cat-eared hoodie, ready to protect us from the drizzle 🌨☔
 |  |
|---|
When it's time to fold it up, simply adjust the hood until it fits inside the pocket. I like that it's compact and that I can even carry it in my pants pocket, because the waterproof fabric doesn't take up much space.

✨☔ Folded Hood ☔✨
At first, I only made one for myself (I made it green). Thanks to this "prototype," I was able to make a few improvements and think about the pocket. My mother liked it so much that she asked me for one, but without ears, so I made it for her in black. Next, I'll show you some others I've made:
 |  |  |
|---|
✨☔ Protected from the rain in style ☔✨
✨ Thank you so much for visiting my post. I hope you found it interesting ✨

💚 Until next time! 💚

CONTENIDO EN ESPAÑOL
¡Hola a todos los integrantes de esta comunidad y amantes de la costura! Desde hace un tiempo estoy buscando comprarme un paraguas bonito, aunque sentía que necesitaba algo más práctico para aquellos ocasiones en que la lluvia no fuese tan intensa y usar un paraguas, resultase incómodo, como al estar en un lugar atestado de gente o cuando tengo ambas manos ocupadas con bolsas. Y es que, lo molesto de las lloviznas es que pueden arruinar el peinado (si eres como yo, que te alisan el cabello), así que siempre optaba por usar un gorro o una bolsa. Hasta que me decidí y me cosí una capucha que pudiera llevar en el bolso, ideal para esas lloviznas repentinas.
Para elaborar éste proyecto, pensé en las capuchas de las gabardinas para la lluvia. Como no tenía suficiente material para hacerme una gabardina y quería algo solamente para proteger el cabello, pensé que lo mejor era tomar como patrón, la capucha de uno de mis suéteres. También quise anexarle un bolsillo y una orejitas de gato, a modo de decoración. Corté las piezas en tela impermeable, aprovechando de que tenía algunos trozos sobrantes: Capucha x 2, 1 para el bolsillo y 4 para las orejas; todo con su respectivo aumento de costura.
| |
|---|
Lo primero que hice fue coser las orejas que anexaría a la capucha, cosiendo por el borde y dejando abierto en la parte inferior para poder voltearlas. Para plisar la tela, pasé una costura recta.
| | |
|---|
✨☔ Orejitas listas ☔✨
Luego, cosí el borde del bolsillo. Creé esta pieza para poder doblar la capucha y guardarla cómodamente, aunque puede ser que cambie su forma y ubicación en un futuro. En este caso, la hice para que se colocase en la parte próxima a la nuca. De esa forma, la cosí a una de las piezas de la capucha, dejando la abertura abierta en donde hice el dobladillo y así, hiciera la función de bolsillo.
| |
|---|
Una vez hecho esto, procedí a coser ambas piezas de la capucha por toda la parte superior y lateral de la misma, enfrentando primero del lado derecho y después de voltear, pasar una costura, para hacer una especie de costura escondida.
| |
|---|
| |
|---|
Seguidamente, hice un par de ojales con el pie de máquina especial para ello, por la altura en la que deseaba que saliese el cordón de la capucha, procurando dejar suficiente espacio para hacer el dobladillo.
Después, realicé el dobladillo en el contorno que iría en la cara, así como en la parte inferior de la capucha, introduciendo con un broche o imperdible, el cordón a través de los ojales previamente realizados.
| |
|---|
De esta forma, tendríamos la capucha lista para usarse.
| |
|---|
Pero, para éste modelo decidí hacerle unas orejitas (las que cosí en un inicio), por lo que, al tener la capucha cosida, lo siguiente fue ubicar dónde irían las orejas, hacer una pequeña abertura y coser allí las mismas con una costura recta.
| | |
|---|
Y ahora sí, tenemos una capucha con orejas de gato, lista para protegernos de las lloviznas 🌨☔
| |
|---|
A la hora de doblarse, basta con acomodar la capucha hasta que la misma pueda guardarse dentro del bolsillo. Me gusta que sea compacto y que inclusive, pueda llevarlo hasta en el bolsillo del pantalón, porque la tela impermeable, no hace tanto bulto.
✨☔ Capucha doblada ☔✨
Al principio, sólo hice una para mí (la hice de color verde), gracias a éste "prototipo", pude hacer unas cuantas mejoras y pensar en lo del bolsillo. A mi madre le gustó tanto que me pidió una, pero sin orejas, así que se la hice en color negro. A continuación, les mostraré otras que he hecho:
| | |
|---|
✨☔ Protegidos de la lluvia con estilo ☔✨
