
¡Feliz inicio de semana!
Happy start of the week!
Comenzó una nueva semana hivers y quiero compartir un tutorial creativo en realidad esta idea la tomé de mi sobrina, al igual que yo es fanática de las manualidades y hace poco creo un organizador con forma de pizza que me pareció muy tierno, claro hice algunas modificaciones como darle un toque kawaii es una artesanía muy original que puede tener diversos usos, puede usarse como organizador, cartuchera, o como una linda caja para un obsequio.
A new hivers week has started and I want to share a creative tutorial, actually I got this idea from my niece, like me she is a fan of crafts and recently created a pizza shaped organizer that I found very cute, of course I made some modifications like giving it a kawaii touch, it is a very original craft that can have several uses, it can be used as an organizer, pencil case, or as a nice box for a gift.
Let's start the craft!


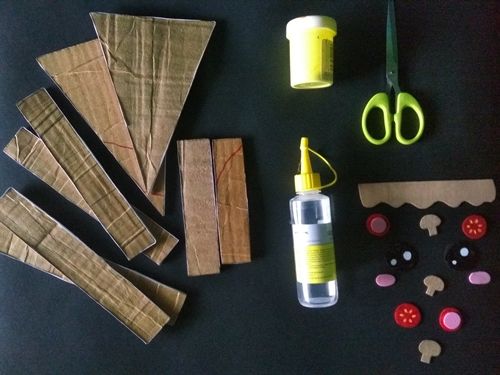
Materiales: || Materials:
Cartón, foami blanco, pinturas (amarilla, roja, rosada, negro, beige y marrón), hojas de papel, tijeras, silicón líquido.
Cardboard, white foami, paints (yellow, red, pink, black, beige and brown), sheets of paper, scissors, liquid silicone.
Paso a paso: || Step by step:
Recorté varias piezas de cartón con las siguientes medidas:
I cut out several pieces of cardboard with the following measurements:
Para la base: || For the base:

Para la tapa: || For the lid:

Los borde de las piezas los cubrí con una tira de papel, luego pegué las piezas usando silicón líquido, primero formé la base y repetí el proceso con las piezas de la tapa.
I covered the edges of the pieces with a strip of paper, then glued the pieces together using liquid silicone, first forming the base and repeating the process with the lid pieces.

Como paso extra y para lograr un mejor acabado, recorté un triángulo de cartulina con las medidas de la tapa y lo pegué sobre ella.
As an extra step and to achieve a better finish, I cut out a triangle of cardboard with the measurements of the lid and glued it on it.

Luego pinté la tapa en color amarillo.
Then I painted the lid yellow.

La base la pinté en color marrón.
I painted the base in brown.

El siguiente paso fue hacer la decoración en foami, hice rodajas de tomate, pepperoni y champiñones, ojos kawaii, mejillas y boca, y los pinté en su respectivo color.
The next step was to make the decoration in foami, I made tomato slices, pepperoni and mushrooms, kawaii eyes, cheeks and mouth, and painted them in their respective color.

Sólo restaba pegar las decoraciones a la tapa y delinear en negro.
The only thing left to do was to glue the decorations to the lid and outline in black.
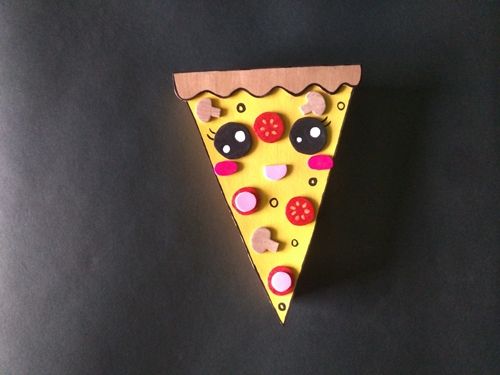
Organizador de accesorios (Pizza Kawaii). || Accessory organizer (Pizza Kawaii).


Thank you for reading this publication!
Imágenes tomadas desde mi Alcatel One Touch Idol 4. || Images taken from my Alcatel One Touch Idol 4.
Separadores hechos en PhotoScape. || Dividers made in PhotoScape.
Ediciones hechas en Photoscape. || Editions made in Photoscape.
Translator Deepl.
Imagen incrustada. || Embedded image. 1