Que gusto estar nuevamente por aquí en una de mis comunidades favoritas y más aún después de un largo rato sin pasar. Ahora bien, a medida que va pasando el tiempo, mi bebé va creciendo y cada día le voy comprando y haciendo más accesorios para su uso, que si unos lazos, ganchos y etc, luego de esto viene el desorden ¿que si donde está? Que falta uno y demás; debido a esto tenía días pensando en hacer un organizador, así que puse manos a la obra a crear uno bien lindo, fácil y lo mejor de todo que reciclando materiales✨
Aquí te muestro como lo hice, espero les guste
How are you? Nice Thursday✨!
What a pleasure to be here again in one of my favorite communities and even more after a long time without stopping by. Now, as time goes by, my baby is growing and every day I'm buying and making more accessories for her use, what if some bows, hooks and etc, after this comes the mess, what if where is it? That one is missing and so on; because of this I had days thinking about making an organizer, so I got down to work to create a nice, easy and best of all that recycling materials✨.
Here I show you how I did it, I hope you like it


- Cartón | Cardboard
- Parte de una caja de celular | Part of a cell phone box
- Trozo de tela | Piece of cloth
- Estambre marrón | Brown yarn
- Retazo de cinta color rosa | Piece of pink ribbon
- Foami color piel | Skin-colored Foami
- Pinturas color negro y blanco | Black and white paints
- Pincel delineador | Liner brush
- Puntero | Pointer
- Silicon frio | Cold silicon
- Tijera | Scissors

Paso a Paso | Step by Step
✨ En el cartón, medí un rectángulo de 9,5cm (esto se ajustaba al ancho de mi caja de celular) por 25cm de alto. Luego dispuse del trozo de tela rojo y con ayuda del silicón líquido pegue muy bien a modo de cubrir y que no quedaran arrugas.
✨On the cardboard, I measured a rectangle of 9.5cm (this fit the width of my cell phone box) by 25cm high. Then I placed the red piece of fabric and with the help of liquid silicone I glued it very well so that it would be covered and there would be no wrinkles.

✨Cubrí con la misma tela roja la caja, de igual forma estirando bien para no dejar arrugas. Deje un lateral sin cubrir, ya que justo allí pegaría el rectángulo que hice al principio (quedando como se muestra en las fotografías).
✨ Una vez pegado, para cubrir la parte que se notaba del cartón como la que deje descubierta de la caja, recorte y pegué un trozo de cartulina, en este caso también de color rojo, para de esta forma darle un mejor acabado a la base del organizador.
✨I covered the box with the same red fabric, stretching it well so as not to leave wrinkles. I left one side uncovered, since right there I would glue the rectangle I made at the beginning (remaining as shown in the photographs).
✨Once glued, to cover the part of the cardboard that was noticeable as the uncovered part of the box, I cut and glued a piece of cardboard, in this case also red, to give a better finish to the base of the organizer.


✨ Cómo me sobraba retazos de tela, corte tiras del ancho de la base del organizador y fui pegando, haciendo formas corrugadas (tratando de simular algún vestido o falda), hice esto por todo el borde.
✨ Since I had fabric scraps left over, I cut strips the width of the base of the organizer and glued them together, making corrugated shapes (trying to simulate a dress or skirt), I did this all around the edge.

✨Con el estambre marrón, hice el cabello de la muñeca (olvidé por completo tomar fotografías) pero para esto, estire todo el estambre y fui dando vueltas de un aproximado de 80cm teniendo en cuenta que quería dos trenzas y debía quedar suficiente largo, (algo así como cuando hacemos un borla). Hice división a la mitad y corte los extremos para comenzar a tejer una trenza, suave para no maltratar tanto el estambre.
✨ Para el rostro, corte un óvalo en foami color piel y difumine su borde con marcador naranja. Luego pegue el cabello a lo que sería el rostro.
✨With the brown yarn, I made the doll's hair (I completely forgot to take pictures) but for this, I stretched all the yarn and went around approximately 80cm, keeping in mind that I wanted two braids and it should be long enough, (something like when we make a tassel). I divided the yarn in half and cut the ends to start weaving a braid, softly so as not to mistreat the yarn so much.
✨ For the face, cut an oval out of skin-colored foami and smudge its edge with orange marker. Then glue the hair to what would be the face.

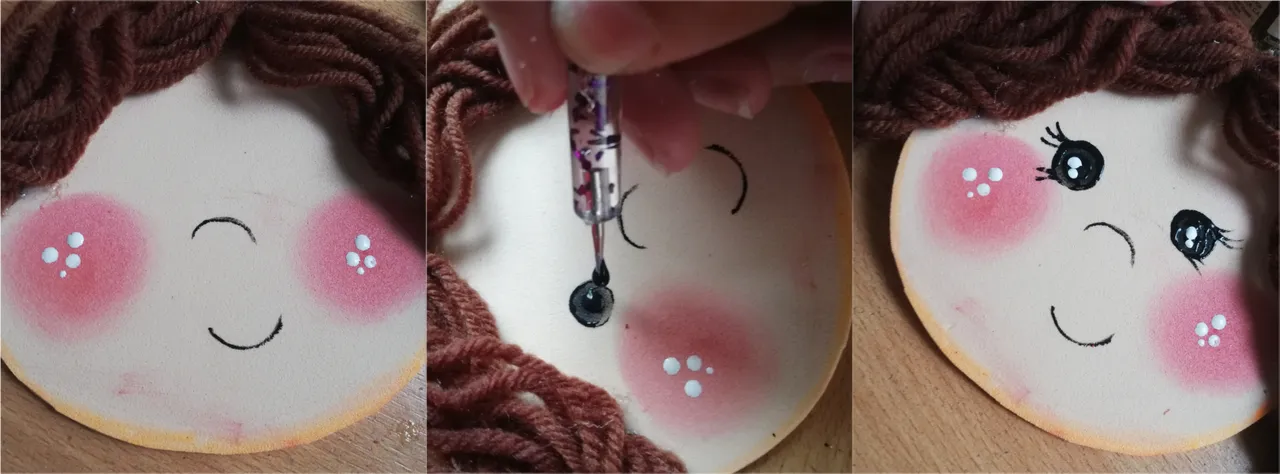
✨ Con un pedazo de tela y un poco de pintura roja hice las mejillas y con el puntero di un poco de luz para luego, con el pincel delineador y pintura negra hacer la nariz y boca.
✨ With a piece of fabric and a little red paint I made the cheeks and with the pointer I gave a little light and then, with the eyeliner brush and black paint I made the nose and mouth.

✨Para finalizar el rostro, con el puntero y pintura negra realice los ojos, y con blanco le di un poco de luz, además realice unas pequeñas y finas pestañas para dar un toque más sutil.
✨ Con la cinta rosa hice dos lazos pequeños y el centro pegue una pequeña franja fucsia, una vez listos los pegue uno a cada lado.
✨To finish the face, with the pointer and black paint I made the eyes, and with white I gave a little light, I also made some small and thin eyelashes to give a more subtle touch.
✨ With the pink ribbon I made two small bows and in the center I glued a small fuchsia stripe, once ready I glued them one on each side.

✨ Por último solo me quedaba pegar el rostro al organizador, al cual para darle otro toque le realice pequeños puntos blancos.. ¡Y LISTOOO! Se ve bastante complejo, pero realmente es muy fácil de hacer..
✨ Finally I just had to glue the face to the organizer, to give it another touch I made small white dots... And READY! It looks quite complex, but it's really very easy to do..


Esto ha sido todo por hoy amigos, gracias por llegar hasta el final, sin más me despido ¡Hasta una próxima oportunidad! 💗
That's all for today folks, thanks for making it to the end, without further ado I bid you farewell. Until next time! 💗
Ediciones en Canva y Picstar | Editing in Canva and Picstar
Traducciones en | Translations in Deepl.com