

Saludos y resumen
Buen día, artesanos y amantes de las manualidades. Bienvenidos a otro Miércoles de carpintería. En esta edición, continuaremos con el proceso de este proyecto. En el capítulo anterior, habíamos doblado los aros para continuar con el proceso de ensamblaje. Hoy, terminaremos de cerrar este instrumento.
Greetings and summary
Hi there handcrafters and handcrafts lovers! Welcome back to another Woodworking Wednesday. In this entry, we'll catch up with this project. Last time we saw it, we had bent the sides to keep the assembling process rolling. Today, we'll close it up!
Aros en su lugar
Al tener estás piezas dobladas, solo quedaba ajustarlas poder pegarlas sobre la tapa. Hay dos cortes por hacer. El primero es para el tacón externo. Se tiene que buscar una diagonal que correspondanda a la pieza. Este tacón es más ancho hacia el frente del instrumento. Una vez tenemos este corte, podemos ubicar el aro sobre la tapa para medir el exceso sobre el tacón interno. Este es el segundo corte.
Tenemos que remover este exceso teniendo en cuenta que aquí se van a unir albos aros. La precisión es clave cuando el instrumento no va a llevar ningún adorno en esta parte. Lo bueno es que hay una línea central para realizar el corte. Una vez tenemos marcados ambos aros, los colocamos uno encima del otro para cortar ambos a la vez. Así nos aseguramos de que el corte se hace el espejo y ambas oeizas calcen.
Eso es un pequeño truco aprendido por la experiencia.
Luego de haber terminado estos pasos, podemos pegar los aros en su lugar.
Placing the sides
Once we have this pieces bent, it's time to adjust them. We need two cuts. The first one will be for the heel. Since it's wider towards the front of the instrument, we need the sides to have this diagonal cut. When we have it ready, we can place the sides in place and measure them at the end block. That's where we need a second cut to remove the excess material from each side.
By placing the sides, we can measure where we need to cut them to fit on the end block. We have a central line to guide this cut. Once we have all the measuring done, we can proceed to cut them. We'll use a little trick. If we stack the sides, we can make a mirror cut. This means the pieces will fit perfectly at both ends.
That's neat little trick I've learnt from experience!
With all these steps out of the way we can proceed to apply glue and fix the sides ok their place.


 |  |  |
|---|
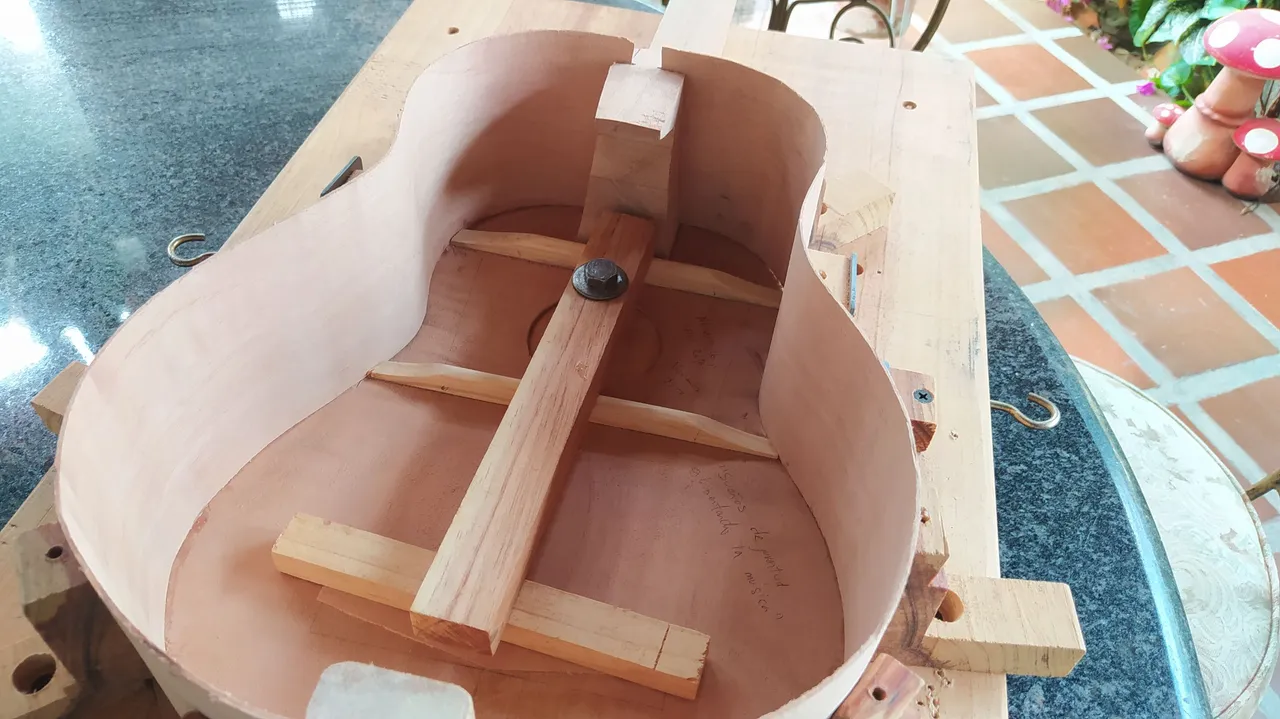
Refuerzos
Ahora podemos colocar todos los refuerzos necesarios para asegurar que el instrumento sea resistente.
Comenzamos por los peones o dientes. Estos ayudan a fijar mejor los aros a la tapa armónica. Se colocan uno a uno tratando de dejar un intervalo regular entre ellos.
Los otros refuerzos son los arillos. Estos se colocan en la parte de arriba y a lo largo de los aros. Así aumentamos la superficie de contacto cuando coloquemos el fondo.
Los últimos son refuerzo extra. Estos han a intervalos regulares a lo ancho de los aros. Esto nos aporta rigidez a lo largo de la pieza.
Reinforcements
It's time to place all the reinforcements. These will ensure a sturdy instrument.
We start with this wood wedges known as kerfing. They help have a wider contact are between the sound board and sides. We place then at regular intervals.
Then, we have another kind of kerfing but in a strip. This goes on the other end of the sides, the one that'll meet the back of the instrument. This will give us a wider contact area as well.
Last but not least, we have some vertical reinforcements for the sides. These also go at regular intervals to stiffen the sides.
 |  |  |
|---|
 |  |  |  |
|---|
Ajustes finales
Hay algunos ajustes finales necesarios antes de cerrar el instrumento. Priemroz rebajar los aros a la altura de los tacones. Siempre lo hago después de de colocar los arillos porque es probable que la madera se astille si no tiene algún apoyo.
Además, tenemos que cortar el exceso de la barras del fondo. Este quizá sea uno de los procesos más lentos porque hay que cortar un poco y mediar si la pieza calza. Hacemos esto varías veces hasta que el fondo calza como una tapa. Lijamos un poco los aros para tener una superficie plana.
El detalle final es colocar información relevante en la etiqueta y pegarla en su lugar. Nunca hay que olvidarse de identificar nuestras obras.
Finishing touch
Before closing up, we need to address a couple of things. First, we need to trim the sides to the height of the heel and end block. We wait until the kerfing is in place so we can do it without chipping away the wood.
Also, it's time to trim the bars of the back of the instrument. This is a slow process since we need to trim only a bit from each one by time. Then, we have to test whether it fits. If it doesn't, we repeat the process until it closes like a lid. We make sure to sand the sides to have an even surface as well.
The last thing is writing a bit of important info on the label and glue it in place. Always remember to identify anything you made with your hands!

 |  |  |
|---|
¡Cerrando!
Después de haber completado todos estos pasos, procedemos a cerrar el instrumento. En mi caso, saco el perno que fija todo a la solera y me dispongo a completar el proceso aparte.
Para cerrar, lo primero es aplicar pegamento sobre los aros y tacones. Luego, colocamos el fondo y lo fijamos en los extremos con prensas. Lo que sigue es utilizar estas tripas de bicicletas para amarrar el fondo y hacer suficiente presión para que la pega haga su trabajo.
Hago énfasis en la parte de "suficiente presión" porque no debe ser un exceso. Si nos excedemos en presión, podemos romper algo y a esta alturas, eso sería una tragedia.
Una vez hayamos amarrado todas las tripas de bicicletas, dejamos que el pegamento seque y así podemos continuar con el proceso en otro momento.
Y con eso terminamos por hoy, pero el proceso continuará en la próxima entrega. ¡Nos veremos allá!
¡Manténganse creativos!
Closing it up!
After finishing all these steps, we can finally put the lid of this one. First, we proceed to remove it from the solera mould. The closing process is easier this way.
To close it up, we first need to apply glue on the sides, heel and end block. Then, we place the back on top of them and use clamps to hold it in place. Now, using inner tubes we proceed to tie the back to the instrument making sure to apply enough pressure.
I have to emphasize the notion of "enough pressure". If we apply too much, something will break. And if it does, at this stage, it would be an utter tragedy.
Once we have tied the back, we can let it rest and wait for the glue to dry up. And thus, we have closed it up!
With that we have come to the end of this entry, but the process will continue next time. Be seeing you!
Stay creative!


- Fotos/Photos 📷: by me (Redmi Note 8 smartphone).
- Portada/Thumbnail 🖼️: by me, made with Canva.

Follow me on Instagram for enquires and commission.
If you'd like to help the workshop grow, you can make a donation here.
You can find me at discord as bertrayo#1763