Saludos amigos, tengo algunas semanas desde que me anime a retomar nuevamente el arte del origami y es algo que desde muy pequeño me ha gustado muchísimo y pasaba horas tratando de armar y recrear grandes figuras de papel, e incluso he compartido variad de ellas aquí este gran mundo de hive y de esa manera muchas personas se animen a practicarlo, ya que una vez que le agarras la técnica de doblar papel podrá armar cualquier cosa que tú desees, y más aún pasar un buen tiempo, ya que el origami permite desesterarse y poner a prueba muchas habilidades.
Hoy les comparto una flor de papel, en específico un tulipán, siendo una flor muy bonita, llamativa y a todas las mujeres les fascina esa flor, así que me anime a llevar esa creatividad al siguiente nivel y de esa manera lograr un gran resultado. Además, esta flor de papel podrá ser un gran regalo para este mes del amor y la amistad, por lo tanto, no te pierdas esta oportunidad de poder elaborar un tulipán de papel.
Greetings friends, I have a few weeks since I was encouraged to take up again the art of origami and it is something that since I was very small I liked a lot and spent hours trying to assemble and recreate great paper figures, and I have even shared several of them here this great world of hive and that way many people are encouraged to practice it, because once you grab the technique of folding paper can assemble anything you want, and even more so have a good time, because origami allows desesterarse and test many skills.
Today I share with you a paper flower, specifically a tulip, being a very pretty flower, eye-catching and all women are fascinated by this flower, so I encouraged myself to take this creativity to the next level and thus achieve a great result. In addition, this paper flower can be a great gift for this month of love and friendship, so do not miss this opportunity to make a paper tulip.


Materiales:
Hoja blanca
Tijera
Regla
Lápiz
Silicón
Materials:
White sheet
Scissors
Ruler
Pencil
Silicone

Lo primero que tenemos que hacer para poder armar nuestra flor de papel es cortar dos cuadrados con la ayuda de la tijera de la hoja, donde el primero será de 15 * 15 cm, y el otro de 7,5 *7,5 cm y de esa manera poder armar nuestro tulipán. A partir de aquí vamos a comenzar a doblar y hacer los distintos pliegues que son esenciales en la técnica del origami para lograr un gran resultado de papel.
The first thing we have to do to be able to assemble our paper flower is to cut two squares with the help of the blade scissors, where the first will be 15 * 15 cm, and the other of 7.5 * 7.5 cm and thus be able to assemble our tulip. From here we will begin to fold and make the various folds that are essential in the origami technique to achieve a great paper result.

Tomamos el cuadrado más pequeño y con mucho cuidado vamos a doblar por toda la diagonal y de esa manera vamos a conseguir un triángulo en la hoja. De allí vamos a doblar una de las esquinas del triángulo hacia arriba formando especie de un barco con la hoja, la cual todos estos dobleces nos ayudaran para marcar la hoja y poco a poco ir obteniendo la flor del tulipán.
We take the smallest square and very carefully we are going to fold the entire diagonal and in this way we will get a triangle on the sheet. From there we are going to fold one of the corners of the triangle upwards forming a kind of a boat with the leaf, which all these folds will help us to mark the leaf and little by little we will get the flower of the tulip.

|
 |
Ahora vamos a abrir toda la hoja y podremos notar que tenemos varias líneas marcadas en la hoja, gracias a los dobles del paso anterior. Volvemos a repetir lo mismo, pero esta vez solo vamos a doblar las caras de la hoja hacia arriba como se notan en las fotos, para así poder obtener parte de la flor de ese gran tulipán de papel.
Now we are going to open the whole sheet and we will be able to notice that we have several lines marked on the sheet, thanks to the doubles of the previous step. We repeat the same thing again, but this time we are only going to fold the sides of the sheet upwards as shown in the pictures, so we can get part of the flower of that big paper tulip.

|
 |
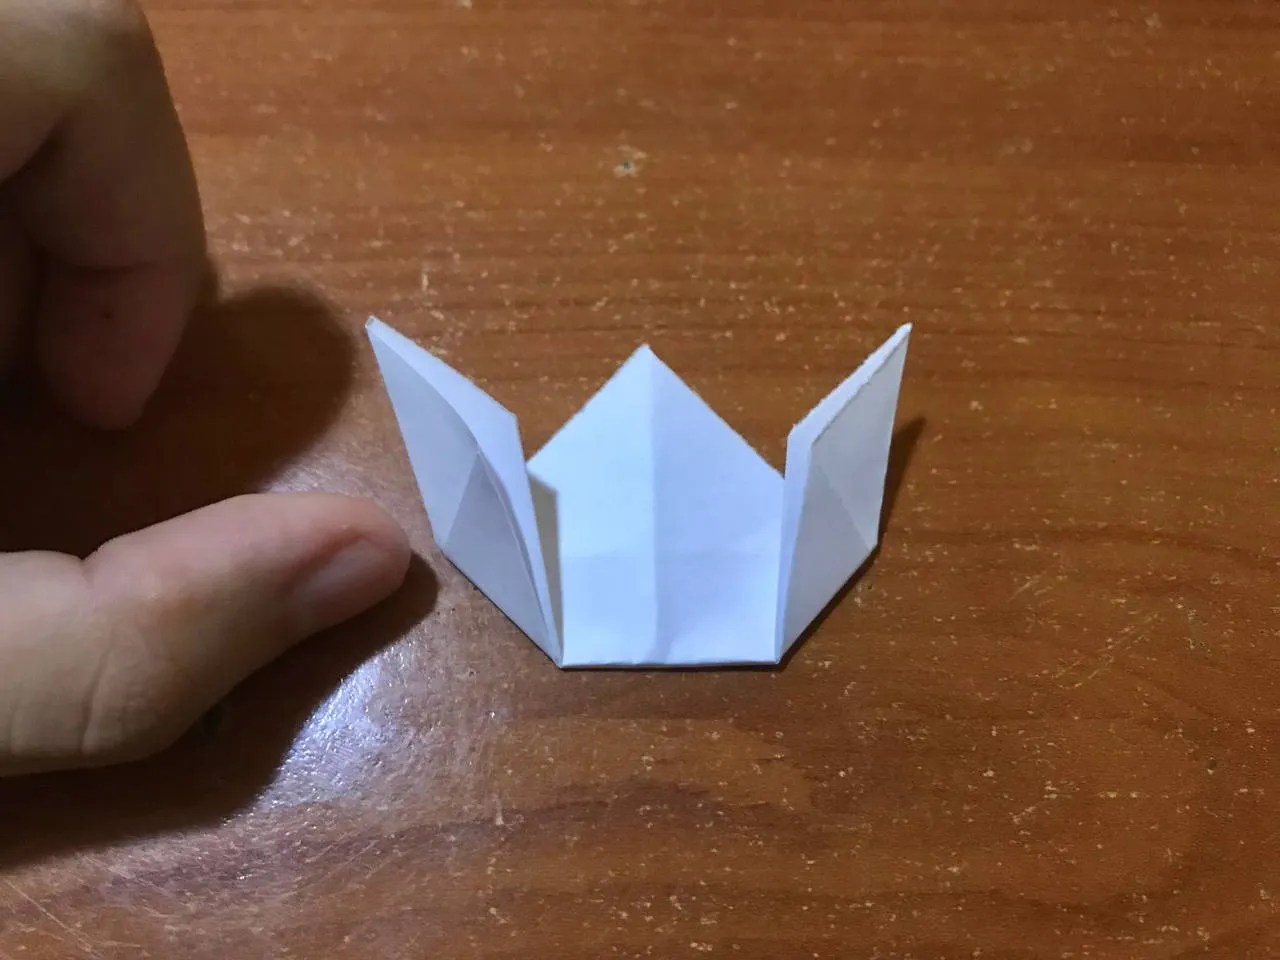
Seguidamente, vamos a doblar los dos extremos de la hoja hacia arriba con mucho cuidado, sin dañar nada con la idea de sacar los pétalos de la flor, donde en cada extremo será un pétalo, una vez dobla vamos a abrir un poco la hoja y de esa manera hacer un pliegue hacia adentro para que así se pueden sostener, eso lo vamos a repetir en ambos lado de la hoja y así de fácil vamos a tener la flor de ese gran tulipán de papel de una manera sobresaliente.
Next, we will fold the two ends of the sheet upwards very carefully, without damaging anything with the idea of removing the petals of the flower, where at each end will be a petal, once folded we will open the sheet a little and thus make a fold inward so that they can be held, that we will repeat on both sides of the sheet and so easy we will have the flower of this great paper tulip in an outstanding way.
|

|

|
Ahora vamos a tomar el cuadrado más grande con la idea de sacar la parte de debajo de la flor, es decir el tallo y las hojas, donde vamos a comenzar a doblar la hoja nuevamente por la diagonal para así lograr trazar una gran línea, marcamos muy bien. Una vez listo eso abrimos la hoja y vamos a llevar los dos extremos hacia el centro y nos quedará especie de un gran cono, como se nota en la foto.
Now we are going to take the biggest square with the idea of taking out the part below the flower, that is to say the stem and the leaves, where we are going to start folding the leaf again on the diagonal in order to draw a big line, we mark it very well. Once that is done, we open the leaf and we will bring the two ends to the center and we will have a kind of a big cone, as shown in the photo.

|
 |
Seguimos doblando el otro lado de la hoja hasta la línea del centro de la misma manera, con mucho cuidado y ahora si no quedara un rombo en la hoja. Hacer esos dos dobles no permitirá armar con mayor tranquilidad el tallo y algunas hojas del tulipán, por eso se tiene que hacer con mucho cuidado. Allí mismo repetimos nuevamente el mismo paso de doblar hacia arriba y esta vez si nos quedará más pequeño todo y se tiene que aplicar un poco de fuerza, para poder lograr las líneas en el papel.
We continue folding the other side of the leaf to the center line in the same way, very carefully and now if there will not be a rhombus on the leaf. Making these two folds will not allow us to assemble the stem and some leaves of the tulip with more tranquility, so it has to be done very carefully. Right there we repeat again the same step of folding upwards and this time everything will be smaller and we have to apply a little force to achieve the lines on the paper.

|

|

|
Luego vamos a doblar el papel por todo la mitad, con mucho cuidado y de allí vamos a hacer un pequeño pliegue con el papel que sacamos y de esa manera poder lograr obtener el tallo y la hoja, un paso algo complicado, por eso se tiene que hacer muy bien y doblar el papel por la línea correcta, una vez que hagas eso, tendrás la segunda parte del esa gran flor lista.
Then we are going to fold the paper in half, very carefully and from there we are going to make a small fold with the paper that we took out and in that way we can get the stem and the leaf, a somewhat complicated step, so it has to be done very well and fold the paper along the right line, once you do that, you will have the second part of this great flower ready.

|

|

|
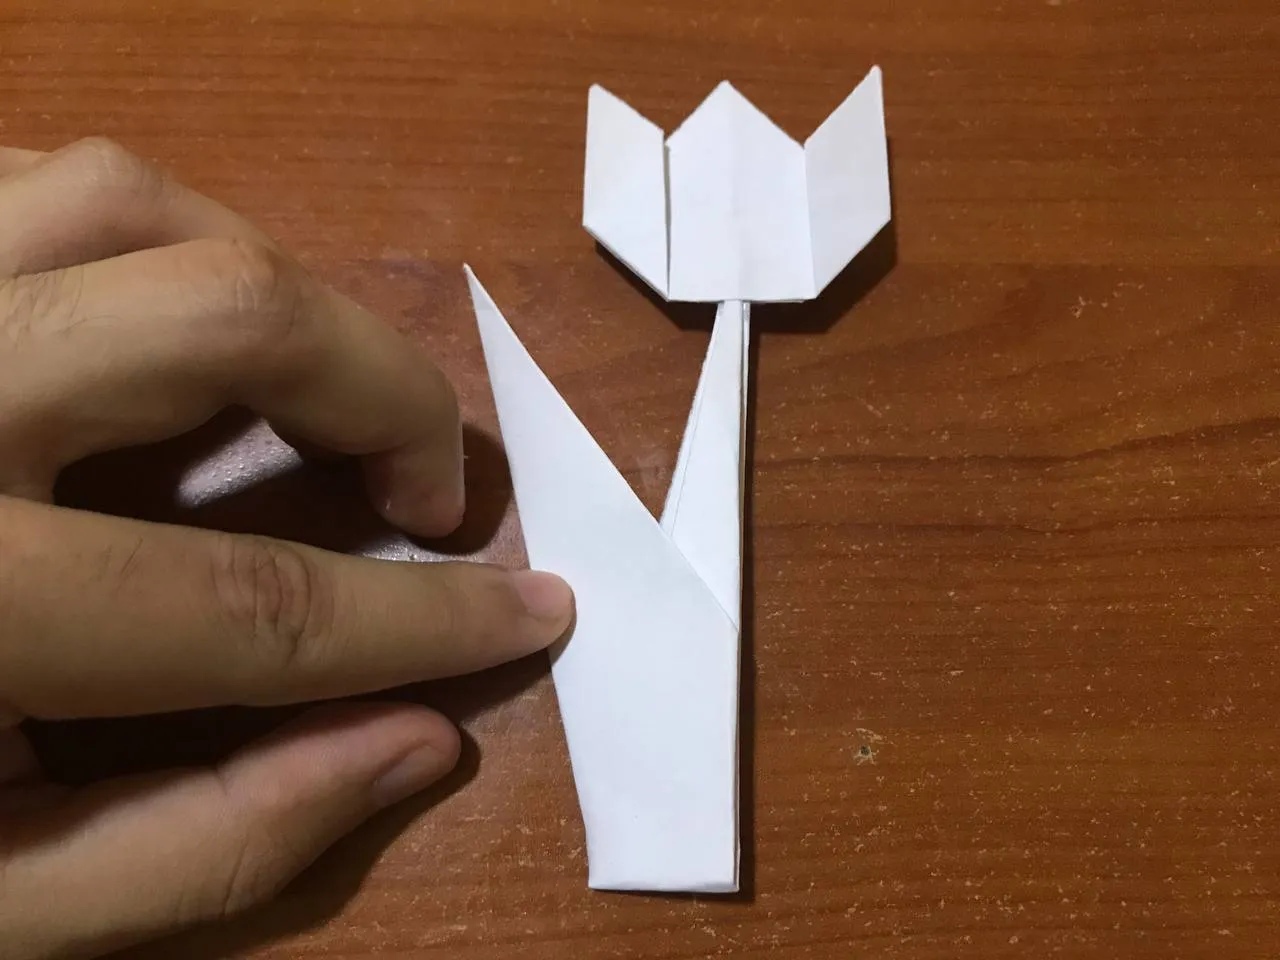
Por último, con la ayuda de la pega, vamos a unir el tallo con la gran flor de tulipán, donde la pegamos del tallo más fino con mucho cuidado, que quede en el centro y con eso damos por terminado la gran flor de tulipán de papel.
Finally, with the help of the glue, we are going to join the stem with the big tulip flower, where we glue the thinner stem very carefully, so that it remains in the center and with that we finish the big paper tulip flower.
Resultado // Result


Un resultado muy bonito, encantador y queda de ese tamaño por las medidas del papel que le dimos, sin embargo, esas medidas pueden variar y de esa manera lograr muchas flores de tulipanes y puedan regalarlas, conservarlas, ponerlas de decoración y muchas otras cosas. Así que nos vemos en la próxima con otro origami.
A very nice and charming result, and it is that size because of the paper measures we gave it, however, these measures can vary and thus achieve many tulip flowers and can give them as gifts, keep them, put them as decoration and many other things. So see you next time with another origami.
Main image edited in Canva.
Fotos tomadas con un Iphone 7 // Photos prises avec un iPhone 7.
