
Hello friends, I hope you are very well, today I want to show you how I made a scale model of the Volkswagen car. For this project I used 12 cans of beer and it took me 3 days to make it. I based it on a model from the 70's. Some parts of the body had to be drawn on paper and then cut out because it was very difficult to calculate the measurements directly from the cans. Hope you like.
Hola amigos, espero que esten muy bien, hoy quiero mostrarles como hice un modelo a escala del auto Volkswagen. Para este proyecto utilicé 12 latas de cerveza y tardé 3 días en hacerlo. Me basé en un modelo de los años 70. Algunas partes de la carrocería tuve que dibujarlas en papel y luego recortarlas porque era muy dificil calcular las medidas directamente desde las latas. Espero que les guste.

PROCESS


The first part of the body that I made were the doors and windows, as this model has a relatively easy design, I made the templates directly on the can. I made the necessary cuts leaving space for the place where the pieces would be glued together, in this way I made the doors on the left and right side.
La primera parte de la carrocería que hice fueron las puertas y ventanas, como este modelo tiene un diseño relatibvamente facil, hice directamente las plantillas sobre la lata. Hice los cortes necesarios dejando espacio para el lugar donde serían unidas las piezas con pegamento, de esta manera hice las puertas del lado izquierdo y derecho.


After the doors I started with the hood, it is a very difficult part to do since it cannot be made from a single piece but consists of several joined to give it shape. So I draw the central part which is the simplest and then I make two templates for the side part, after making them on paper I cut them out on the can and take out both pieces, then in the indicated place we join it with glue.
Despues de las puertas comencé con el capó, es una parte de hacer muy dificil ya que no puede hacerse de una sola pieza sino que consta de varias unidas para darle forma. Así que dibujo la parte central que es la más sencilla y despues hago dos plantillas para la parte de los lados, luego de hacerlas en papel las recorto sobre la lata y saco ambas piezas, luego en el lugar señalado vamos uniendola con pegamento.


Now it's time to join the doors we made in the first place with the piece that represents the hood. We take the front end of the doors where it has a capo and from that side we will join the hood using glue. Once this process is complete, we make the piece where the windshield goes, we cut it out measuring the space where it will be placed, and we also place it in place with glue.
Ahora es el momento de unir las puertas que hicimos en primer lugar con la pieza que representa el capó. Tomamos el extremo delantero de las puertas donde tiene una cejilla y de ese lado uniremos al capó utilizando pegamento. Una vez completado este proceso hacemos la pieza donde va el parabrisas, lo recortamos midiendo el espacio donde irá puesto, y también lo colocamos en su sitio con pegamento.


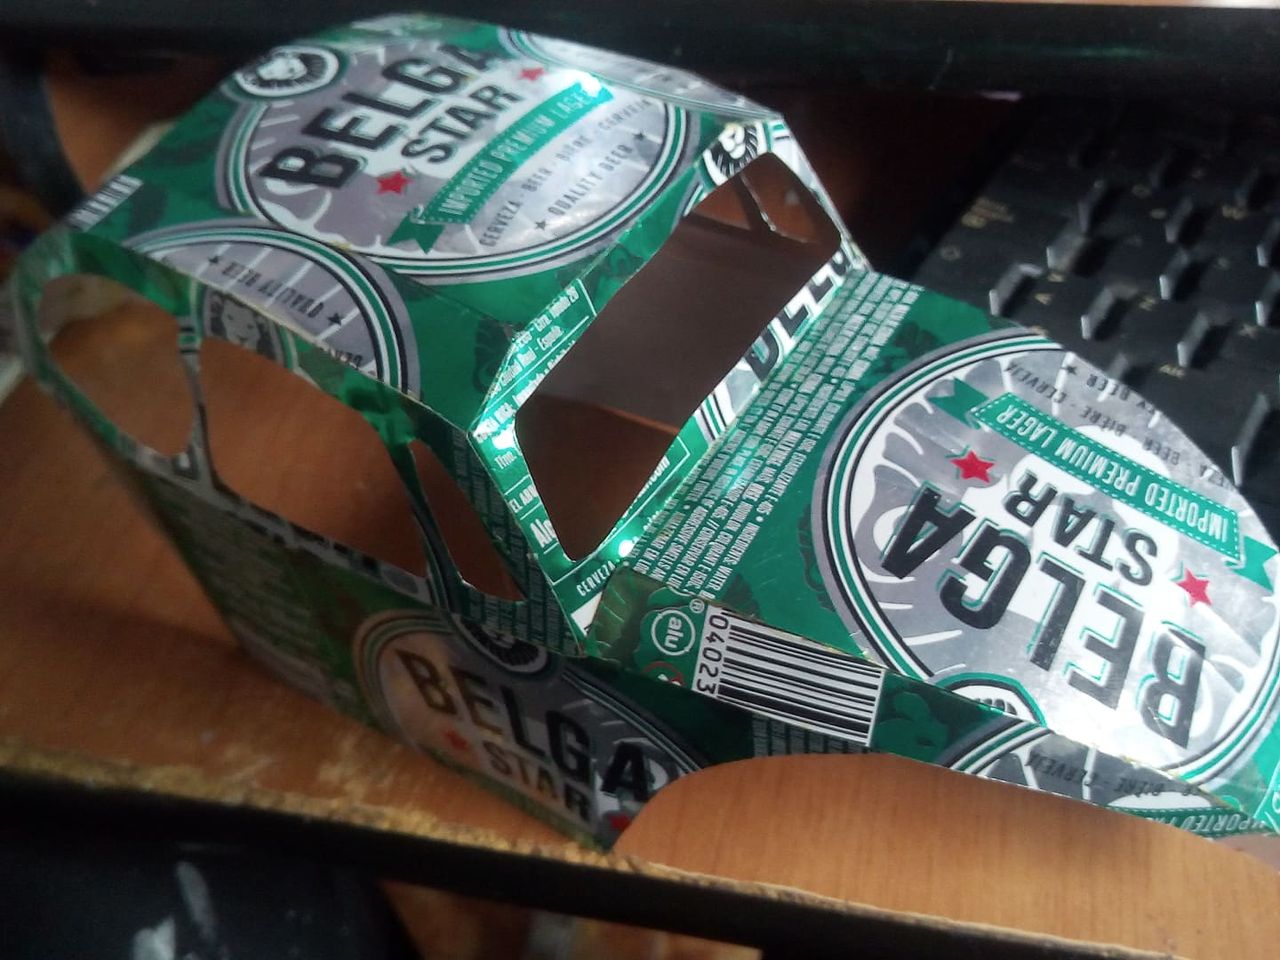
Next we will do the back part which is a bit similar to the front part. We make two templates like the previous ones that serve us to extend the door piece in the back part, then on states two we will place one that serves to join both parts. Then we finish placing the roof, as you can see the body of the volkswagen has already taken shape and looks great.
Seguidamente haremos la parte trasera que es un poco similar a la parte delantera. Hacemos dos plantillas como las anteriores que nos sirvan para extender la pieza de las puertas en la parte trasera, luego sobre estados dos colocaremos una que nos sirvapara unir ambas partes. Luego culminamos colocando el techo, como se puede observar la carrocería del volkswagen ya ha cobrado forma y luce muy bien.


Now we will make the fenders of the volkswagen, we will take 4 cans and remove the top cover, we will use this circular part as follows. We are going to measure with a ruler the distance that there is in the place where the gang guards go, that will be the measurement that we will use to cut the pieces. We will do it in the following way, following the line of curvature and leaving space so that they can be joined. We will cut 4 pieces in total.
Ahora haremos los guardafangos del volkswagen, tomaremos 4 latas y retiraremos la tapa superior, vamos a utilizar esta parte circular de la siguiente manera. Vamos a medir con una regla la distancia que hay en el lugar que van los guardagangos, esa será la medida que utilizaremos para cortar las piezas. Lo haremos de la siguiente forma, siguiendo la linea de la curvatura y dejaremos espacio para que se puedan unir. Cortaremos 4 piezas en total.


Then we will put each piece in its place. We put enough glue and let it dry very well so that the process looks good. As we can see, the Volkswagen is almost complete. We just need to add a few details.
Despues iremos colocando cada pieza en su lugar. Ponemos el pegamento suficiente y dejamos secar muy bien para que el proceso quede bien. Como podemos observar ya el Volkswagen está casi completo. Solo nos falta agregar unos pocos detalles.


To make the glasses we will use plastic which we can extract from bottles or containers. We cut it following the model of the windows and join with glue. Then we make the accessory that goes on the bottom of the doors, we will use this later to glue the floor. We'll also make the fenders where we'll put them in place.
Para hacer los vidrios utilizaremos plástico el cual podemos extraer de botellas o recipientes. Lo cortamos siguiendo el modelo de las ventanas y unimos con pegamento. Luego hacemos el accesiorio que va en la parte inferior de las puertas, esto lo utilizaremos más adelante para pegar el piso. También haremos las defensas en las pondremos en su lugar.


Now the next step is to make the floor where we will place the seats. We will use cardboard so that the surface remains hard. We measure from the front of the car to the back, that will be the length, and we measure from the doors and that will be the width, we will leave enough room for the wheels to fit. We paste the surface by the ends that we use to measure, and finally we draw the line where the axles of the wheels will go.
Ahora el siguiente paso es hacer el piso donde colocaremos los asientos. Utilizaremos cartón para que la superficie quede dura. Medimos desde la parte frontal del auto hasta la parte trasera, ese será el largo, y medimos desde las puertas y ese será el ancho, dejaremos espacio suficiente para que las ruedas entren. Pegamos la superficie por los extremos que utilizamos para medir, y por último trazamos la linea por donde iran los ejes de las ruedas.


We make the wheels using the bases of the cans, we take 8 in total and then join them together and we will have the 4 wheels. Let's open a small hole in the middle where we will put the axes. Then we will make some small tubes that we will put in the part that we measured before and through them we will pass the axles of the wheels, in this way the car will be able to roll.
Las ruedas las hacemos utilizando las bases de las latas, tomamos 8 en total y luego las unimos una con otras y tendremos las 4 ruedas. Abriemos un pequeño hoyo en el medio por donde pondremos los ejes. Despues haremos unos pequeños tubos que pondremos en la parte que medimos antes y a traves de ellos pasaremos los ejes de las ruedas, de esta forma el auto podrá rodar.


To finish we will make the front and rear lighting headlights and place them in their corresponding places. We will also make the handles to open the doors, using the security ring that the cans have and that are used to open them, we cut the rings in half, fold it and then stick it on each door. Thus we will have finished this scale model.
Para finalizar haremos los faros de iluminación delanteros y traseros y los colocaremos en sus lugares correspondientes. También haremos las manillas para abrir las puertas, utilizando el anillo de seguridad que tienen las latas y que sirven para abrirlas, cortamos los anillos por la mitad, lo doblamos y luego lo pegamos en cada puerta. Así habremos finalizado este modelo a escala.
FINAL WORK


This is how this scale model of the Volkswagen car has been finished, a car with a dark origin, since according to the official story, it was ordered to be built by the dictator Adolf Hitler as an accessible car for the German working class. This car has been one of the longest-running models in history as it remains operational and has a design that makes it very useful. I hope you liked it, it had been a long time since I embarked on a project of many days, I really like working with this type of pieces, and I hope to be able to bring models of a more complex scale and thus share my creations with the community. I say goodbye see you soon and don't forget to recycle, in our homes there are always things that we can give a second chance. See you soon. Greetings.
Así ha quedado finalizado este modelo a escala del auto Volkswagen, un auto con un origen oscuro, ya que según cuenta la historia oficial, fue mandado a construir por el dictador Adolf Hitler como un auto accesible para la clase obrera alemana. Este auto ha sido uno de los modelos más longevos de la historia al mantenerse operativo y tener un diseño que lo hace muy útil. Espero que les haya gustado, tenía tiempo que no me embarcaba en un proyecto de muchos días, me gusta mucho trabajar este tipo de piezas, y espero poder traer modelos de una escala más compleja y así compartir con la comunidad mis creaciones. Me despido hasta pronto y no olviden reciclar, en nuestros hgares siempre hay cosas que podemos darle una segunda oportunidad. Hasta pronto. Saludos.