Saludos a todos en la comunidad, se que a muchos les ha pasado que después de un tiempo sus globos decorativos se desinflan o no retienen el aire por suficiente tiempo, si no se logra ver por donde se escapa el aire no hay manera de solucionarlo y termina convirtiéndose en basura muy pronto, no es que dichos globos sean costosos pero creo que no se les saca provecho por suficiente tiempo, es decir, tienen una vida útil muy corta y eso genera aun mas contaminación, por eso cuando noté que uno de los globos que tiene mi hijo con sus personajes favoritos ya no podía mantener inflado, decidí reutilizar el material y convertirlo en un cuadro decorativo para ampliar su vida útil, acá les comparto el paso a paso por si quieren intentarlo 😉
Greetings to everyone in the community! I know many of you have experienced your decorative balloons deflating or not holding air long enough after a while. If you can't see where the air is escaping, there's no way to fix it, and they end up as trash very quickly. It's not that these balloons are expensive, but I think they aren't used for long enough; they have a very short lifespan, which creates even more pollution. That's why, when I noticed that one of my son's balloons with his favorite characters couldn't stay inflated anymore, I decided to reuse the material and turn it into a decorative picture to extend its lifespan. Here's the step-by-step guide if you'd like to try it! 😉

Materiales / Materials
- Globo decorativo
- Tijera
- 16 paletas de madera
- Silicón
- Decorative balloon
- Scissors
- 16 wooden sticks
- Silicone

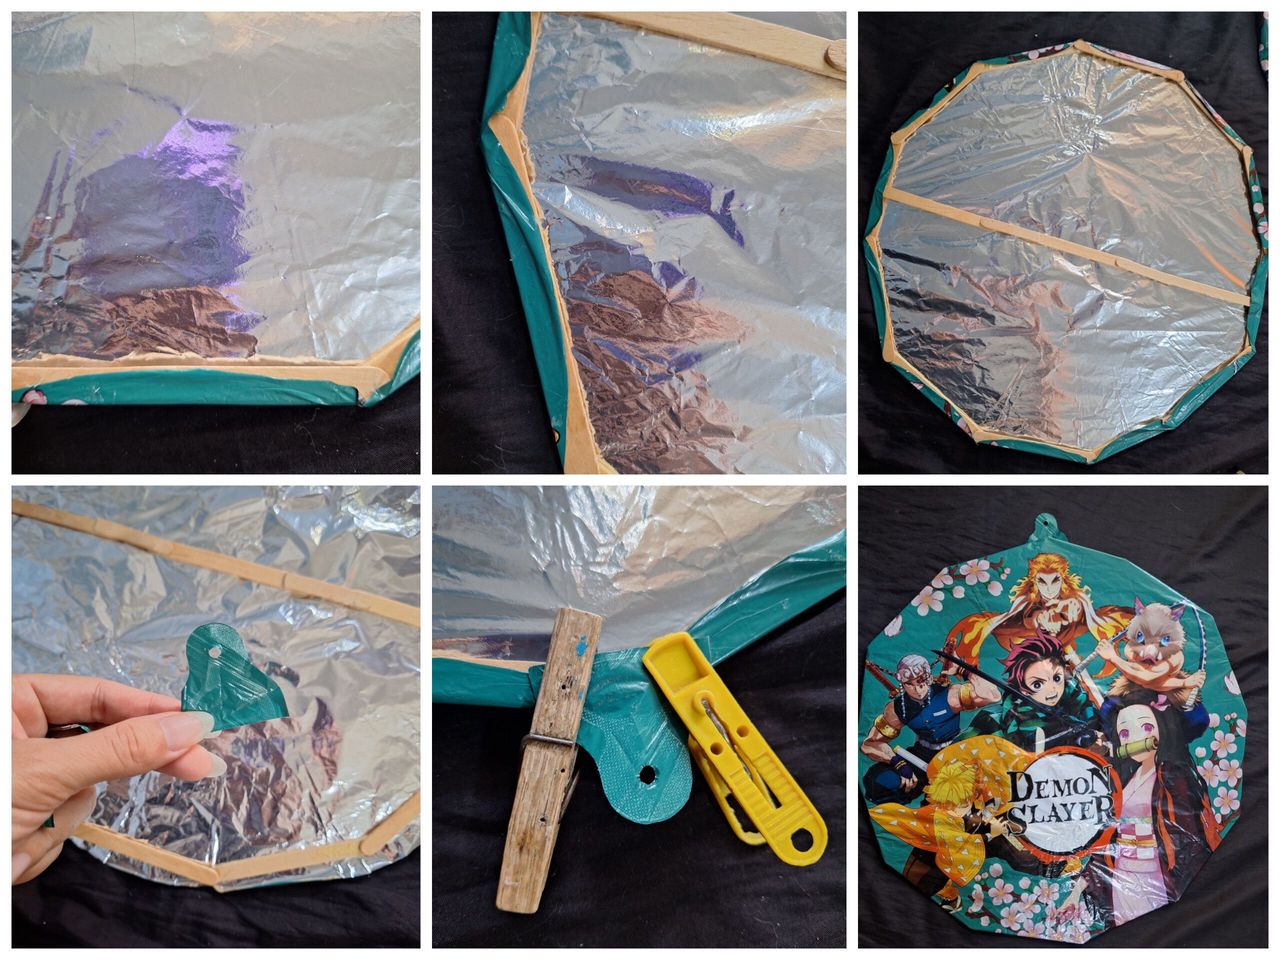
El primer paso es cortar el globo por todo el borde, de ese modo se obtienen dos circunferencias iguales, se puede hacer otro cuadro con el que queda, pero en este caso solo hice uno.
The first step is to cut the balloon all around the edge, that way you get two equal circles, you can make another square with the one that is left, but in this case I only made one.

Presentar las paletas por el borde del globo para medir la distancia a la que se debe pegar, se deben superponer en las puntas de las paletas, para la circunferencia se necesitan 12 paletas mientras que para la línea del centro 4. Luego pegar con silicón las paletas y dejar secar el marco formado.
Position the popsicle sticks along the edge of the balloon to measure the distance at which they should be glued. They should overlap at the tips of the popsicle sticks. 12 popsicle sticks are needed for the circumference, while 4 are needed for the center line. Then glue the popsicle sticks with silicone and let the frame dry.

Colocar las paletas encima del círculo por la cara de atrás y pegar los bordes a las paletas, cortar la parte del globo cerca de donde se encontraba la válvula de llenado de aire para aprovechar el colgante y pegarlo en la parte superior para poder colgar el cuadro 😊
Place the popsicle sticks on top of the circle from the back and glue the edges to the sticks. Cut the part of the balloon near where the air valve was located to use the hanging loop and glue it to the top so you can hang the picture. 😊
Resultado / Result

Imágenes tomadas con dispositivo Samsung A54.
Pictures taken with Samsung A54 device.

Espero les haya gustado. Les invito a leer mis próximas publicaciones y siempre estaré dispuesta a responder sus preguntas y comentarios, también pueden seguirme y contactarme en cualquiera de mis redes sociales. ¡Muchas gracias!
I hope you liked it. I invite you to read my next publications and I will always be willing to answer your questions and comments, you can also follow me and contact me on any of my social networks. Thank you!
Facebook
Twitter
Instagram
Ko-Fi
Discord: irenenavarroart#0361