
INGLÉS
¡Bienvenidos a mi blog!
Hola queridos amigos de esta comunidad #hivediy, espero se encuentren bien, ya casi finalizando la semana mayor. Dios les bendiga.
También doy gracias a Dios por cuidar de todos, me divertí demasiado . Ahora a descansar para el día lunes ir a trabajar.
Eso sí no descuido mis proyectos , a pesar de tener unos días de vacaciones estoy trabajando. Siento que si no lo realizó falta como algo en mi vida. Aunque no lo crean esto distrae y uno se olvida de la situación o de algunos problemas.
El día de hoy quiero mostrar como realizar una hermosa pulsera con hilo cola de ratón color azul , en macramé con cadenas y nudos alondra.
Esta pulsera está de modas y en estos días es especial usarla, llama la atención. Hoy la llevé a la playa, mis amigas quedaron encantada de lo hermosa que se ve la pulsera. Querian que le regalará la pulsera, cada vez que realizó una pulsera para mí siempre se enamoran y al final se las regalo.
ENGLISH
Welcome to my blog!
Hello dear friends of this #hivediy community, I hope you are well, almost ending the major week. God bless you.
I also thank God for taking care of everyone, I had too much fun. Now to rest and go to work on Monday.
I am not neglecting my projects, even though I have a few days of vacation I am working. I feel that if I don't do it I am missing something in my life. Believe it or not this distracts and one forgets about the situation or some problems.
Today I want to show you how to make a beautiful bracelet with blue mouse tail thread, in macramé with chains and lark's foot knots.
This bracelet is in fashion and these days it is special to wear it, it attracts attention. Today I took it to the beach, my friends were delighted with how beautiful the bracelet looks. They wanted me to give the bracelet as a gift, every time I make a bracelet for them they always fall in love with it and in the end I give it to them as a gift.

Materiales para la realización de la hermosa pulsera hecha con cadena y nudo alondra:
- 2 metros de hilo cola de ratón, color azul.
- Tijera.
- Cadena de bisutería color plateada.
- Yesquero.
- Regla.
- Carpeta con gancho
- Gancho sujetador pequeño.
- 2 mostacillas grandes.
Materials for the realization of the beautiful bracelet made with chain and lark knot:
- 2 meters of mouse tail thread, blue color.
- Scissors.
- Silver-colored jewelry chain.
- Tinder.
- Ruler.
- Folder with hook
- Small hook fastener.
- 2 large beads.

Paso a paso para la realización de la hermosa pulsera con cadenas y nido alondra:
Paso 1:
- Lo primero que haremos es, medir con la regla el hilo cola de ratón color azul de 2 metros. Y otro pedazo de 25 centímetros. Luego recortar con las tijeras.
- Quemar las puntas con el yesquero par aque se haga más fácil la realización de la pulsera.
Step by step for the realization of the beautiful bracelet with chains and lark's nest:
Step 1:
- The first thing we will do is, measure with the ruler the blue mouse tail thread of 2 meters. And another piece of 25 centimeters. Then cut with scissors.
- Burn the ends with the tinder to make it easier to make the bracelet.

- Introducir dentro del hilo cola de ratón color azul, la mostacilla y hacer un nudo sencillo, para que no se salga y quemar la punta con el yesquero.
- Ahora medir con la regla 15 centímetros y hacer un nudo sencillo.
- Introduce inside the blue mouse tail thread, the bead and make a simple knot, so that it does not come out and burn the tip with the tinder.
- Now measure with the ruler 15 centimeters and make a simple knot.

- Sujetar el pedazo de hilo cola de ratón color azul, en la carpeta con gancho.
- Ahora utilizaremos la cadena, tiene una medida de 20 centímetros.
- Comenzamos a meter el hilo cola de ratón de la siguiente manera, metes el hilo de arriba hacia abajo dentro del hueco de la cadena y sale por el medio de los hilos.
- Luego metes el hilo por debajo del mismo hueco de la cadena y lo sacas por arriba ,pero por el medio de la cadena. Aquí tenemos nuestro primer punto alondra.
- Attach the piece of blue mouse tail thread to the folder with a hook.
- Now we will use the chain, it has a measure of 20 centimeters.
- We begin to put the mouse tail thread in the following way, you put the thread from top to bottom inside the hole of the chain and it comes out in the middle of the threads.
- Then you put the yarn underneath the same hole in the chain and pull it out from the top, but through the middle of the chain. Here we have our first lark stitch.
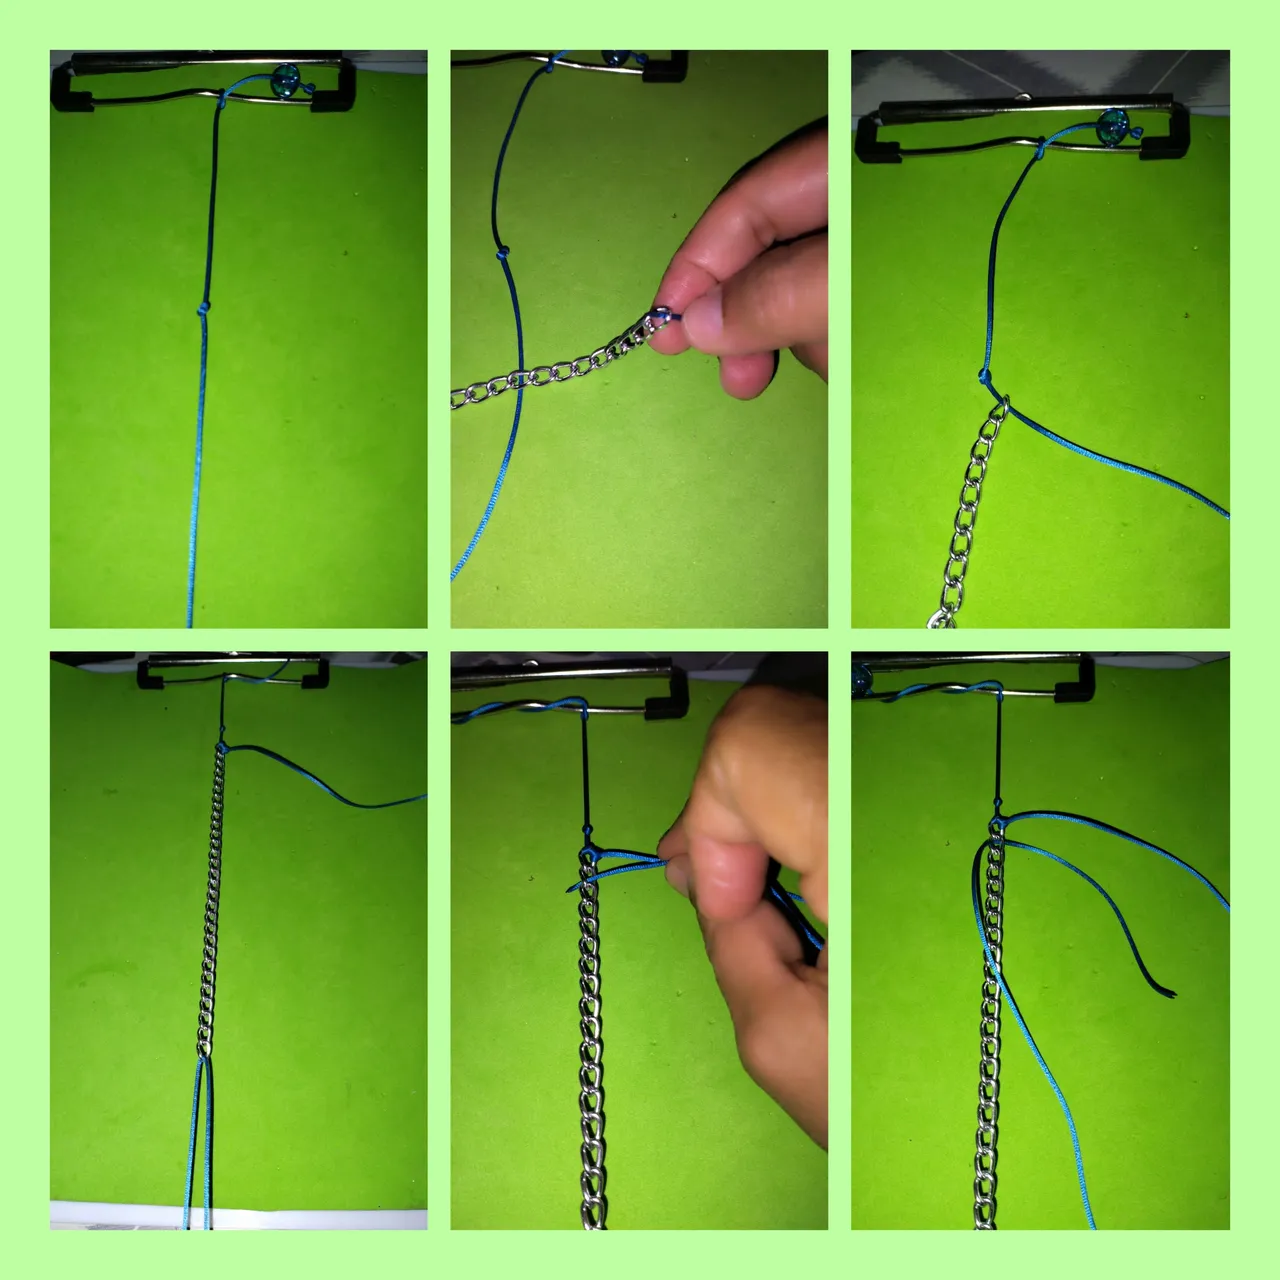

- Así van a realizar todos los nudos alondra,
- Cuando hayan realizado dos nudos alondra en cada hueco de la cadena. Para el siguiente hueco de la cadena, dejan un pedazo de hilo en forma de semicírculo. Traten que sea del mismo tamaño.
- This is how you will tie all the lark's knots,
- When you have made two lark's knots in each hole of the chain. For the next hole in the chain, leave a piece of yarn in the shape of a semicircle. Try to make it the same size.

- Cuando hayan terminado de hacer los nudos alondra en cada hueco de la cadena.
- Procedemos a colocar la otra mostacilla de color azul.
- Hacen un nudo al final y queman la punta con el yesquero.
- Luego para colocar lo que permitirá abrir y cerrar la pulsera, tomamos el otro pedazo de hilo cola de ratón,
Vamos a hacer nudos planos. - Colocamos la pulsera con las puntas de un lado y de otro, tomamos el hilo , hacemos un nido sencillo , colocamos el hilo derecho hacia la izquierda. El hilo de la izquierda lo pasamos sobre el hilo de la derecha y lo introducimos por dentro del hueco y lo sacamos , jalamos el hilo hasta pegarlos de los dos hilos centrales. Ahora lo hacemos comenzando por la izquierda.
- Cuando terminemos con todo el hilo. Quemamos con el yesquero.
- Y así ya terminamos con la hermosa pulsera. Vieron lo hermosa que quedó.
- When you have finished making the lark's knots in each hole of the chain.
- Proceed to place the other blue beads.
- Make a knot at the end and burn the tip with the tinder.
- Then to place what will allow to open and close the bracelet, we take the other piece of mouse tail thread,
We are going to make flat knots. - We place the bracelet with the ends on one side and the other, we take the thread, we make a simple nest, we place the right thread to the left. The thread on the left we pass it over the thread on the right and we introduce it inside the hole and pull it out, we pull the thread until we glue the two central threads together. Now we do it starting from the left.
- When we finish with all the thread. We burn with the tinder.
- And so we are done with the beautiful bracelet. You saw how beautiful it was.


Aquí el resultado final de la hermosa pulsera
Here is the final result of the beautiful bracelet

Espero que sea de su agrado.
I hope you like it.

Las fotos son mías , tomadas con teléfono INfinix, editado con incollage y traducido con Deepl.
The photos are mine, taken with INfinix phone, edited with incollage and translated with Deepl.