


Hello my dear readers, I hope you are well and that you have or have had an excellent and wonderful day. Here in Venezuela we don't normally celebrate Halloween, however since a few years ago, I don't know if in all the cities of Venezuela, but I am going to tell you about the city where I live, where they have been celebrating this kind of festivity.
In the city of Lechería, in the state of Anzoátegui, they have created what they call a Halloween Route or trick or treat route. Many stores, restaurants, clothing and shoe stores, among others, agreed to create this route, which will be for children from 2 to 12 years old. A main store is in charge of giving a map to all participants, of the stores they must visit looking for candy and they must stamp the map as proof that the store was visited. Once the whole route is done, the participants arrive to a specific place where they all meet and have a nice time, showing their spooky costumes.
I have seen many places that decorate them with images alluding to the holiday and so today I want to share with you an ornament that can be placed in any environment, either to decorate a table at home or the desk of an office. I show you the step by step below.


STEP BY STEP:
To start I looked for a plastic bottle and I will use only the top of the bottle, in my case I already had a bottle from another job I had done. I will grab the cardboard and pull out a circle the size of the diameter of the bottle.

With the piece of black fabric, I will line the cardboard circle that I just cut out, I will make some picks all around it, so that when I glue it with the silicone, it will have a better finish. Then I will cut out a circle with the same black fabric and glue it to the circle to cover up the pickets I just glued so it doesn't look ugly.
 |  |  |
|---|
I will take the branches and plastic container and measure a size, neither too big nor too small to be able to cut the branches, so that when I am going to place them inside the container, they do not stick to the plastic.


Once I have the exact size of the branches, I take the circle that I lined and in the center I glue the branches, adding enough silicone, I hold the branches while I wait for the silicone to dry well, so they don't go sideways.

With the paper, I cut out two rectangles, the truth is that they do not have a specific size, but they are about 5 x 6 cm.

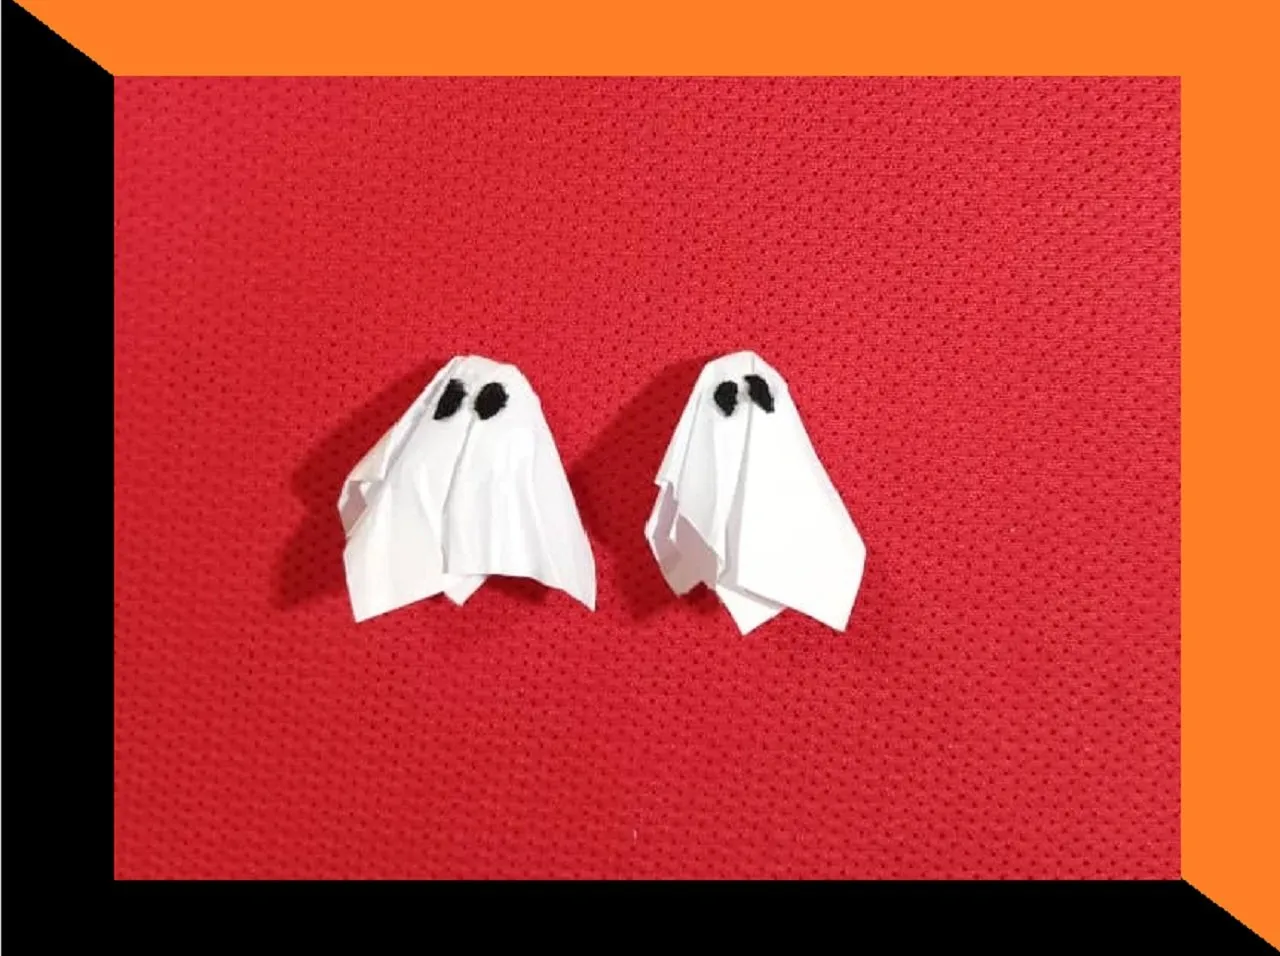
I will take a rectangle and place it on one finger of my hand, with my other hand, I will wrap it and press it into the shape shown in the image.


I will cut out with the black fabric, two mini drops, which I will glue to the paper, simulating the eyes of the little ghost. And I will do the same procedure with the other paper to have my two ghosts, as shown in the image.

Now I proceed to decorate the circle where I placed the branches, glue one by one each stone with the silicon, surrounding the branches and making a kind of hill.
 |  |  |
|---|
I will take the ghosts and put some silicone on the top and carefully glue them to the dry branch, trying not to flatten them and lose their shape.
 |  |
|---|
I will cut a black strip the width of the lid and the length that covers all around it, glue it with the silicone and then cut out a circle to cover the top.


I will then glue the plastic container to the base. I will cut a long strip of the black fabric about 1.5 cm wide and glue it around the edge of the base to cover any imperfections.
 |  |  |
|---|
I will then glue the plastic container to the base. I will cut a long strip of the black fabric about 1.5 cm wide and glue it around the edge of the base to cover any imperfections.

I say goodbye as always, but not before thanking you for dedicating a little of your valuable time to me. I hope to see you in my next publication, be well and take care of yourselves.
Original creation content:
👻 All photos are my own taken and edited with my Alcatel cell phone.
🎃 The cover image was made with Canva application and edited by me.
👻 The images of the divider, were taken from the Canva page and edited by me in Paint.
🎃 The English translation was done with the help of DeepL.
👻 The letters indicating the languages, were taken from the Cooltext page.

Hola mis queridos lectores, espero que se encuentren bien y que tengan o hayan tenido un excelente y maravilloso día. Aquí en Venezuela normalmente no se celebra el día de Halloween, sin embargo desde hace unos años atrás, no se si en todas las ciudades de Venezuela, pero les voy hablar de la ciudad donde yo vivo, donde si han estado celebrando este tipo de festividad.
Les cuento un poquito de como lo hacen, en la ciudad de Lechería, en el estado Anzoátegui, han creado lo que llaman una Ruta Halloween o ruta dulce o truco. Muchos comercios tanto restaurantes, tiendas de ropa o zapatos, entre otras, se pusieron de acuerdo para crear esta ruta, la cual será para que los niños desde los 2 hasta los 12 años la realicen. Un local principal se encarga de dar un mapa a todos los participantes, de las tiendas que deberán visitar buscando dulces y deben de sellarle el mapa como muestra de que fue visitado ese local. Una vez realizado toda la ruta se llega a un sitio específico donde todos se reúnen y pasan un rato bastante agradable, mostrando sus espeluznantes trajes.
He visto muchos locales que los decoran con imágenes alusivas a la festividad y para ello hoy les quiero compartir un adorno que pueden colocar en cualquier ambiente, bien sea para decorar una mesa en la casa o el escritorio de una oficina. Les muestro el paso a paso a continuación.

PASO A PASO:
Para empezar busqué una botella de plástico y usaré solo la parte de arriba de la botella, en mi caso ya tenía una botella de otro trabajo que había realizado. Agarraré el cartón y sacaré un círculo del tamaño del diámetro de la botella.
Con el retazo de tela negra, forraje el círculo de cartón que acabo de recortar, haré unos piquetes por todo el alrededor, para que al momento de pegarlo con el silicón, tenga un mejor acabado. Luego recorte un círculo con la misma tela negra y la pegaré al círculo para tapar los piquete que acabo de pegar y no se vea feo.
| | |
|---|
Tomaré las ramas y envase de plástico y medire un tamaño, ni muy grande ni muy pequeño para poder cortar las ramas, para que cuando las vaya a colocar dentro del envase, no peguen del plástico.
Ya una vez tenga la medida exacta de las ramas, agarre el círculo que forre y en el centro pegare las ramas, agregando suficiente silicon, sostengo las ramas mientras espero que seque bien el silicón, para que luego no se vayan a ir de lado.
Con el papel, recortaré dos rectángulos, la verdad no tienen una medida específica pero quedaron como de 5 x 6 cm.
Agarrare un rectángulo y lo colocare en un dedo de mi mano, con mi otra mano, lo envolveré y lo presionaré para que quede de esa forma que se muestra en la imagen.
Recortaré con la tela negra, dos mini gotas, las cuales pegaré al papel, simulando los ojos del fantasmita. Y haré el mismo procedimiento con el otro papel para así tener mis dos fantasma, quedaron tal como se aprecia en la imagen.
Ahora procedo a decorar el círculo donde coloque las ramas, pegue de una en una cada piedra con el silicon, rodeando las ramas y haciendo una especie de loma.
| | |
|---|
Agarrare los fantasma y les colocare un poco de silicón en la parte de arriba y con mucho cuidado los pegare a la rama seca, tratando de que no se aplasten y pierdan la forma.
| |
|---|
Recortare una tira negra del ancho de la tapa y del largo que cubra todo su alrededor, la pegare con el silicon y luego recortare un círculo para cubrir la parte de arriba.
Luego pegare el envase de plástico a la base. Recortare una tira larga de la tela negra como de aproximadamente 1,5 cm de ancho, la pegare en toda la orilla de la base, para cubrir cualquier imperfección que haya quedado.
| | |
|---|
Y ya tengo listo mi adorno de fantasma, listo para decorar cualquier lugar que deseen. Espero que les haya gustado y que lo puedan realizar, es fácil de hacer y bien decorativo.
Me despido como siempre, no sin antes agradecerles por dedicarme un poco de su valioso tiempo. Los espero en mi próxima publicación, pórtense bien y cuídense mucho.
Contenido de creación original:
👻 Todas las fotos son de mi propiedad tomada y editadas con mi celular Alcatel.
🎃 La imagen de portada fue realizada con la aplicación Canva y editada por mi.
👻 Las imágenes del separador, fueron tomado de la página Canva y editado por mí en Paint.
🎃 La traducción al idioma inglés fue realizada con ayuda de DeepL.
👻 Las letras de indicación de los idiomas, fueron tomadas de la página Cooltext.