Hola hijitos reciban un saludo y muchas bendiciones de parte de esta abuelita, hoy les traigo un trabajo que hice ya que en este mes se celebra halloween y a los más pequeños les gusta disfrazarse, por eso le hice este increíble adorno para el cabello, que lo va a usar mi bella flor Lupita cuando llegue la fiesta de Halloween del colegio.
Quiero aprovechar la oportunidad para agradecer la receptividad y el apoyo que ha tenido mi trabajo dentro de este ecosistema maravilloso llamado #hive y que se ha convertido en un medio de sentirme activa nuevamente, luego de años de jubilación, para este post utilicé el traductor deepl versión gratuita y el programa polish, y las fotos fueron tomadas con mi teléfono Xiaomi redmi y son mías.
🎃🦴🕷️ Materiales 🕷️🦴🎃

🎃 Foami verde manzana, naranja, blanco, negro, lila, morado, amarillo, marrón, gris y fucsia escarchado.
🦴 Silicón líquido.
🕷️ Peineta.
🎃 Tijera.
🦴 Regla.
🕷️ Lapicero.
🎃 Plumilla.
🦴 Pintura al frío verde manzana, blanca, roja.
🕷️ Rubor.
Esta aplicación para el cabello lleva muchos detalles, sobre todo son piezas pequeñas que yo fui armando de manera individual y que una vez elaboradas todas lo que hice fue ensamblar todo.
🎃🦴🎃 Paso a paso. 🎃🦴🎃
🎃 Paso 1:

Previamente saque algunos patrones de las figuras con las que voy a trabajar, y di inicio al trabajo con el foami blanco, en el que marque las figuras de la calavera y una vela, luego de dibujar, se procedió a cortarlas.
🦴 Paso 2:

En el foami naranja, marqué y corté dos calabazas, una más pequeña que la otra.
🕷️ Paso 3:

Tome el Foamy morado y lila y en cada uno de ellos marque y recorte la silueta de una urna.
🎃 Paso 4:

Luego recorté dos tiras delgadas una en el foami naranja y otra en el Foami amarillo.
🦴 Paso 5:

A las dos tiras que recorté, le hice varios cortes, luego le fui poniendo silicón líquido y vamos enrollando, estás deben ser pequeñas yo saqué cinco de cada tira, aunque sólo utilice unas pocas, las otras me las reservo para otros trabajos.
🕷️ Paso 6:

En el foami de color gris dibuje y posteriormente recorte un círculo.
🎃 Paso 7:

Ahora vamos a crear cada pieza, inicié con la calavera.
Recorte dos pequeños círculos de el Foami negro a las que le aplique silicón líquido y pegué de la pieza de foami blanca, luego en el foami escarchado fucsia recorte un corazón bien pequeñito, que pegue en el centro del cráneo con el silicón líquido, y con la plumilla dibujamos la boca.
🦴 Paso 8:

Con las pinturas verde manzana, y roja hice varios dibujos a la calavera y con la pintura blanca los ojos.
🕷️ Paso 9:

Tome las dos piezas en forma de ataúd y coloque una sobre la otra, pegando con silicón líquido, también recorté dos círculos pequeños de foami negro y pegamos para formar los ojitos y del foami blanco recorte una pequeña cruz la cual pegamos en el centro.
🎃 Paso 10:

Tome la plumilla y dibuje la boca, después tomé el pincel fino y la pintura blanca y dibuje los ojos, y con otro pincel y el rubor dibuje las mejillas.
🦴 Paso 11:

Del Foami fucsia escarchado recorte una pequeña base que pegue al borde de la vela, luego recorté los dos círculos y los pegue para formar los ojitos, con la pintura roja y el pincel fino dibujé un corazón y con la plumilla dibujé la boca, recorte una pequeña llama del foami amarillo y lo pegue, y como toque final, aplique el rubor para formar las mejillas.
🕷️Paso 12 :

Tome la plumilla y dibuje las líneas de las calabazas y recorte las ramas del foami verde manzana y lo pegué con silicón líquido, y del foami negro recorte los triángulos que son los ojos y la boca y procedi a pegarlos.
🎃 Paso 13:

Juntamos todas las piezas ya elaboradas y el círculo de color gris.
🦴 Paso 14:

Llegó el momento de armar la pieza, para esto nuestro centro será el círculo gris.
Le aplicó silicón líquido a la calavera y pegó, luego pegamos la calabaza.
🕷️ Paso 15:

Pegamos la vela, el ataúd y la otra calavera.
🎃 Paso 16:

En el foami amarillo y en el verde manzana dibujé y recorté unas bambalinas típicas de las fiestas mexicanas y sobretodo del hallowen, luego con el silicón líquido las pegue en la parte de abajo.
🦴 Paso 17:

Con el silicón líquido pegamos las flores que formamos, yo solo use tres, dos amarillas y una naranja y listo hemos terminado de armar.
🕷️ Paso 18:

Aplicó silicón líquido en la peineta y le pegó la pieza de foami ya terminada y dejamos secar.
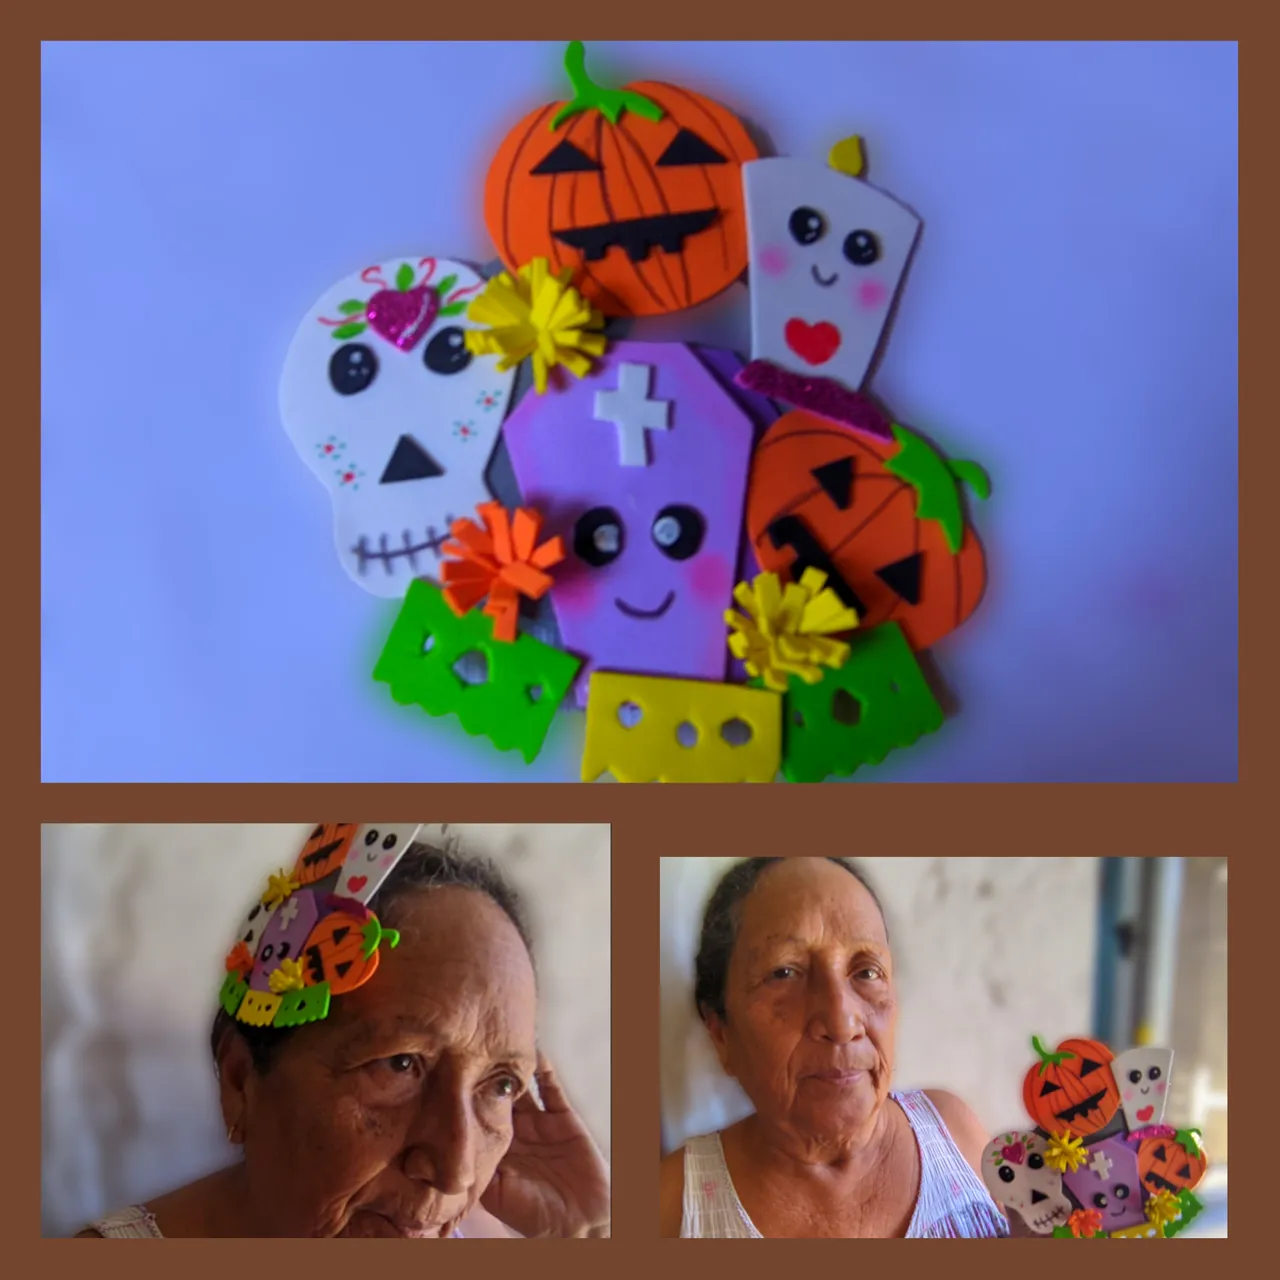
🎃🦴🕷️Fotos finales 🎃🦴🕷️


Cómo pueden ver este trabajo aunque fue un poco largo, es fácil de hacer y queda muy bonito, es un lindo detalle para colocar el el cabello a las princesas de la casa el día de Halloween, espero que les haya gustado y que lo pongan en práctica, pronto les traigo nuevas ideas para esta fiesta tan divertida como lo es el Halloween.
🎃🦴🕷️Nos vemos y que Dios los bendiga a todos 🕷️🦴🎃


🎃🦴🕷️🕷️🎃🦴🕷️🎃🦴🕷️🎃🦴🕷️🎃
🎃 English 🕷️
Hello hi hijitos receive a greeting and many blessings from this grandma, today I bring you a job I did because this month is halloween and the little ones like to dress up, so I made this amazing hair ornament, which will use my beautiful flower Lupita when the school Halloween party arrives.
I want to take this opportunity to thank the receptivity and support that my work has had within this wonderful ecosystem called #hive and that has become a way to feel active again, after years of retirement, for this post I used the free version deepl translator and polish program, and the photos were taken with my Xiaomi redmi phone and are mine.
🎃🦴🕷️ Materials 🕷️🦴🎃
🎃 Apple green, orange, white, black, purple, purple, yellow, brown, grey and fuchsia frosted foami.
🦴 Liquid silicone.
🕷️ Comb.
🎃 Scissors.
🦴 Ruler.
🕷️ Pencil.
🎃 Pencil.
🦴 Apple green, white, red cold paint.
🕷️ Blusher.
This hair application has a lot of details, especially the small pieces that I put together individually and once they were all done, I assembled them all together.
🎃🦴🎃 Step by step. 🎃🦴🦴🎃
🎃 Step 1:
Previously I drew some patterns of the figures I'm going to work with, and I started working with the white foami, on which I marked the figures of the skull and a candle, after drawing, I proceeded to cut them.
🦴 Step 2:
On the orange foami, I marked and cut out two pumpkins, one smaller than the other.
🕷️ Step 3:
Take the purple and lilac Foamy and mark and cut out the silhouette of an urn on each of them.
🎃 Step 4:
Then I cut out two thin strips one on the orange foami and one on the yellow Foami.
🦴 Step 5:
To the two strips that I cut out, I made several cuts, then I put liquid silicone on them and rolled them up, they should be small, I took five of each strip, although I only used a few, the others I will keep for other jobs.
🕷️ Step 6:
On the grey foami draw and then cut out a circle
🎃 Step 7:
Now we're going to create each piece, I started with the skull.
Cut out two small circles from the black foami, apply liquid silicone and stick them to the white foami piece, then cut out a very small heart from the fuchsia frosted foami, stick it in the centre of the skull with the liquid silicone, and draw the mouth with the pen.
***
🦴 Step 8:
With the apple green and red paints I made several drawings on the skull and with the white paint the eyes.
🕷️ Step 9:
Take the two coffin-shaped pieces and place one on top of the other, gluing with liquid silicone, I also cut out two small circles of black foami and glued them together to form the eyes and from the white foami I cut out a small cross which I glued in the centre.
🎃 Step 10:
Take the nib and draw the mouth, then I took the fine brush and the white paint and drew the eyes, and with another brush and the blusher I drew the cheeks.
🦴 Step 11:
From the fuchsia frosted Foami I cut out a small base that I glued to the edge of the candle, then I cut out the two circles and glued them to form the eyes, with the red paint and the fine brush I drew a heart and with the pen I drew the mouth, I cut out a small flame from the yellow foami and glued it, and as a final touch, I applied the blusher to form the cheeks.
🕷️Paso 12 :
Take the pen and draw the lines of the pumpkins and cut out the branches from the apple green foami and glued them with liquid silicone, and from the black foami I cut out the triangles that are the eyes and mouth and proceeded to glue them on.
🎃 Step 13:
Join all the pieces already made and the grey circle.
🦴 Step 14:
It's time to assemble the piece, for this our centre will be the grey circle.
Applied liquid silicone to the skull and glued, then we glued the pumpkin.
🕷️ Step 15:
Paste the candle, the coffin and the other skull.
🎃 Step 16:
On the yellow and apple green foami I drew and cut out some typical Mexican holiday and especially halloween wobbles, then with liquid silicone I glued them on the bottom
🦴 Step 17:
With the liquid silicone we glue the flowers that we formed, I only used three, two yellow and one orange and that's it, we have finished the assembly.
It's time to assemble the piece, for this our centre will be the grey circle.
Applied liquid silicone to the skull and glued, then we glued the pumpkin.
🕷️ Step 18:
Applied liquid silicone on the comb and glued the finished foami piece to it and let it dry.
🎃🦴🕷️Fotos ends 🎃🦴🕷️
How you can see this work although it was a little long, it is easy to do and looks very nice, it is a nice detail to put in the hair of the princesses of the house on Halloween, I hope you liked it and that you put it into practice, soon I will bring you new ideas for this party as fun as Halloween.
🎃🦴🦴🦴🕷️Nos see you and God bless you all 🕷️🦴🎃