
🌸🌸🌸🌸🌸🌸🌸🌸🌸🌸🌸🌸🌸
Hola mis nietecitos hermosos de este ecosistema maravilloso llamado #hive quiero contarles que estos días aunque no me he sentido tan bien por mis problemas con la tensión, siempre busco un momento para compartir con ustedes alguna de mis manualidades que hago, hoy les traje un pequeño paso a paso de como hacer una preciosa pinza para el cabello, decorada con una flor de foami o goma Eva.
Aquí les muestro el paso a paso y las fotos del trabajo ya terminado, espero que les guste como quedó, para este post use el traductor deepl versión gratis, y el programa polish, ojalá sea de su agrado.
🌸Materiales 🌸

🌸 Foami escarchado azul.
🌸 Foami escarchado verde.
🌸 Foami escarchado amarillo.
🌸 Silicón líquido.
🌸 Pinza.
🌸Regla.
🌸 Plancha.
🌸 Lápiz.
🌸Paso a paso 🌸
🌸 Paso 1:

Primero agarré el gancho que voy a decorar y lo colocó encima del foami escarchado azul y con el lápiz marqué la forma de él, luego lo recorté y finalmente agregué el silicón líquido y pegué la pequeña tira que recorté del foami y pegue.***
🌸 Paso 2:

Nuevamente agarre el foami escarchado azul y marqué un círculo, debe ser lo suficientemente grande para que cubra el gancho.
🌸 Paso 3:

Después agarré la regla y con el lápiz marqué el círculo, haciendo divisiones iguales, luego las recorté sin llegar al final.
🌸Paso 4:
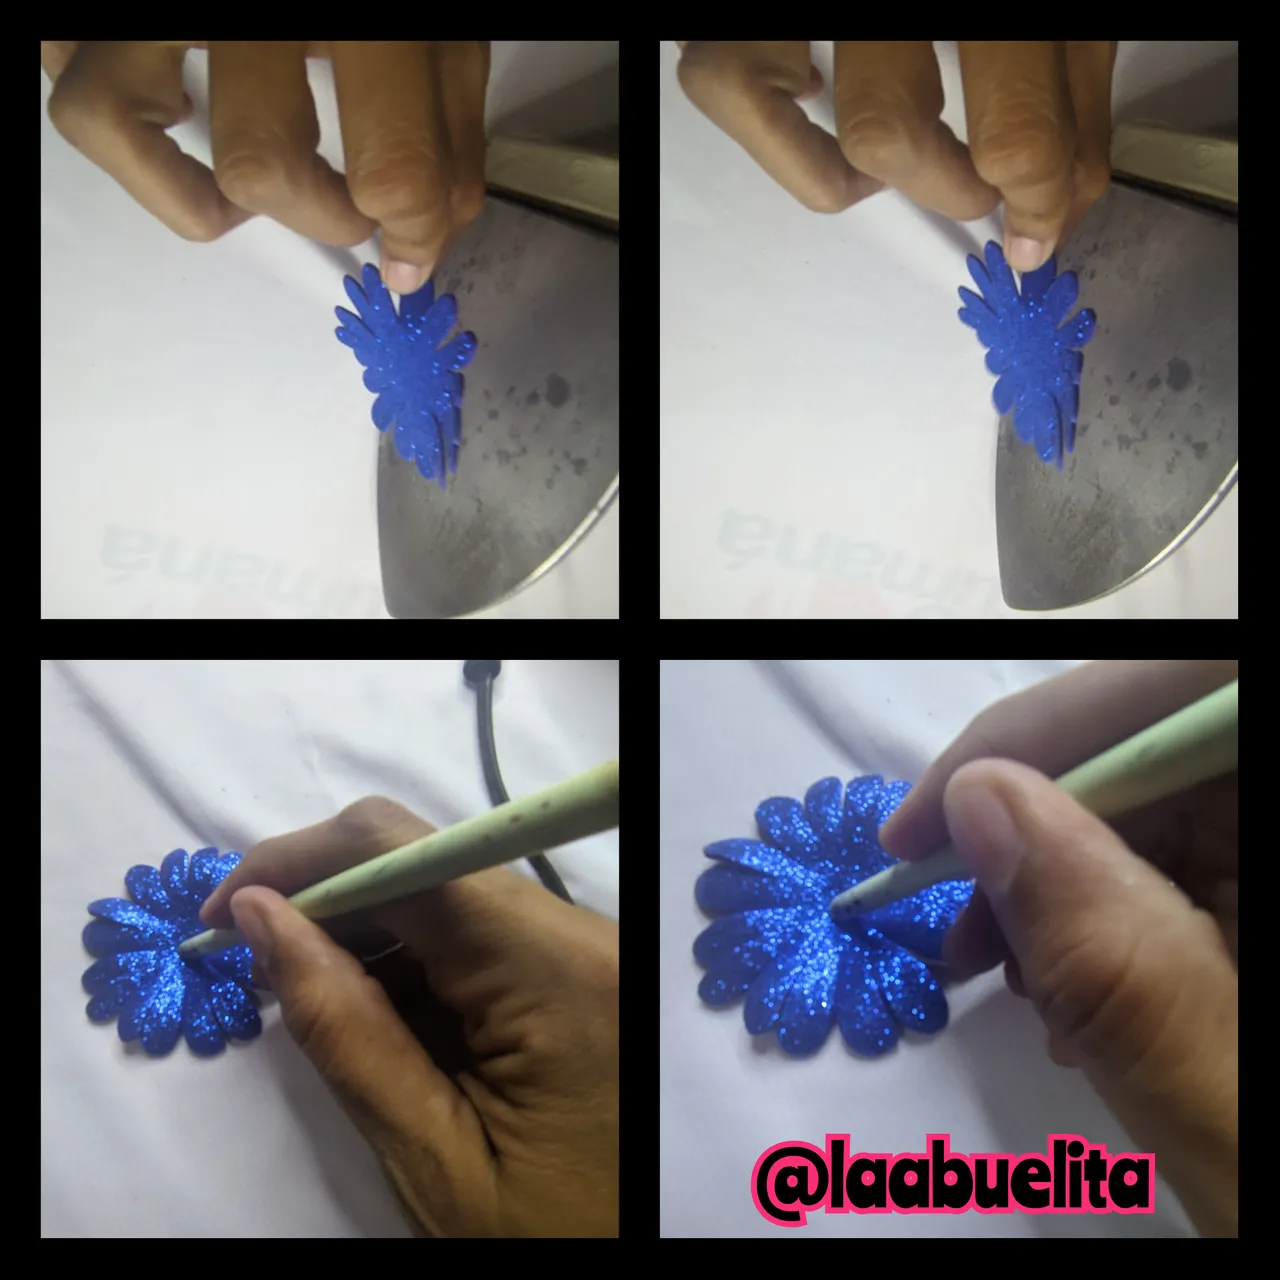
Puse a calentar la plancha, cuando estaba lo suficientemente caliente puse la flor de foami encima, esto causa una reacción en este material y nos permite moldearlo, fue lo que hice, doble los pétalos hacia abajo, y luego con la parte trasera de un pincel le di profundidad a la flor.
🌸 Paso 5:

Ahora recorté una pequeña tira del foami escarchado amarillo, y le hice pequeños cortes, luego le apliqué silicón líquido y enrrolle.
🌸 Paso 6:

Cuando la pieza está seca con los dedos abrimos un poco, luego le aplicamos un poco de silicón líquido y pegamos en el centro de la flor.
🌸 Paso 7:

En el foami escarchado verde dibujé una pequeña hoja y luego la recorté, le apliqué silicón líquido y lo pegué a la flor, luego pegue la flor al gancho y listo hemos terminado.
🌸 Fotos del trabajo realizado 🌸


Para mí fue un placer elaborar este trabajo, que sirve para demostrar que se pueden hacer detalles hermosos con materiales y en pocos pasos, por ahora me despido esperando tengan un feliz inicio de semana.
🌸Dios me los bendiga a todos.🌸

🌸 ENGLISH 🌸
Hello my beautiful grandchildren of this wonderful ecosystem called #hive I want to tell you that these days although I have not been feeling so well because of my problems with stress, I always look for a moment to share with you some of my crafts that I do, today I brought you a small step by step of how to make a beautiful hair clip, decorated with a foami flower or Eva rubber.
Here I show you the step by step and the photos of the finished work, I hope you like it, for this post I used the free version of deepl translator, and the polish program, I hope you like it.
🌸Materials 🌸
🌸 Blue frosted foami.
🌸 Green frosted foami.
🌸 Yellow frosted foami.
🌸 Liquid silicone.
🌸 Tweezers.
🌸 Ruler.
🌸 Iron.
🌸 Pencil.
🌸Step by step 🌸
🌸 Step 1:
First I grabbed the hook that I am going to decorate and placed it on top of the blue frosted foami and with the pencil I marked the shape of it, then I cut it out and finally I added the liquid silicone and glued the little strip that I cut out of the foami and glued.***
🌸 Step 2:
Again grab the blue frosted foami and mark out a circle, it should be big enough to cover the hook.
🌸 Step 3:
Then I took the ruler and with the pencil I marked the circle, making equal divisions, then I cut them out without going all the way through.
🌸Step 4:
I heated the iron, when it was hot enough I put the foami flower on top, this causes a reaction in this material and allows us to mould it, this is what I did, I folded the petals down, and then with the back of a brush I gave depth to the flower.
🌸 Step 5:
Now I cut out a small strip of the yellow frosted foami, and made small cuts in it, then applied liquid silicone and rolled it up.
🌸 Step 6:
When the piece is dry, open it a little with your fingers, then apply some liquid silicone and stick it in the centre of the flower.
🌸 Step 7:
On the green frosted foami I drew a small leaf and then cut it out, applied liquid silicone and glued it to the flower, then glued the flower to the hook and that's it.
🌸 Photos of the work done 🌸
I was a pleasure to make this work, which serves to demonstrate that you can make beautiful details with materials and in a few steps, for now I say goodbye and hope you have a happy start of the week.
🌸God bless you all.🌸