Hola querida comunidad de hiveblog. Me es un gusto poder compartir con ustedes el paso a paso de una de las más pedidas de mi emprendimiento, la pulsera 7 nudos.
Hello dear Hiveblog community. I'm happy to share with you the step-by-step instructions for one of the most requested items from my business: the 7-knot bracelet.

Para hablar claro, esto fue un encargo, de un set de pulseras en color azul, la persona me mando una foto de su idea, y traté en lo posible de recrearla. En la foto se oberservaba que, la pulsera era doble, y siempre la hago sencilla, lo que para mi era un reto, porque no sabía si iba a doblar/girar igual que, cuando se hace con solo un pedazo de hilo, pero, lo intenté y salió bien, mucho mejor de lo que esperaba y quise compartirlo con ustedes.
To be clear, this was a custom order for a set of blue bracelets. The person sent me a photo of their idea, and I tried my best to recreate it. The photo showed that the bracelet was double-stranded, and I usually make them single-stranded, which was a challenge for me because I wasn't sure if it would bend/twist the same way as when made with just one piece of thread. But I tried it, and it turned out well, much better than I expected, and I wanted to share it with you.
Materiales: | Materials:
Hilo cola de serpiente azul
Tijera
Pitillo (popote)
Encendedor (yesquero)
Blue snake-tail cord
Scissors
Straw
Lighter
Paso a paso : | Step-by-step instructions:
Se miden dos pedazos hilo de 90 centímetros cada uno.
Measure two 90-centimeter pieces of cord.

Les voy a enseñar a como hacer el nudo franciscano paso a paso. Primero con ayuda de un pedazo de pitillo se da una primera vuelta, usando los dos pedazo de hilo, en mi caso, di 4 vueltas para hacer el nudo de más grosor, pero ya eso depende si se desea más tupido o delgado. Al tener las 4 vueltas se ingresa dentro del pitillo, y se tira hasta sacar el pitillo y apretar el nudo.
I'm going to show you how to make the Franciscan knot step by step. First, using a piece of straw, make the first loop with both pieces of thread. In my case, I made four loops to create a thicker knot, but this depends on whether you want it tighter or thinner. Once you have the four loops, insert the thread through the straw and pull until you can remove the straw and tighten the knot.

De igual forma, es mucho mejor ver videos para este tipo de nudos, y recordar que, a la primera no nos va a salir. A mi me costó varias pruebas para que me quedarán bien prolijos los nudos. Así que, a intentarlo.
It's much better to watch videos for this type of knot, and remember that you won't get it right the first time. It took me several tries to get the knots neat. So, give it a try!

Este proceso del nudo, se repite 7 veces seguidas, con los dos pedazo de hilos, recordar que, estamos haciendo una pulsera doble. Dejando un espacio de 1 cm entre cada nudo.
Repeat this knotting process seven times in a row with both pieces of thread. Remember, we're making a double bracelet. Leave a 1 cm space between each knot.

Al terminar los 7 nudos seguidos, haremos los nudos finales para cerrar la pulsera, son iguales con los que se trabajo al comienzo. En este caso se deja una brecha de 8-10 cm entre el último nudo de los 7 nudos seguidos, con respecto al nudo final, esta cantidad de centímetros dependerá de que tan pequeña o larga se requiera la pulsera.
After completing the seven consecutive knots, make the final knots to close the bracelet. These are the same knots you used at the beginning. In this case, leave an 8-10 cm gap between the last knot of the seven consecutive knots and the final knot. This length will depend on how short or long you want the bracelet to be.

Teniendo ya la pulsera con los 7 nudos seguidos, más los dos en cada esquina se procede a cortar los restos excedentes de hilo y quemar con el encendedor.
Once you have the bracelet with the seven consecutive knots, plus the two at each corner, cut off the excess thread and burn it with a lighter.

Me gusta trabajar con este tipo de hilo porque al quemarlo pega como especie de plástico, y ayuda a que, el hilo no se mueva o deshaga, es decir, que quede bien apretado.
I like working with this type of thread because when you burn it, it sticks like plastic, which helps prevent the thread from unraveling and keeps it tight.

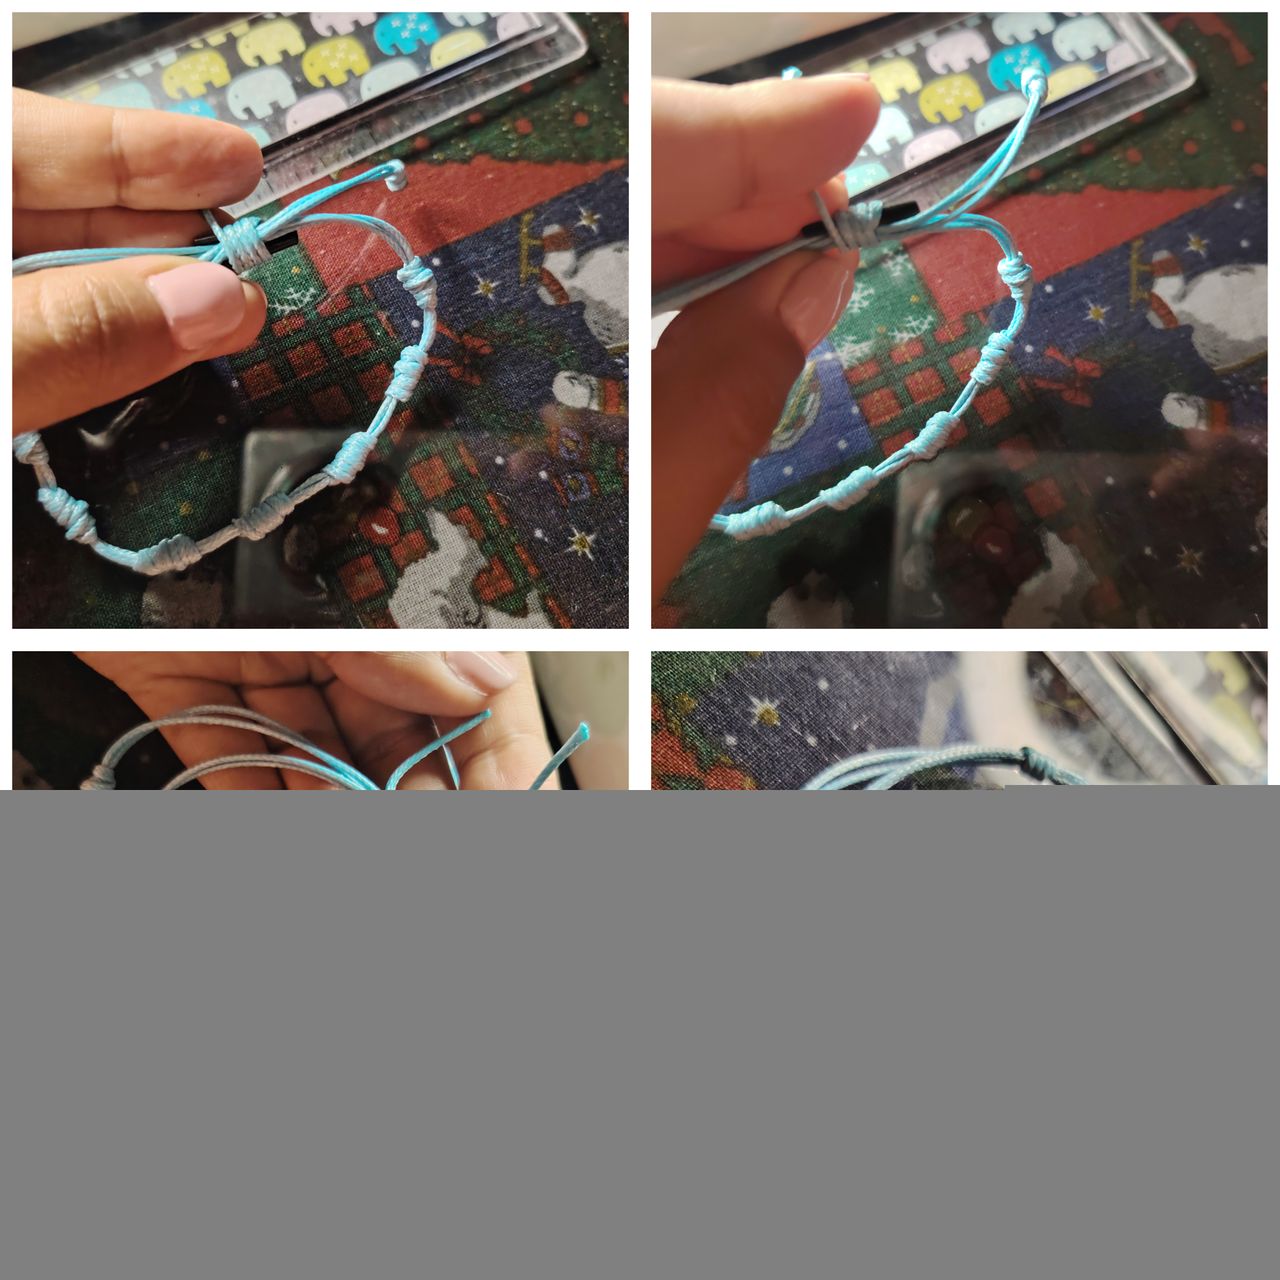
Ahora bien, para terminar la pulsera se hace un nudo franciscano uniendo los dos extremos de la pulsera, se usa el pitillo, un pedazo de hilo qué haya sobrado, y se dan 4 vueltas. Me gusta trabajar con una misma cantidad de vueltas en toda la pulsera para que quede más prolijo el trabajo.
Now, to finish the bracelet, make a Franciscan knot joining the two ends of the bracelet. Use the straw and a piece of leftover thread, and wrap it around four times. I like to use the same number of wraps throughout the bracelet for a neater finish.
Espero que, les guste este paso a paso. También quiero anexar la otra pulsera del set, qué es una sencilla de nudos franciscanos, balines de oro chino, y un corazón de ojo turco.
I hope you enjoy this step-by-step tutorial. I also want to include the other bracelet from the set, which is a simple one made with Franciscan knots, Chinese gold beads, and a Turkish eye heart.

En la descripción del paso a paso, me encantó poder darles también tipsy qué, me han servido mucho en mi trabajo artesanal. Espero seguir publicando para todos ustedes, y lamento estar menos activa en estas semanas.
in the step-by-step instructions, I was happy to share some tips that have been very helpful in my crafting. I hope to continue posting for all of you; I apologize for being less active these past few weeks.


#diy
Fotografía por | Photography by: 
Banner by | Banner por Photoroom.
Collage by | Collage por Canva.
Translated with | Traducido por https://translate.google.com
