Feliz lunes queridos amigos de HIVE DIY, espero hayas disfrutado de un excelente fin de semana y de antemano les deseo que tengan una bendecida semana. ☃️💖
El día de hoy quiero compartir con ustedes una idea para hacer unos lindos muñequitos de nieve con foami, este es el primer adorno navideño que hago este año, espero poder lograr hacer muchos de los que tengo en mente, estos días pasan volando 😊, así que manos a la obra aquí les comparto el paso a paso:
Happy Monday, dear HIVE DIY friends! I hope you had a wonderful weekend, and I wish you a blessed week ahead. 💖
Today I want to share with you an idea for making cute little snowmen out of craft foam. This is the first Christmas ornament I've made this year, and I hope I can make many more of the ones I have in mind. These days are flying by! 😊 So, let's get started! Here's the step-by-step tutorial:

MATERIALES
MATERIALS
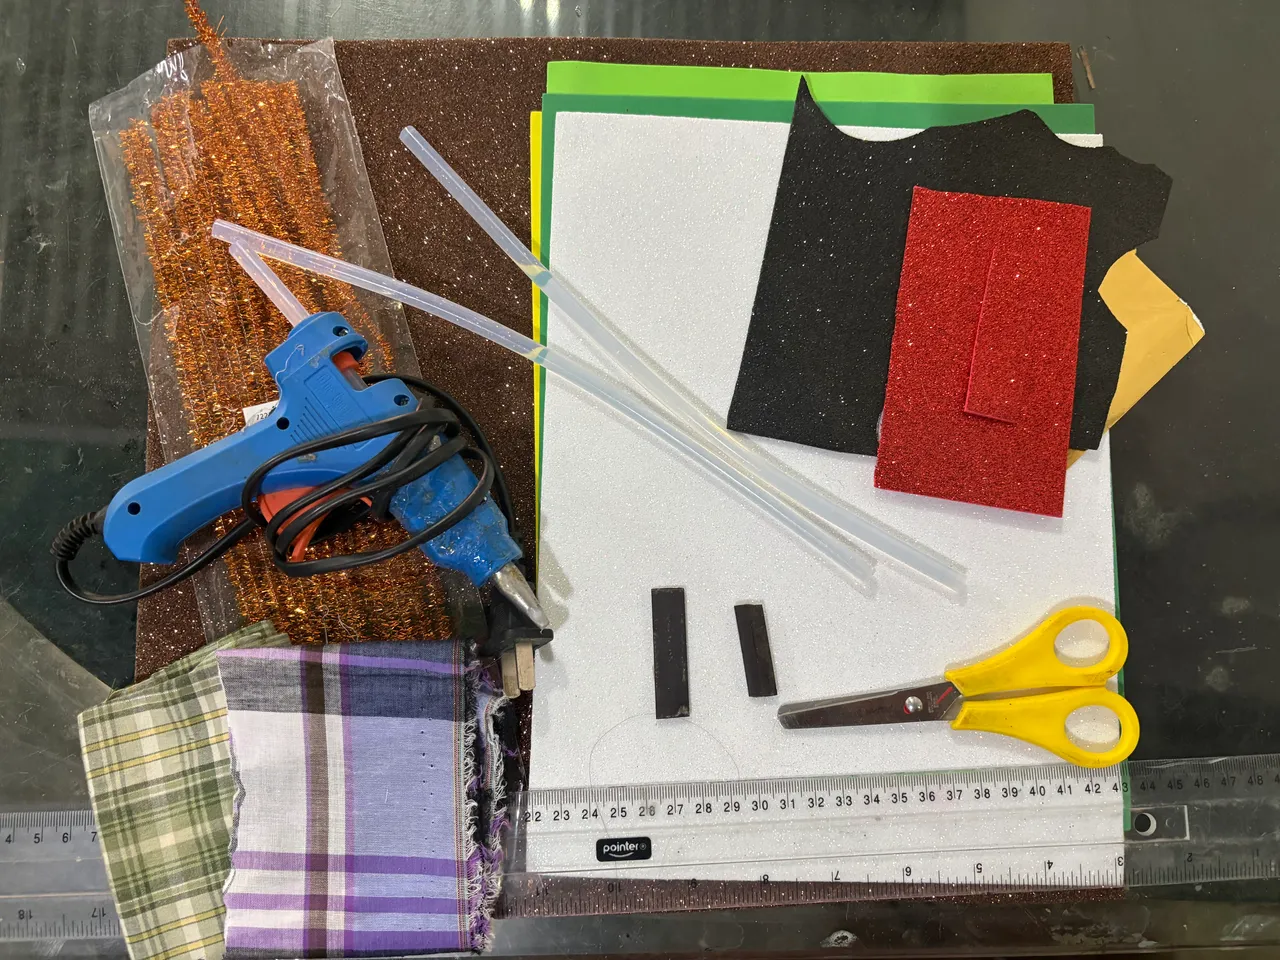
En lo personal amo la Navidad 🎄 , desde muy joven me gusta mucho hacer mis propios adornos ya que los hago a mi gusto y a mi estilo, el foami tiene una ventaja enorme, este puede durar muchos años y con el tiempo si se ensucian, puede lavarlos, retocarlos y volverlos a utilizar, siempre me ha gustado colocarle alguna decoración a mi nevera y esta idea me pareció excelente para hacer unos lindos muñecos de nieve, y así comenzar a decorar mi hogar con la Navidad, aquí le dejo la lista de materiales a utilizar :
- foami blanco, marrón, rojo, negro, pueden ser pedazos pequeños, ya que son detalles que lleva cada muñeco
- Lápiz
- Tijeras
- Retazo de tela de cuadros
- Saca bocado
- Silicon, caliente
- Imán del que venden por metro
- Limpia, pipa
Personally, I love Christmas 🎄. Since I was very young, I've enjoyed making my own decorations because I can make them to my liking and in my own style. Foam has a huge advantage: it can last for many years, and if it gets dirty over time, you can wash it, touch it up, and reuse it. I've always liked decorating my refrigerator, and this idea seemed excellent for making some cute snowmen to start decorating my home for Christmas. Here's the list of materials you'll need:
- White, brown, red, and black foam (small pieces are fine, as these are details for each snowman)
- Pencil
- Scissors
- Scrap of plaid fabric
- Hole punch
- Hot glue gun
- Magnets (sold by the meter)
- Pipe cleaner
PASO A PASO
STEP BY STEP
Me siento muy feliz al hacer mi primera manualidad navideña de este año, para comenzar a hacer esta linda parejita de muñecos de nieve, vamos a comenzar haciendo la figura principal, la cual será en color blanco, una vez hice unos muñequitos de nieve, pero el cuerpo se los hice en dos partes, pero esta vez voy a hacerlos todo unido para que quede más firme, para dibujar los círculos voy a utilizar un vaso, dibujo la parte de abajo del muñeco de nieve un poco más grande que la de arriba, uniendo los círculos, dibujo en una hoja, luego lo corto por toda la orilla.
I feel very happy to be making my first Christmas craft of the year. To start making this cute pair of snowmen, we'll begin by making the main figure, which will be white. I made some snowmen once before, but I made the body in two parts. This time, I'm going to make them all one piece so they're sturdier. To draw the circles, I'm going to use a glass. I draw the bottom part of the snowman a little bigger than the top part, joining the circles. I draw them on a sheet of paper, then cut them out along the edges.
 |  |
|---|
En este paso vamos a dibujar en el foami por la parte de atrás las dos figuras de los muñecos de nieve, para esto voy a utilizar foami en color blanco escarchado, cortamos, y ahora vamos a darle forma al sombrero, este lo voy a hacer en color marrón, escarchado, igual lo dibujo primero en una hoja corto, para luego pasarlo al foami el sombrero de la hembra, le voy a hacer una pequeña modificación para que se vea diferente al del varón.
Para hacerle los brazos, vamos a utilizar un limpia pipas, le damos la forma como unas pequeñas ramitas, para esto utilice un limpia pipas y la mitad de otro, con eso fue suficiente para hacer los cuatro bracitos
In this step, we're going to draw the two snowman figures on the back of the foam sheet. For this, I'll use glittery white foam. We'll cut them out, and now we'll shape the hat. I'll make this with glittery brown foam. I'll also draw it first on a piece of paper and cut it out, then transfer it to the foam sheet. I'll make a small modification to the female snowman's hat so it looks different from the male one.
To make the arms, we'll use pipe cleaners. We'll shape them into little twigs. For this, I used one pipe cleaner and half of another; that was enough to make the four little arms.
 |  |
|---|---|
 |  |
Ahora vamos a confeccionarle la bufanda, vamos a cortar una tira de tela de aproximadamente 20 cm de largo y el ancho puede ser de 2 o 3 cm, hacemos pequeños cortes en las orillas y pegamos, empezamos por la parte de atrás de cada muñeco luego le damos la forma en la parte delantera, haciéndole como un nudo, podemos poner puntos de Silicon para fijar y que no se mueva.
Now we're going to make the scarf. We'll cut a strip of fabric approximately 20 cm long and 2 or 3 cm wide. We'll make small cuts on the edges and glue them. We'll start at the back of each doll, then shape it at the front, making a knot. We can add silicone dots to secure it and prevent it from moving.
 |  |
|---|
En este paso vamos a pegar cada detalle de nuestros muñecos de nieve, al sombrero le vamos a colocar una franja en foami de otro color, luego pegamos a nuestro muñeco en la cabeza de medio lado, le pegamos los brazos, a la chica le hice los botones en forma de corazón, al varón le di la forma de los botones y ojos en color negro, con un sacabocado.
In this step we are going to glue each detail of our snowmen, we are going to put a strip of foam of another color on the hat, then we glue our snowman on the head from the side, we glue the arms, for the girl I made the buttons in the shape of a heart, for the boy I gave the shape of the buttons and eyes in black, with a hole punch.
 |  |
|---|---|
 |  |
Ya casi están listos estos lindos muñecos de nieve, ahora vamos a hacerle una figura triangular alargada para la nariz, le hacemos como marcador negro, la figura de la boca, y ya para finalizar pegamos un pequeño trozo de imán por la parte de atrás y así ya están listos estos lindos muñecos de nieve para decorar nuestra nevera☃️
These cute snowmen are almost ready! Now we'll make an elongated triangular shape for the nose, draw the mouth with a black marker, and finally glue a small magnet to the back. And there you have it, these cute snowmen are ready to decorate our fridge! ☃️
 |  |
|---|
Me encantaron estos lindos muñecos de nieve, amo la Navidad y ya con ellos voy comenzando a decorar mi hogar, me gusta colocar detalles navideños en cada rincón, y por supuesto en nuestra cocina no pueden faltar, espero les hayan gustado de antemano estoy muy agradecida de que hayan visitado mi publicación, es todo por hoy, hasta otra oportunidad 🎄 ❤️
I loved these cute snowmen! I love Christmas and I'm already starting to decorate my home with them. I like to put Christmas details in every corner, and of course, they're a must in our kitchen. I hope you liked them. I'm so grateful that you visited my post. That's all for today, see you next time! 🎄 ❤️
 |  |
|---|

las fotos aquí compartidas son de mi propiedad tomadas con mi teléfono iPhone 11, la edición fue hecha en Canva, para la traducción del inglés utilice el traductor de Google