English

Greetings, I really hope you had a memorable peaceful days with your loved ones. And I hope that at the end of the year there will be peace, health and tranquility for everyone.
I want you to be in the best possible situation, and if you're not, I hope you have the courage to get ahead in whatever situation you find yourself in life.
On this occasion I wanted to share a repair of my electric screwdriver, one of my tools that I take care of with great care. But like all things, the moment came when it required service.

This screwdriver is from a very good brand, it came with its set of accessories and a briefcase, it has been with me for several years without giving any problem.
It's a good tool, it doesn't have very complicated mechanisms, it's quite simple, it was worth spending a little time to make it work.
Disassembly is very simple, it only has a steel retainer and a Phillips or slotted screw.

Sorry, I usually follow factory directions, but this time I'm going to ignore the disassembly warning.


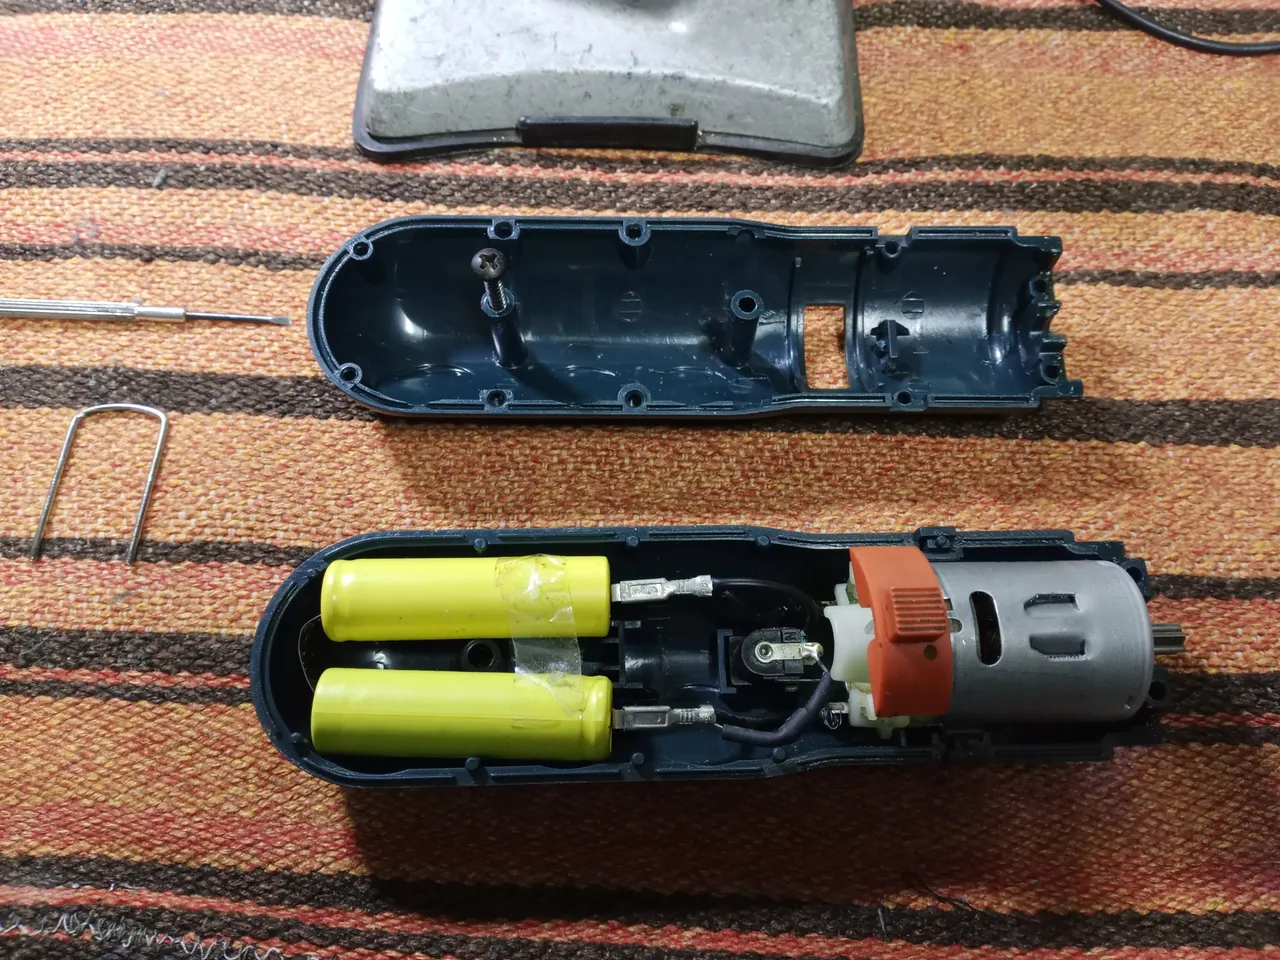
Now free of the covers, we can see part of the problem, the welds have leaked, it is a fairly common problem, I have the idea that it is the result of the residue of the paste that was used to weld them when they were manufactured.

I have seen that same failure in some flashlights and various toys that I have refurbished or repaired.

The deterioration was enough to separate the cable from the solder, if the damage to the cable was even greater, all the wiring would have to be done again. But it can be used, the damage is not that advanced.

I used solvent to remove all the sulphate and redid the soldering, checked the batteries and the rest of the connections and everything seemed fine but the screwdriver still wouldn't work.

So I had to disassemble the electric motor, it's a 3 volt permanent magnet motor, it comes sealed from the factory under pressure without screws, with two tabs from the same casing. I had to rough the tabs with a file to be able to separate the parts.


And I saw the cause of the failure, the rust had reached the base of one of the brushes, deteriorating it and when it wore out they had come off.

I couldn't weld it to its original base, I couldn't find a way to separate it from the plastic and if I forced it it could break, so we made a new cable base with the brush part.


After mounting I spent a while trying to place it in the best position, I had to adjust several times to get it in a good working area.

I needed some help to assemble the motor, I had to separate the brushes to get the motor into position, it is a permanent magnet motor, so the magnets pull on the rotor and I know it would get out of place.
Luckily my brother lent me his collaboration.
Once assembled, I made it work for a long time in one direction and then in the reverse direction so that the brushes could settle and verify that there were no faults.

Assemble carefully so that all parts snap into position and fit into the support and latch notches.

I hope it will work for several more years, we still have a lot of repairs and restorations ahead of us.
As always, the post is not a tutorial. It's a way to get the job done - it can be solved in many other ways, that's for sure, but this in my case was the way I solved it.
Maybe you guys can come up with a better way to do it, but if you don't have basic training in using the tools, I recommend you take some training course first.
Avoid accidents.
Thank you very much for spending some time and reading me.
I have used Google translate for the English language.
The images unless otherwise indicated are screenshots of my work in the workshop.
Have an excellent week.
Peace.
Español
Saludos, realmente espero que hayan tenido unos días memorables en paz con sus seres queridos. Y espero que en el fin de año haya paz, salud y tranquilidad para todos.
Deseo que estén en la mejor situación que sea posible, y si no es así, espero que tengan el ánimo para salir adelante en la situación en que se encuentre de la vida.
En esta ocasión quería compartir una reparación de mi destornillador eléctrico, una de mis herramientas que cuido con todo esmero. Pero como todas las cosas, le llego el momento en que requirió de servicio.
Este destornillador es de una muy buena marca, venía con su juego de accesorios y un maletín, me ha acompañado desde hace varios años sin dar ningún problema.
Es una buena herramienta, no tiene mecanismos muy complicados, es bastante simple, valía la pena dedicarle un poco de tiempo para hacerla funcionar.
El desmontaje es muy simple, solo tiene un retén de acero y un tornillo tipo Philips o de estrías.
Lo siento, por lo general respeto las indicaciones de fábrica, pero esta vez voy a pasar de largo la advertencia sobre el desmontaje.
Ya libre de las cubiertas, podemos ver parte del problema, se sulfataron las soldaduras, es un problema bastante común, tengo la idea de que es resultado del residuo de la pasta que se usó para soldarlos cuando se fabricaron.
He visto esa misma falla en algunas linternas y varios juguetes que he restaurado o reparado.
El deterioro fue lo suficiente para separar el cable de la soldadura, si el daño en el cable fuese aún mayor habría que hacer todo el cableado de nuevo. Pero puede usarse, no está tan avanzado el daño.
Use solvente para eliminar todo el sulfato y rehice la soldadura, revise las baterías y el resto de las conexiones y todo parecía bien, pero el destornillador seguía sin funcionar.
Así que tuve que desmontar el motor eléctrico, es un motor de imanes permanente de 3 volts, viene sellado de fábrica a presión sin tornillos, con dos lengüetas de la misma carcasa. Tuve que desbastar las lengüetas con una lima para poder separar las partes.
Y vi la causa de la falla, el óxido había llegado hasta la base de una de las escobillas deteriorándola y al desgastarse se habían desprendido.
No podía soldarla a su base original, no encontré forma de separarla del plástico y si lo forzaba podía romperse, por lo que hicimos una nueva base de cable con la parte de la escobilla.
Luego de montar pase un rato tratando de colocarla en la mejor posición, tuve que ajustar varias veces para dejarla en una buena zona de trabajo.
Necesite algo de ayuda para armar el motor, tenía que separar las escobillas para llevar el motor a posición, es un motor de imanes permanentes, así que los imanes halan el rotor y sé salía de lugar.
Por suerte mi hermano me presto de su colaboración.
Ya armado lo hice funcionar un buen rato en un sentido y luego en el sentido inverso para que se asentaran las escobillas y verificar que no presentara fallas.
Arme con cuidado de que asentaran todas las partes en su posición y encajaran en las muescas de soporte y seguro.
Espero que funcione por varios años más, aún tenemos muchas reparaciones y restauraciones por delante.
Como siempre, la publicación, no es un tutorial. Es una forma de realizar el trabajo: se puede resolver de muchas otras formas, eso es seguro, pero este en mi caso fue la forma en que lo resolví.
Tal vez ustedes puedan idear una mejor manera para hacerlo, pero si no tienes una formación básica del uso de las herramientas, te recomiendo que primero tomen algún curso de capacitación.
Eviten accidentes.
Muchas gracias por pasar un rato y leerme.
He usado el traductor de Google para el idioma inglés.
Las imágenes a menos que se indique lo contrario son capturas de mi trabajo en taller.
Que tengan una excelente semana.
Paz.