
✦ What is it like to create this, from an amateur's perspective 𝓤𝔀𝓤 - Collage & Edition in FotoJet, photos by @Tesmoforia ✦

🇪🇸 ~ ¿Sabes lo que es un "Porta Insignia, tipo roseta"?, actualmente famosos y mejor conocidos en el mundo de la personalización de los "ita bag", es un soporte o base decorativa para exhibir pines.
También conocidas como "rosetas" (rosettes) son un artículo que en su formato mas simple eran utilizadas originalmente como el equivalente de trofeos o medallas en menciones premiadas de diferente naturaleza (llamadas entonces "rosette prizes/award").
! [ENGLISH VERSION]
🇺🇸 ~ Do you know what a “rosette-style badge holder” is? Currently popular and well-known in the world of customization of “ita bags”, it is a decorative stand or base for displaying pins.Also known as “rosettes,” they are an item that, in their simplest form, were originally used as the equivalent of trophies or medals in various types of awards (then called “rosette prizes/awards.”)
✦ Prestigious symbol of recognition: They have a long and fascinating history, such as being used to indicate levels of excellence. Even today, they are still a prized item in many countries, and in a more contemporary vein, a “frame” version has been created to display an image of a character we really like. ✦

✦ Símbolo prestigioso de reconocimiento: Tienen una gran y fascinante historia, como ser utilizadas para indicar niveles de excelencia. Todavía hoy en muchos países son un articulo apreciado, y en un tono mas actual, ha nacido una variante en formato "marco" para exhibir una imagen de un personaje que nos guste mucho ✦
Hoy, es un articulo DIY que evoca elegancia y nostalgia, y cuya complejidad puede llegar a ser impresionante por su diseño multicapas en combinación a la variedad de materiales que se utilizan para su fabricación, que puede ir desde el papel, telas, y cintas, a broches y apliques de materiales valiosos.
En internet podrás conseguir multitud de creaciones espectaculares, multicolores y con calidad de lujo, estoy segura que te enamorarás como a mi me han enamorado, pero es claro que para llegar a ese nivel de composición tan maravillosa hay primero que entender de primera mano cómo o qué compone el cuerpo de este accesorio ultra llamativo.
Así, fabricado mi primera rosette en materiales surtidos y he adaptado esa experiencia a este formato tutorial, para demostrar cómo se ve el proceso desde la perspectiva de una completa amateur en la fabricación de este tipo de accesorios.
! [ENGLISH VERSION]
Today, it is a DIY item that evokes elegance and nostalgia, and whose complexity can be impressive due to its multi-layered design in combination with the variety of materials used in its manufacture, which can range from paper, fabrics, and ribbons to brooches and appliqués made of valuable materials.
✨ I've wanted to make my own rosettes for a long time! ✨ On the internet, you can find a multitude of spectacular, multicolored, luxury-quality creations, and I'm sure you'll fall in love with them just as I have, but it's clear that to achieve such a wonderful level of composition, you first need to understand firsthand how or what makes up the body of this ultra-eye-catching accessory.
So, I made my first rosette out of assorted materials and adapted that experience to this tutorial format to show what the process looks like from the perspective of a complete amateur in making this type of accessory.

 |  |
|---|
✦ MATERIALES Y HERRAMIENTAS ✦
| 🇪🇸 ~ Las herramientas y materiales que necesitaras para elaborar este proyecto son: Alfileres pequeños, bolígrafo, tijeras, encendedor, pinzas, pistola de silicón, regla escolar, cinta métrica, máquina de coser (opcional), hilo, aguja, imán pequeño, fieltro escolar, cuero sintético, disco vacío de alfileres pequeños, rosas de fieltro pre-cortadas, barras de silicón y cintas de seda o material surtido de diferentes grosores (1,5 - 2,5 - 3 - 3,5 y 5 centímetros). |
|---|
| 🇺🇸 ~ The tools and materials you will need to complete this project are: Small pins, pen, scissors, lighter, tweezers, silicone gun, school ruler, measuring tape, sewing machine (optional), thread, needle, small magnet, school felt, synthetic leather, empty small pin disc, pre-cut felt roses, silicone bars, and silk ribbons or assorted material of different thicknesses (1.5 - 2.5 - 3 - 3.5 and 5 centimeters). |
 |  |
|---|---|
 |  |
 |  |

✦ PASO 1 ✦ Como primera parte del diseño decidí comenzar por los apliques, y decoraciones. Entre mis materiales conseguí estas rosas de fieltro pre-cortadas, y para armarlas sostuve el centro de la sección más fina de cada pieza y comencé a enroscar el fieltro suavemente, terminando con una gota de silicón caliente en la base y apretando suavemente el final de la figura contra el pegamento.
Aquí puedes ver cómo es el movimiento necesario o técnica que se utiliza para formar rosas con este material base; y si no tienes estas piezas pre-cortadas esta es una buena segunda opción 👈 ✔️
! [ENGLISH VERSION]
✦ STEP 1 ✦ As the first part of the design, I decided to start with the appliqués and decorations. Among my materials, I found these pre-cut felt roses, and to assemble them, I held the center of the thinnest section of each piece and began to gently twist the felt, finishing with a drop of hot glue at the base and gently pressing the end of the shape against the glue.Here you can see the necessary movement or technique used to form roses with this base material; and if you don't have these pre-cut pieces, this is a good second option 👈 ✔️

 |  |
|---|---|
 |  |


✦ PASO 2 ✦ A continuación, vamos a preparar las cintas plisadas que formaran las capas de la "rosette", para eso haremos una superposición de 2 centímetros de izquierda a derecha en cada pieza de cinta, y fijaremos temporalmente cada pliegue con los alfileres.
como 0,5 centímetros hacia dentro y luego hacia afuera.
Para saber cuánto de secciones plisadas necesitas, mide previamente con la cinta métrica el contorno exterior de la rueda de plástico vacía de alfileres (me gusta trabajar con material de reciclaje y por eso escogí reutilizar este pequeño objeto, pero tu puedes escoger la base que prefieras, como un circulo de cartón grueso).
! [ENGLISH VERSION]
✦ STEP 2 ✦ Next, we will prepare the pleated ribbons that will form the layers of the rosette. To do this, we will overlap each piece of ribbon by 2 centimeters from left to right and temporarily secure each fold with pins.You can also use other sequences,
such as 0.5 centimeters inwards and then outwards.To find out how many pleated sections you need, first measure the outer circumference of the empty plastic pinwheel with a tape measure (I like to work with recycled materials, which is why I chose to reuse this small object, but you can choose whatever base you prefer, such as a thick cardboard circle).
You can sew by hand or take the pieces to the sewing machine; use a straight stitch No. 4, half a centimeter from the edge.

 |  |  |
|---|

 |  |  |
|---|

 |  |
|---|
✦ PASO 3 ✦ En tu configuración favorita o la que visualmente te guste más (que fue mi caso), pega con ayuda de la pistola de silicón las capas de cinta plisada que has preparado.
Si están "demasiado esponjadas" puedes aplicar calor suave con una plancha para ropa, colocando sobre la pieza un pañuelo para evitar potenciales quemaduras-deformidades en el material.
! [ENGLISH VERSION]
✦ STEP 3 ✦ Using your preferred setting or the one you like best visually (which was my case), use the silicone gun to glue the layers of pleated tape you have prepared.If they are “too fluffy,” you can apply gentle heat with an iron, placing a cloth over the piece to avoid potential burns or deformities in the material.
 |  |
|---|---|
 |  |

✦ PASO 4 ✦ Completado el "cuerpo principal" de mi roseta, es momento de las terminaciones mas estéticas, comenzando por un circulo de fieltro rojo para el centro, con una pestaña de cinta de seda para el pasador de los pines, ambas piezas de tela las pegue con silicón caliente, y el circulo guía de papel mide aproximadamente 6 cm de diámetro.
utilice esta trenza de cintas onduladas.
! [ENGLISH VERSION]
✦ STEP 4 ✦ Once the “main body” of my rosette is complete, it's time for the more aesthetic finishes, starting with a red felt circle for the center, with a silk ribbon tab for the pin fastener. I glued both pieces of fabric with hot silicone, and the paper guide circle measures approximately 6 cm in diameter.To make the transition between materials less obvious,
use this braid of wavy ribbons.


 |  |
|---|---|
 |  |
✦ PASO 5 ✦ Como decoración principal escogí hacer un lazo de 2 piezas, con 2 colores diferentes. Para la parte superior utilice 2 piezas de 18 cm de largo, y para la parte de debajo utilice 2 piezas de 23 cm de largo. Todo lo uní con silicón caliente en el reverso.
Para las cintas que caen detrás del lazo, corté 4 piezas de 20 cm de largo (las que forman una V invertida), 1 pieza de 15 y 1 pieza 9 cm de largo (las del centro).
! [ENGLISH VERSION]
✦ STEP 5 ✦ As the main decoration, I chose to make a two-piece bow with two different colors. For the top part, I used two 7.5-inch-long pieces, and for the bottom part, I used two 9-inch-long pieces. I attached everything together with hot glue on the back.For the ribbons that fall behind the bow, cut four 20 cm long pieces (the ones that form an inverted V), one 15 cm piece, and one 9 cm piece (the ones in the center).
✨ 🌹 Now is also the time to permanently attach the felt roses we made in step 1 🌹 ✨
 |  |
|---|---|
 |  |
 |  |

 |  |
|---|
✦ PASO 6 ✦ Finalmente para terminar, corté un circulo de 9 cm de diámetro en la cuerina sintética, puedes hacerlo con un compas o una pequeña tapa que emule esa medida.
Para poder colgar o sujetar la roseta próximamente, como no tengo broches de metal grandes, use como alternativa 2 piezas de cinta se seda de 32 cm de largo (fíjate en las imágenes guía cómo se colocan antes de pegar el círculo de semi cuero a la roseta).
E igual que en el frente del accesorio, decore la parte entre ambos materiales con esa cinta trenzada para una mejor terminación.
✔️ El ultimo paso fue pegar
el imán en la parte baja del circulo de fieltro ✔️
! [ENGLISH VERSION]
Optionally with more lines
 |  |  |
|---|---|---|
 |  |  |
✦ EXTRA ✦ Puedes agregar mas decoraciones si quieres, como lazos pequeños, perlas sintéticas, botones, pequeños brillos, o más flores; recomiendo mucho planchar el material que sea de tela, antes de comenzar a construir tu roseta, porque le da un acabado mas limpio y bonito.
! [ENGLISH VERSION]
✦ EXTRA ✦ You can add more decorations if you want, such as small bows, synthetic pearls, buttons, small sparkles, or more flowers. I highly recommend ironing any fabric material before you start making your rosette, as this will give it a cleaner and more attractive finish.
 |  |
|---|---|
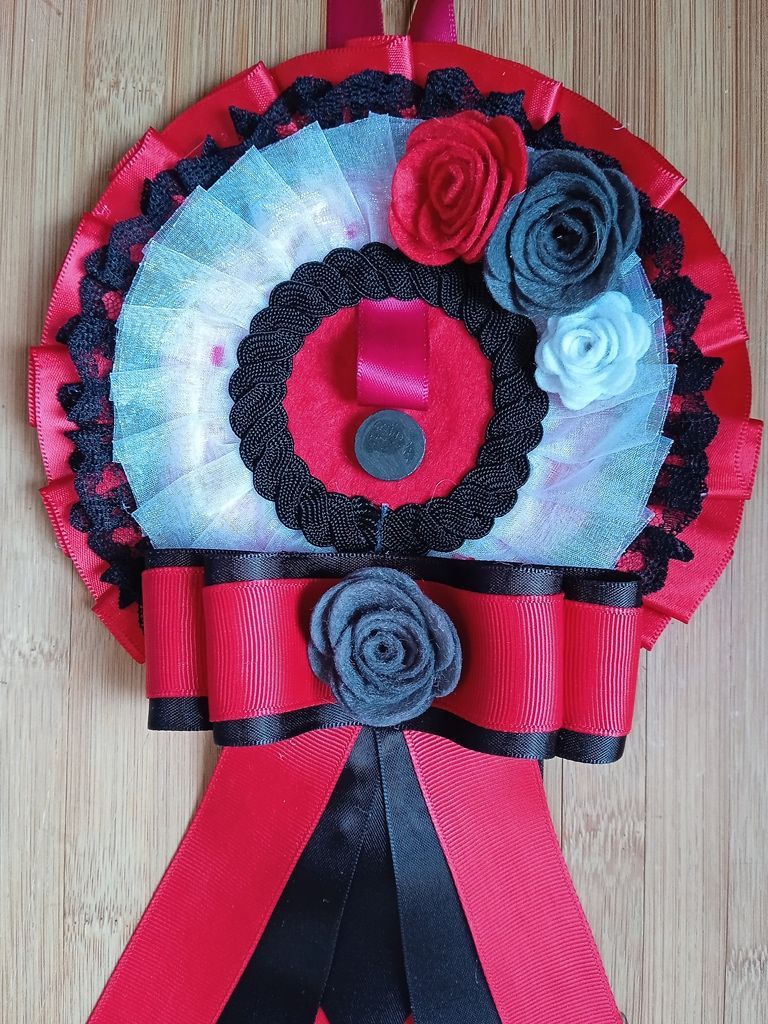 |  |

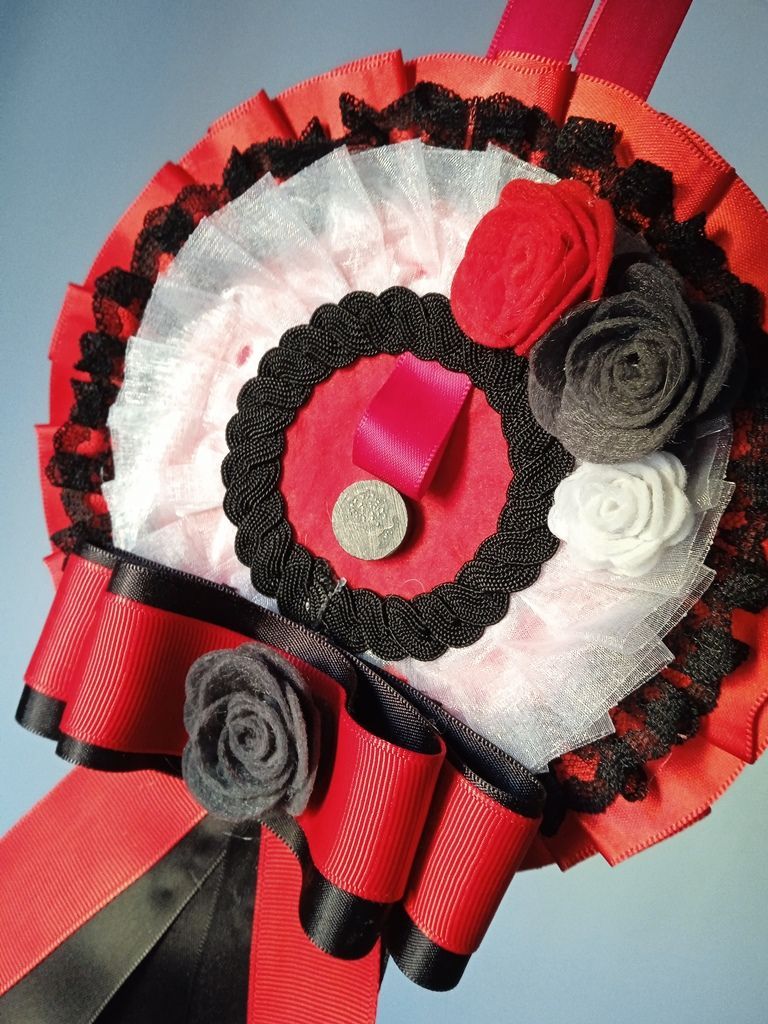
✦ RESULTADO ✦ La "rosette" que ven en fotos mide en total 16 cm de diámetro, y tomando en cuenta las cintas de la parte inferior, mide 31 cm de largo. Por la base de plástico se siente bastante estable, tema que me preocupaba y una de las principales dudas que tengo acerca de estos accesorios:
"¿Qué tan resistentes son, cómo está compuesto su interior, y cuál es el periodo de vida promedio en uso antes que empiece a estropearse?", estoy segura que me falta mucho por explorar y aprender sobre las "rosette para itabags" y después de esta experiencia me siento muy motivada.
! [ENGLISH VERSION]
✦ RESULT ✦ The rosette you see in the photos measures 16 cm in diameter, and taking into account the ribbons at the bottom, it measures 31 cm in length. The plastic base makes it feel quite stable, which was something I was concerned about and one of my main doubts about these accessories:“How sturdy are they, what are they made of inside, and what is their average lifespan before they start to deteriorate?” ~ I am sure I still have a lot to explore and learn about rosettes for itabags, and after this experience, I feel very motivated.

✦ Unedited images, taken in natural light ✦
Aprendí que aunque estos accesorios permitan bastante libertad creativa en cuanto selección de materiales y secuencias/diseños, sí existe una fórmula para lograr ese efecto tan bonito de superposición y maximalismo que al mismo tiempo es sumamente limpio y atractivo.
De mi diseño corregiría varias cosas, principalmente las dimensiones, utilizaría cintas menos anchas y mayor cantidad de rosas; he trabajado desde la improvisación con lo que tenía en casa y sin plantillas guía, fue un trabajo 100% intuitivo y midiendo con la regla de vez en cuando.
¡Seguiré practicando!, gracias por acompañarme en esta mini aventura y como siempre, estaré muy feliz de que compartas tus pensamientos, opiniones y sugerencias en los comentarios. Un abrazo a todos 💕
! [ENGLISH VERSION]
I learned that although these accessories allow for a lot of creative freedom in terms of material selection and sequences/designs, there is a formula for achieving that beautiful effect of layering and maximalism that is also extremely clean and attractive.I would correct several things about my design, mainly the dimensions. I would use narrower ribbons and more roses. I worked improvisationally with what I had at home and without guide templates. It was 100% intuitive work, measuring with a ruler from time to time.
I'll keep practicing! Thank you for joining me on this mini adventure and, as always, I'd be very happy if you shared your thoughts, opinions, and suggestions in the comments. Hugs to all! 💕

✦ See you soon! Have a great start to March! ✦


 |  |  |  |  |  |  |  |  |
|---|
✨ 🍓 Texts & photos by @Tesmoforia 🍓 ✨
📸 Tools: Smartphone 📲 Snow 🎬 TinyPNG 🌓 FotoJet 📐
🚨 ¡Please do not take, edit or republish my material without my permission! 🚨
💌 ¿Do you wish to contact me? Discord #tesmoforia 💌
🌙 Graphics @Vanuzza - InstaLog 📲