
✦ As the lovely Emily would say, "Rococo kisses!" 💖 - Collage & Edition in FotoJet, photos by @Tesmoforia ✦

🇪🇸 ~ Nunca he hecho una manualidad con temática de lucha o concientización sobre el cáncer de mama y mientras escribía para una iniciativa en la comunidad de Woman Tribe, me inspiré en comenzar este pequeño bordado:
Bordado que evolucionó en la idea de un BROCHE ROCOCÓ, y es que es imposible resistirse al carisma y los conjuntos que se crea "Emily Rococó" a quien sigo en YouTube, y cuyos videos me han estado acompañando al final del día cuando he tenido tiempo para crear para mi blog en Hive.
🇺🇸 ~ I have never done a craft project with a theme of breast cancer awareness or advocacy, and while writing for an initiative in the Woman Tribe community, I was inspired to start this little embroidery project:
Embroidery that evolved into the idea of a ROCOCÓ BROOCH, because it's impossible to resist the charisma and outfits created by “Emily Rococó”, whom I follow on YouTube, and whose videos have been keeping me company at the end of the day when I've had time to create for my blog on Hive.

✦ Fashions that should make a comeback ✦
Emily es un bonito recordatorio de autenticidad en un mundo digital -y no tan digital- sobresaturado de "la copia de la copia", y mi inspiración para crear este broche (siéntete libre de sustituir el imán por un imperdible para que puedas lucirlo en tu bolso o chaqueta favorita).
⏳ Tiempo: ⭐⭐⭐⭐/ 5.
🚀 Dificultad: ⭐⭐⭐⭐/ 5.
🪙 Costo aproximado: ⭐⭐⭐/ 5.
Emily is a beautiful reminder of authenticity in a digital—and not-so-digital—world oversaturated with “copies of copies,” and my inspiration for creating this brooch (feel free to replace the magnet with a safety pin so you can wear it on your favorite bag or jacket).
⏳ Time: ⭐⭐⭐⭐/ 5.
🚀 Difficulty: ⭐⭐⭐⭐/ 5.
🪙 Approximate cost: ⭐⭐⭐/ 5.

« 𝕋 𝕆 𝕆 𝕃 𝕊 • 𝔸 ℕ 𝔻 • 𝕄 𝔸 𝕋 𝔼 ℝ 𝕀 𝔸 𝕃 𝕊 »
 |
|---|
| 🇪🇸 ✦ Las herramientas y materiales que necesitas para elaborar este proyecto son: Papel de reciclaje, tijeras, bolígrafo, regla, tela para bordar o etamina, hilos de diferentes colores o madejas para bordar, aguja regular, plancha para ropa, carton corrugado fino, cartulina color blanco, pegamento escolar, pistola de silicón, barra de silicón, cinta de encaje de colores, perlas sintéticas de 0.5 cm, hilo regular, cinta de seda de 1cm de ancho, encajes y cintas de seda finas surtidas en colores pasteles, fieltro color rosa, silicón liquido, 1 imán pequeño de 2cm de radio. |
| 🇺🇸 ✦ The tools and materials you need to make this project are: Recycled paper, scissors, pen, ruler, embroidery fabric or muslin, different colored threads or embroidery skeins, regular needle, iron, thin corrugated cardboard, white cardstock, school glue, silicone gun, silicone stick, colored lace ribbon, 0.5 cm synthetic pearls, regular thread, 1 cm wide silk ribbon, assorted pastel-colored lace and thin silk ribbons, pink felt, liquid silicone, 1 small magnet with a 2 cm radius. |
« 🎗️ Let's celebrate "Breast Cancer Awareness Month" with sensitivity and optimism! 🎗️ »

 | | |
|---|---|---|
 |  |  |

【 PASO 1 】 Comenzamos con buscar en tu página de referencias favorita un patrón guía, en Pinterest hay muchos de buena calidad, y yo escogí una simple sin sombras por un tema de practicidad y para no sobresaturar la pieza (al final del post en los pasos finales me entenderás).
【 STEP 1 】 We started by searching your favorite reference page for a pattern guide. There are many good ones on Pinterest, and I chose a simple one without shadows for practical reasons and so as not to oversaturate the piece (you'll understand why at the end of the post in the final steps).
 |  |  |
|---|---|---|
 |  |  |
 |  |  |

【 PASO 2 】 Preparamos una pieza simple de etamina o tela para bordar, cargamos una agua regular de hilo color rosa (si es de madeja 1 sola hebra esta bien, si usas hilo de coser utiliza 2 hebras); comienza primero de izquierda a derecha y luego regresa sobre la figura de derecha a izquierda. Este es un bordado en punto de cruz donde decidí experimentar y cargar la aguja con 2 tonos diferentes de rosado.
【 STEP 2 】 Prepare a simple piece of muslin or embroidery fabric, load a regular pink thread (if it is a single strand skein, that is fine; if you are using sewing thread, use 2 strands); start from left to right and then go back over the figure from right to left. This is cross-stitch embroidery where I decided to experiment and load the needle with two different shades of pink.
 |  |
|---|---|
 |  |
 |  |

 |  |
|---|

【 PASO 3 】 A continuación con el papel de reciclaje, regla y bolígrafo vamos a dibujar un ovalo, si es mas redondo que cuadrado es una decisión personal, a mi me gusta mas esta figura tipo rectángulo de bordes redonditos.
【 STEP 3 】 Next, using the recycled paper, ruler, and pen, we are going to draw an oval. Whether it is more round than square is a personal choice. I prefer this rectangle-like shape with rounded edges.
Cortaremos el "rectángulo ovalado", comprobamos que la figura del bordado se ve bien, y replicamos la silueta de la "ventana de papel" en el cartón fino. Ahora recortamos la figura de cartón, la replicamos en la cartulina blanca y unimos ambas piezas con pegamento escolar.
Cut out the “oval rectangle,” check that the embroidery design looks good, and trace the outline of the “paper window” onto the thin cardboard. Now cut out the cardboard shape, trace it onto the white cardstock, and glue the two pieces together with school glue.
🟡 DATO CURIOSO: La cartulina blanca tiene la función de iluminar el bordado, al ser una tela con pequeños agujeros el fondo marron del carton lo oscurece, en cambio un fondo de un color mas claro lo ilumina.
🟠 CURIOUS FACT: The white cardboard serves to brighten the embroidery, as the brown background of the cardboard darkens it due to the small holes in the fabric, whereas a lighter-colored background brightens it.

 |  |
|---|---|
 |  |

【 PASO 4 】 Buscamos la plancha para ropa y a temperatura media vamos a planchar el pequeño bordado. Y cuando la pieza de cartón y cartulina blanca estén totalmente secos, vamos a "forrar" esa pieza con el bordado, agregando poco a poco silicón caliente en pequeñas cantidades en todo el borde exterior del "rectángulo ovalado".
【 STEP 4 】 Find the iron and set it to medium heat to iron the small embroidery. Once the cardboard and white cardstock are completely dry, cover the piece with the embroidery, gradually adding hot silicone in small amounts around the entire outer edge of the oval rectangle.
Recomiendo estirar un poco la tela para tensarla a medida que la pegamos al cartón de reciclaje. Cuando todo este bien pegado, con ayuda de la tijera corta los excesos de tela de la parte posterior.
I recommend stretching the fabric a little to tighten it as you glue it to the recycled cardboard. When everything is securely glued, use scissors to cut off the excess fabric from the back.
 |  |
|---|

 |  |
|---|---|
 |  |
【 PASO 5 】 ¡ESTA ES LA PARTE MAS DIVERTIDA!, vamos a decorar como mas nos guste; yo escogi utilizar un encaje rosa que plisé a mano hace algunos meses, y lo pegué al reverso de la pieza de cartón con silicón caliente.
【 STEP 5 】 THIS IS THE MOST FUN PART! Let's decorate it however we like. I chose to use some pink lace that I pleated by hand a few months ago, and I glued it to the back of the cardboard piece with hot glue.
Debo decir que en esta etapa si ya estas satisfecho con el look puedes dar el proyecto por terminado y saltar hasta el [Paso N°8], pero si te gusta la estética rococó y lo romántico y sobresaturado, sigue leyendo.
I should mention that at this stage, if you are already satisfied with the look, you can consider the project finished and proceed to [Step 8], but if you like the rococo aesthetic and the romantic and oversaturated look, please continue reading.
 |  |
|---|---|
 |  |

 |  |
|---|---|
 |  |
 |  |
【 PASO 6 】 La segunda capa de decorado será una cadena de perlas sintéticas. Para hacerla toma hilo color blanco y pásalo doble por la aguja regular.
【 STEP 6 】 The second layer of decoration will be a string of synthetic pearls. To make it, take white thread and double it through a regular needle.
Has una cadena de perlas del largo exacto de la circunferencia de este "camafeo bordado", y después has un nudo para cerrar la cadeneta y crear un pequeño collar, que ahora pegaras de forma permanente con ayuda de la pistola de silicón, agregando pequeñas cantidades de silicón caliente en el borde del "camafeo" sobre el encaje rosado.
Make a pearl chain that is exactly the same length as the circumference of this “embroidered cameo,” then tie a knot to close the chain and create a small necklace, which you will now permanently attach using the silicone gun, adding small amounts of hot silicone to the edge of the “cameo” on the pink lace.
Hazlo lentamente, no agregues pegamento en todo el rededor de la pieza de una sola vez porque se secará antes que puedas pegar las perlas.
Do it slowly; don't add glue all around the piece at once because it will dry before you can stick the beads on.
 |  |
|---|


 |  |
|---|---|
 |  |
 |  |
 |  |
【 PASO 7 】 Con las cintas de seda de diferentes colores pasteles has un ramillete simple que pegaras con silicón caliente en la parte inferior de central del camafeo, detrás del encaje rosa.
【 STEP 7 】 Using silk ribbons in different pastel colors, make a simple bouquet that you will attach with hot glue to the bottom center of the cameo, behind the pink lace.
Con la cinta de 1cm de ancho elabora una rosa (si no sabes cómo hacer rosas en cinta de seda has 🌹 CLICK AQUÍ 🌹 para aprender cómo hacer una rosa como la de las fotos que estas viendo en este post). Pega esta rosa en el centro inferior del camafeo.
Using the 1 cm wide ribbon, make a rose (if you don't know how to make silk ribbon roses, 🌹 CLICK HERE 🌹 to learn how to make a rose like the ones in the photos you are seeing in this post). Glue this rose to the bottom center of the cameo.

 |  |  |
|---|---|---|
 |  |  |
 |  |  |
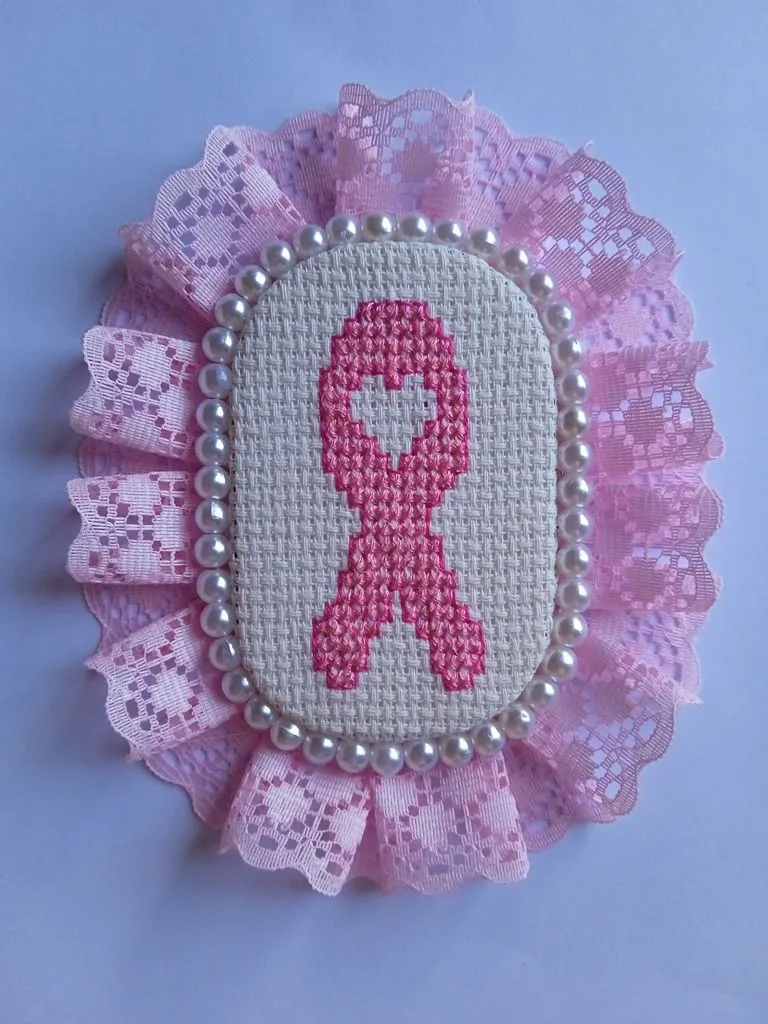
【 PASO 8 】 Para finalizar solo queda forrar con fieltro rosa el reverso del broche; para eso replicamos el molde que hicimos para crear la base de cartón reciclado, pero ahora sobre el fieltro, despues lo pegamos al reverso del broche con silicón liquido, y finalmente pegamos el imán con una cantidad generosa de silicón caliente.
【 STEP 8 】 To finish, all that remains is to cover the back of the brooch with pink felt. To do this, we replicate the mold we made to create the recycled cardboard base, but now on the felt. Then we glue it to the back of the brooch with liquid silicone, and finally glue the magnet with a generous amount of hot silicone.
« 🎗️ A reminder to be supportive and never lose hope 🎗️ »
 |  |
|---|---|
 |  |
 |  |

El cáncer de mamá es un tema sensible pero estoy segura que todos tenemos la capacidad de abordarlo con empatía, sensibilidad y sobre todo con un espiritu de solidad y apoyo con quien lo ha sufrido, lo sufre o tiene un ser querido que lo padece.
No olvidemos que la mejor "arma" contra el cáncer de mama es la detección a tiempo, por favor cuando notes o sientas algo extraño no lo pienses dos veces y ve al doctor
🙏 🔬 🩺
Espero de corazón que este pequeño proyecto te haya gustado, y como siempre me encantará leer lo que piensas u opinas en los comentarios, un abrazo enorme ~ 💕
Breast cancer is a sensitive topic, but I am sure that we all have the ability to address it with empathy, sensitivity, and above all, with a spirit of solidarity and support for those who have suffered from it, are affected by it, or have a loved one who is suffering from it.
Let's not forget that the best “weapon” against breast cancer is early detection, so please, if you notice or feel anything unusual, don't think twice and go to the doctor
🙏 🔬 🩺
I sincerely hope you enjoyed this little project, and as always, I would love to read your thoughts and opinions in the comments. Big hugs ~ 💕

✦ Where would you place this dual-themed ornament? Who would you give it to? ✦


 |  |  |  |  |  |  |  |  |
|---|
✨ 🍓 Texts & photos by @Tesmoforia 🍓 ✨
📸 Tools: Smartphone 📲 Snow 🎬 TinyPNG 🌓 FotoJet 📐
🚨 ¡Please do not take, edit or republish my material without my permission! 🚨
💌 ¿Do you wish to contact me? Discord #tesmoforia 💌
🌙 Graphics Keili Lares - InstaLog 📲