✨¡Hola amigos amantes de la creatividad! Espero que estén todos bien✨
Buenas tardes, amigos. Espero estén pasando una excelente semana. Por mi parte, contenta de pasar por acá a compartir una nueva creación con ustedes. En esta ocasión les comparto el paso a paso para elaborar un bonito colgante para la cocina. Hace mucho no hacía un colgante, creo jaja, es que de tantas creaciones que hago ya no recuerdo muy bien, si tardo mucho en repetir alguna idea o no, además de que olvido todo muy rápido, se podrán imaginar. Pero, en fin, como la semana pasada compartí una idea muy linda para la cocina, esta vez quise elaborar un lindo colgante que hiciera juego con otra decoración de gallina.
🔸Sin más que añadir, a continuación los dejo con el paso a paso:
✨¡Hello friends who love creativity! ✨
Good afternoon, friends. Good afternoon, friends. I hope you are having a great week. For my part, I am happy to stop by here to share a new creation with you. On this occasion I am sharing with you the step by step to make a nice pendant for the kitchen. It has been a long time since I made a pendant, I think haha, it is because of so many creations that I do not remember very well, if it takes me a long time to repeat an idea or not, and I forget everything very quickly, you can imagine. But, anyway, since last week I shared a very nice idea for the kitchen, this time I wanted to make a nice pendant that matched another chicken decoration.
🔸Without more to add, then I leave you with the step by step:

♥️ESPERO QUE TE GUSTE,
¡Empecemos!
♥️I HOPE YOU LIKE IT,
Let's start!

✂️ MATERIALES | ✂️ MATERIALS
- Cartón grueso.
- Cartulina corrugada.
- Malla metálica.
- Foami escarchado negro, blanco,
naranja, amarillo y rojo. - Foami escarchado blanco y verde.
- Cinta delgada.
- Lazo.
- Pinturas y marcadores.
- Hoja blanca.
- Pegamento.
- Tijeras.
- Lápiz.
- Thick cardboard.
- Corrugated cardboard.
- Metal mesh.
- Black, white, orange, yellow and red frosted foam.
White and green frosted foam.
Thin ribbon. - Bow.
- Paints and markers.
- White sheet.
- Glue.
- Scissors.
- Pencil.
🌟 PROCEDIMIENTO | 🌟 PROCESS
- PASO 1:
Lo primero que hice fue la circunferencia de la base del colgante, en este caso utilicé las medidas de un plato pequeño y en el centro también tracé y recorté una circunferencia mucho más pequeña, dejando un borde de 2.5 cm de ancho. Al estar listo, simplemente calqué el mismo patrón de la base en cartulina corrugada y recorté.
- STEP 1:
The first thing I did was the circumference of the base of the pendant, in this case I used the measurements of a small plate and in the center I also traced and cut out a much smaller circumference, leaving a 2.5 cm wide border. When it was ready, I simply traced the same pattern of the base on corrugated cardboard and cut it out.


- PASO 2:
En la circunferencia más pequeña de la base, pegué la malla metálica, la cual recorté dejando un borde para pegar, además pegué la cinta para colgar en el borde superior de la base y encima pegué la circunferencia de cartulina corrugada para cubrir.
- STEP 2:
On the smaller circumference of the base, I glued the metal mesh, which I cut out leaving a border to glue, I also glued the ribbon to hang on the upper edge of the base and on top I glued the corrugated cardboard circumference to cover.


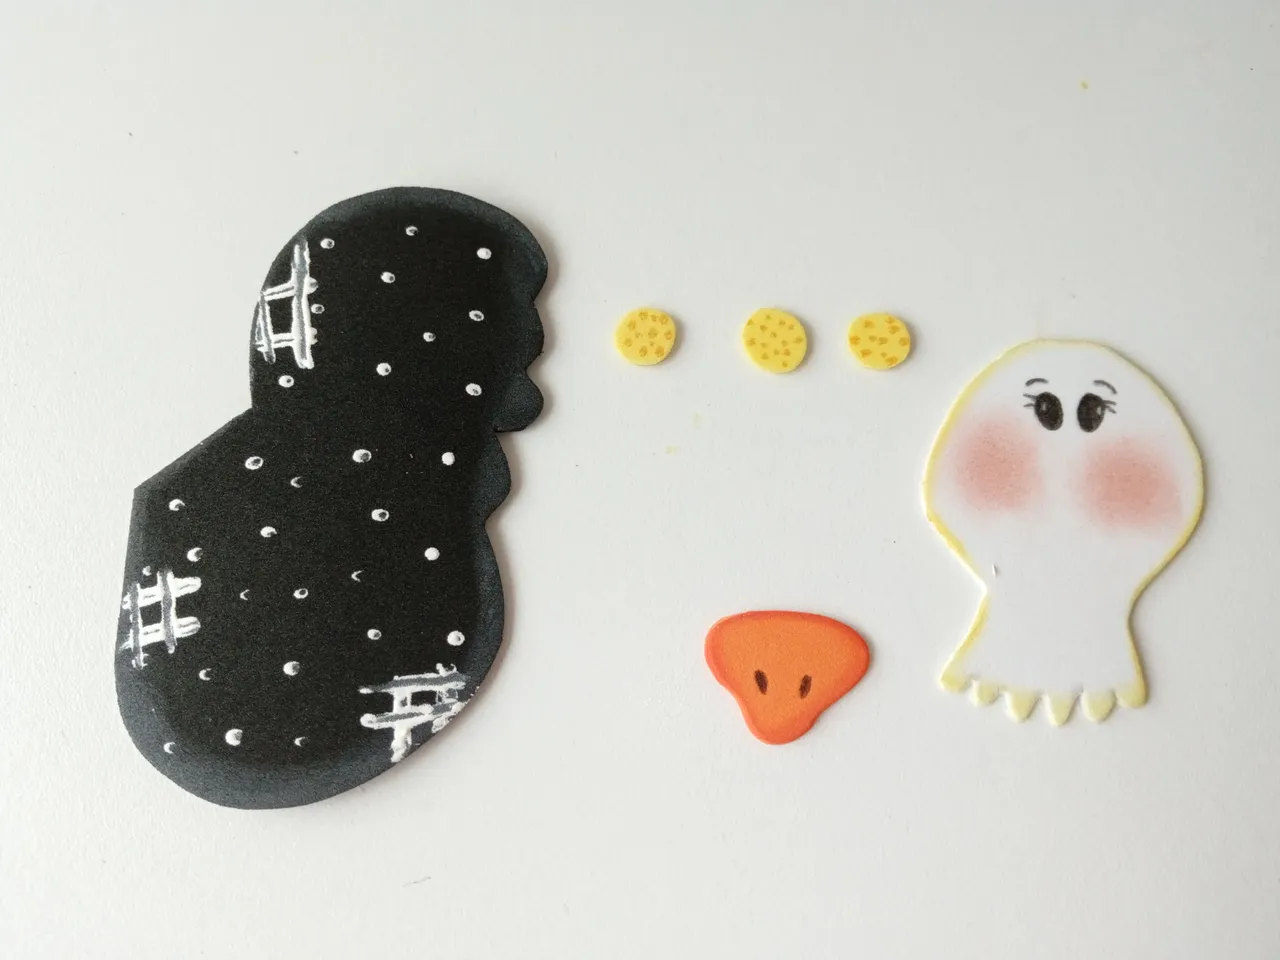
- PASO 3:
Enseguida comencé a dibujar los patrones de la decoración que en este caso fueron unas cuantas flores y una gallina como protagonista. Luego, transferí los patrones a los colores correspondientes de foami, de la siguiente manera: Para la gallina; cuerpo en foami negro, cabeza en foami blanco, pico en foami naranja y cresta en foami rojo. Para las flores; foami escarchado blanco, centro en foami amarillo y hojas en foami escarchado verde.
- STEP 3:
I immediately began to draw the patterns of the decoration, which in this case were a few flowers and a hen as the protagonist. Then, I transferred the patterns to the corresponding colors of foam, as follows: For the hen; body in black foam, head in white foam, beak in orange foam and crest in red foam. For the flowers; White frosted foam, yellow foam center and green frosted foam leaves.


- PASO 4:
Al tener todas las piezas recortadas, comencé a dar color a los bordes de los foamis lisos; tomé las pinturas y con ayuda de un pañito fui difuminando los bordes. Luego, di detalles a la nariz y ojos con marcador negro, hice puntos blancos y algunos diseños extras en el cuerpo de la gallina y al centro de las flores, puntos naranjas para que hiciera contraste.
- STEP 4:
Al tener todas las piezas recortadas, comencé a dar color a los bordes de los foamis lisos; tomé las pinturas y con ayuda de un pañito fui difuminando los bordes. Luego, di detalles a la nariz y ojos con marcador negro, hice puntos blancos y algunos diseños extras en el cuerpo de la gallina y al centro de las flores, puntos naranjas para que hiciera contraste.

- PASO 5:
Ya casi para finalizar, comencé a unir las piezas hasta formar la gallina, las flores y luego, las comencé a pegar en el orden deseado a la base. En mi caso, quise pegar la gallina en uno de los laterales, las flores y hojas a los bordes, pero como no me convencía las flores que tenía, recorté unas más para completar.
- STEP 5:
Almost finished, I started to join the pieces together to form the hen and the flowers, and then I started to glue them in the desired order to the base. In my case, I wanted to glue the hen on one of the sides, the flowers and leaves on the edges, but as I wasn't convinced by the flowers I had, I cut out some more to complete them.


- PASO 6:
Por último, escribí en una hoja blanca una frase, pegué sobre cartulina escarchada (opcional), pegué al espacio superior vacío junto con el lazo. Además, pinté algunas manchas de color azul por todo el borde que combinaran con el lazo.
- STEP 6:
Finally, I wrote a phrase on a white sheet, glued it on frosted cardboard (optional), glued it to the empty space above along with the bow. I also painted some blue spots around the edge to match the bow.


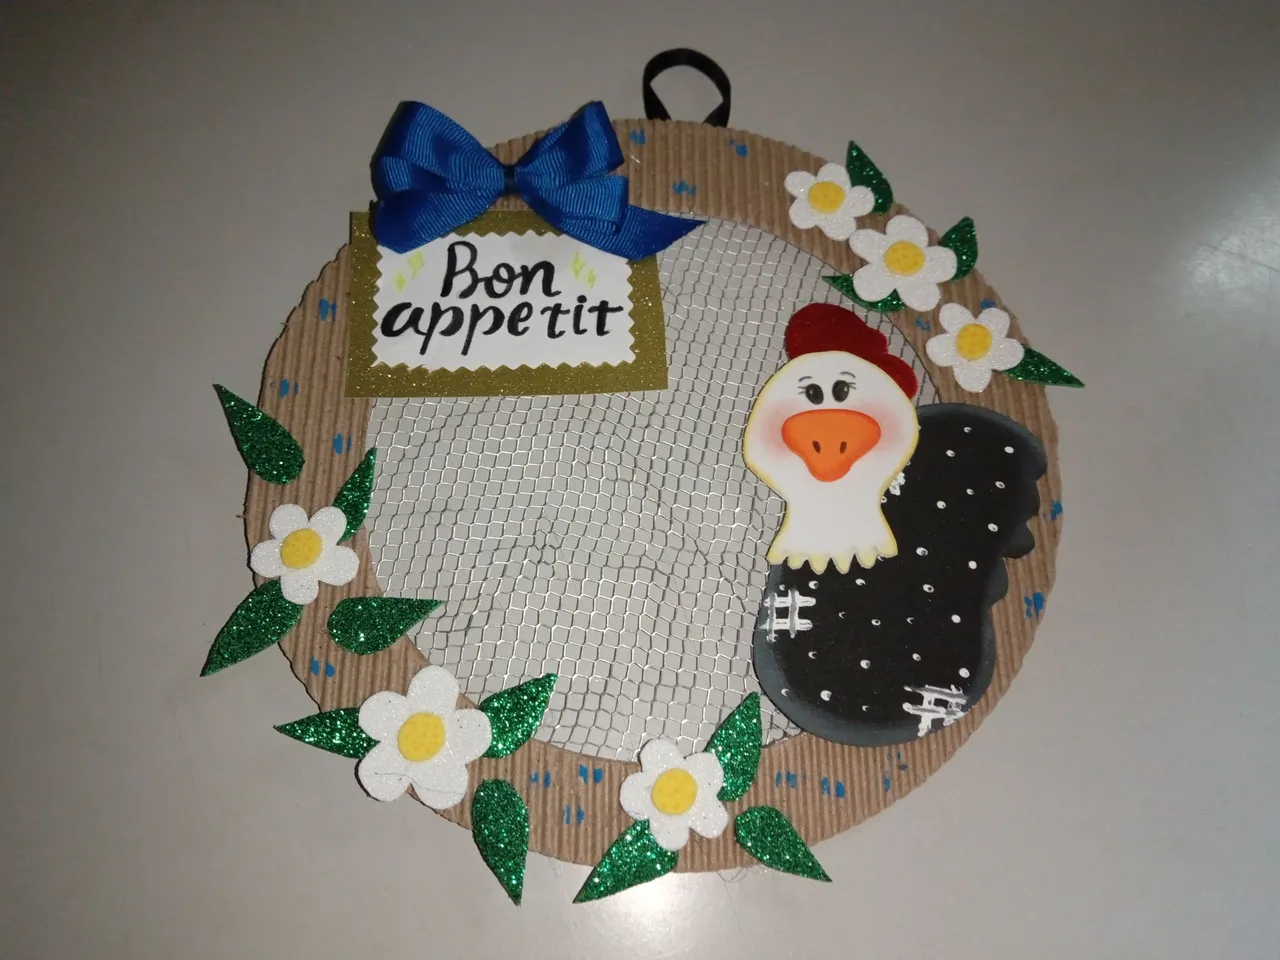
Así es como pueden elaborar un bonito colgante para la cocina. Deben tener en cuenta que yo utilicé bastante cantidad de materiales, pero si quieres pueden reducir esta cantidad, pues no tienen que poner la malla metálica y en vez de utilizar cartulina corrugada pueden forrar la base de cartón con telas y así ayudarse un poco con otros materiales más económicos o fáciles de conseguir. Espero que les haya gustado el paso a paso y se animen a elaborarlo.
❤️Hasta la próxima publicación.
This is how you can make a nice kitchen pendant. Keep in mind that I used quite a lot of materials, but if you want you can reduce this amount, because you don't have to use the metal mesh and instead of using corrugated cardboard you can cover the cardboard base with fabric and thus help yourself a little with other cheaper or easier to get materials. I hope you liked the step by step and are encouraged to make it.
❤️Until the next post.
✨RESULTADO: | ✨RESULT:


!TE DESEO UN GRAN DÏA¡
Todas las fotografías son de mi propiedad.
Separador y Fotos editadas en Canva
!I WISH YOU A GOOD DAY
All photographs are my property.
Photos edited in Canva