✨🐦¡Hola amigos amantes de la creatividad! Espero que hayan pasado un muy buen comienzo de semana.🐦✨
El día de hoy comparto con ustedes un hermoso colgante de casita para pájaros. Hace un tiempo, concretamente principios de diciembre, elaboré una casita con temática navideña similar a esta, pero como yo quedé encantada quise elaborar otra casita, con diferente temática para poder dejarla colgada por todo el año. Sinceramente, me parece una decoración muy bonita para decorar una pared o la puerta de una habitación. Además es muy fácil de elaborar, rápido y necesitaremos materiales de provecho como cartón y tiene un tamaño bastante moderado, lo cual nos ayuda para utilizar pequeños retazos de tela, piezas de foami restantes, etc. Por otro lado, podemos hacerlo con la temática que queramos, se trata de utilizar nuestra imaginación y crear algo muy bonito.
🔸Sin más que añadir, a continuación los dejo con el paso a paso:
✨🐦¡Hello friends who love creativity! I hope you had a very good start to the week.🐦✨
Today I share with you a beautiful pendant of a birdhouse. Some time ago, specifically at the beginning of December, I made a Christmas-themed house similar to this one, but as I was delighted I wanted to make another house, with a different theme so I could leave it hanging all year. Honestly, I find it a very nice decoration to decorate a wall or the door of a room. It is also very easy to make, fast and we will need useful materials, such as cardboard and it has a fairly moderate size, which helps us to use small fabric scraps, foami remains, etc. On the other hand, we can do it with the theme we want, it is about using our imagination and creating something very beautiful.
🔸Without more to add, then I leave you with the step by step:

♥️ESPERO QUE TE GUSTE,
¡Empecemos!
♥️I HOPE YOU LIKE IT,
Let's start!

✂️ MATERIALES | ✂️ MATERIALS
- Cartón grueso.
- Paletas de helado.
- Retazo de tela.
- Foami escarchado dorado.
- Foami escarchado verde.
- Foami rosados.
- Foami amarillo.
- Foami negro.
- Pintura blanca.
- Sombras o tizas.
- Marcador negro.
- Perlas pequeñas plásticas
(Color de preferencia). - Silicona caliente.
- Tijeras.
- Papel.
- Lápiz.
- Regla.
- Thick cardboard
- Ice cream stick
- Fabric.
- Golden frosty foami.
- Green frosty foami.
- Pink foam
- Yellow foam.
- Black foam
- White paint.
- Shadows or chalks.
- black markers
- Small plastic beads
(Colour of preference). - Hot silicone.
- Scissors.
- Paper.
- Pencil.
- Rule.

🐦 PROCEDIMIENTO | 🐦 PROCESS
- PASO 1:
Lo primero que debemos hacer es tomar el cartón grueso y dibujar la figura de una casa. En mi caso; Dibujé un rectángulo de 12 cm x 7 cm y sobre él, un triángulo de 6 cm de largo y recorté. Por otro lado, cortar un trozo de tela de 1cm o 2cm más largo en cada extremo que la pieza de la casa, en mi caso; 16cm x 15,5. Forrar la casa pegando los extremos sobre ella, guiándonos por la forma de la casa. Seguramente tendrás un espacio vacío sin tela. Para que quede prolijo, debemos cortar un rectángulo que cubra la parte vacía. En mi caso; 11 cm x 6,5 cm. Pegamos y giramos la pieza al frente.
- STEP 1:
The first thing we must do is take the thick cardboard and draw the figure of a house. In my case; I drew a 12 cm x 7 cm rectangle and on it, a 6 cm long triangle and cut out. On the other hand, cut a piece of fabric 1cm or 2cm longer at each end than the piece of the house, in my case; 16cm x 15.5. Lining the house gluing the ends on it, guiding us by the shape of the house. You will surely have an empty space without fabric. To make it neat, we must cut a rectangle that covers the empty part. In my case; 11cm x 6.5cm. We glue and turn the piece to the front.


- PASO 2:
En esta parte, toma 2 paletas, pega 1 a uno de los dos extremos para formar el techo de la casa, toma un trozo de cinta delgada, dóblalo en dos y pega justo donde se cruzarán las dos paletas. Una vez hecho esto, pega la otra paleta al otro extremo entrecruzándola con la otra y ocultando la cinta.
- STEP 2:
In this part, take 2 pallets, glue one to one of the two ends to form the roof of the house, take a piece of thin tape, fold it in two and glue just where the two pallets will cross. Once this is done, glue the other palette to the other end crisscrossing it with the other and hiding the tape.


- PASO 3:
Para la entrada, dibujar y recortar un corazón en foami negro, pegar en la parte superior de la casa y pegar pequeñas perlas del color deseado alrededor del corazón. Por otro lado, dibuja y corta 4 hojas largas de tu elección en foami verde escarchado. Luego pegar 2 en el techo y 2 en la parte inferior de la casa. Para dar más detalle; corta tiras muy finas de foami de diferentes colores, enrolla formando una flor y pega en el orden deseado sobre las hojas.
- STEP 3:
For the entrance, draw and cut out a heart in black foam, glue it to the top of the house and glue small pearls of the desired color around the heart. On the other hand, draw and cut 4 leaves of your choice in frosty green foam. Then glue 2 on the roof and 2 on the bottom of the house. To give more detail; Cut very thin strips of different colored foam rubber, roll them into a flower shape and glue them in the desired order on the leaves.


- PASO 4:
Ahora si podemos empezar con la elaboración de los pajaritos. Busca la figura de un pájaro que te guste y dibuja las partes de su cuerpo de forma individual para tener el patrón. Luego, traza y corta en el color del foami correspondiente. En mi caso; el cuerpo, 2 piezas de 4,3cm x 3,2cm en fomai rosa oscuro y amarillo. Alas, 2 piezas de 2,5cm en foami rosa claro y amarillo. Por último, el pico, 2 piezas de 0,5 cm en foami escarchado dorado. Pega cada pieza al color correspondiente de ambos pájaros.
- STEP 4:
Now if we can start with the elaboration of the little birds. Find the shape of a bird that you like and draw the parts of its body individually to have the pattern. Then, trace and cut the color of the corresponding foami. In my case; the body, 2 pieces of 4.3cm x 3.2cm in the form of dark pink and yellow. Wings, 2 pieces of 2.5cm in light pink and yellow foam. Finally, the beak, 2 pieces of 0.5 cm in golden frosted foam. Glue each piece to the corresponding color of both birds.


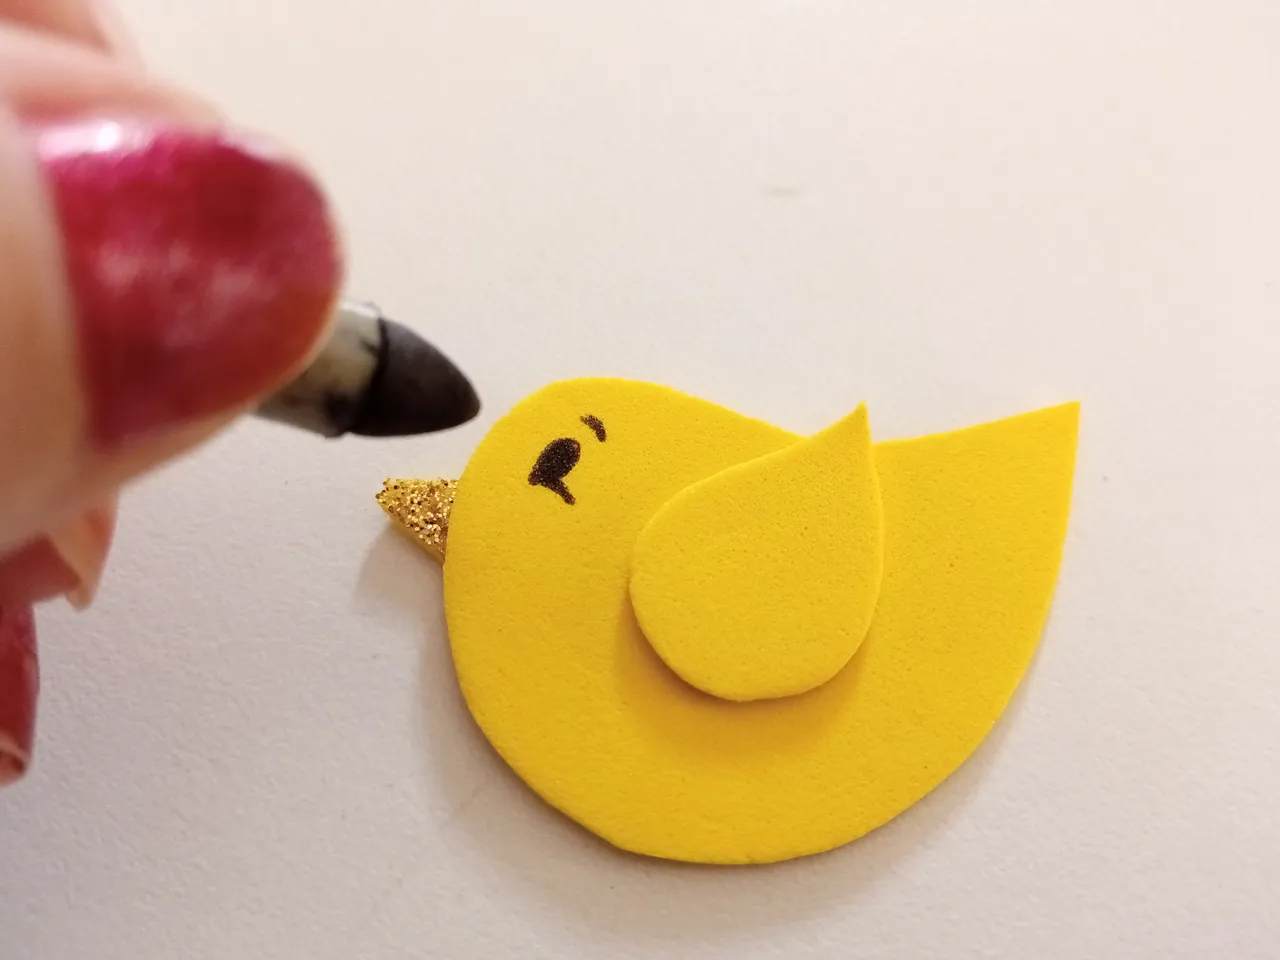
- PASO 5:
Para los ojos, toma un marcador negro, preferiblemente de punta fina, y dibuja los ojos de los pájaros. Como hice una hembra y un macho, hice los ojos diferentes. En el caso del macho, dibujé un ojo ovalado, debajo una línea curva que sobresale y arriba una pequeña ceja. Para la hembra es mucho más fácil, dibujé una línea larga, curva y antes del final una pequeña pestaña.
- STEP 5:
For the eyes, take a black marker, preferably a fine tip, and draw the eyes of the birds. Since I made a female and a male, I made the eyes different. In the case of the male, I drew an oval eye, below a curved line that protrudes and above a small eyebrow. For the woman it is much easier, I drew a long, curved line and before the end a small eyelash.

- PASO 6:
Para dar más detalle, repasa todo el borde de ambos cuerpos y alas con un tono más oscuro de sombra o tiza, o que simplemente contraste, puedes ayudarte de un pincel o paño. Seguidamente, con la punta de un lápiz y la pintura blanca, haz 3 puntos en las mejillas de cada ave y en el ala de la hembra. Para el pájaro macho hice puntos en las alas con un marcador negro. Y finalmente, pegar ambos pajaritos frente a frente, justo encima de las dos hojas inferiores.
- STEP 6:
To give more detail, go over the entire edge of both bodies and wings with a darker shade of shadow or chalk or simply contrast, you can help with a brush or cloth. Next, with the tip of a pencil and the white paint, make 3 dots on the cheeks of each bird and on the wing of the female. For the male bird I made dots on the wings with a black marker. And finally, glue the two little birds one in front of the other, just above the two lower leaves.


✨🐦¡Y listo!🐦✨ Así hice este lindo colgante casa para pajaritos, la verdad que cuando escribí este post me di cuenta que es una decoración bastante romántica jaja y falta poco para empezar con las decoraciones para el día del amor y la amistad que es celebrada el 14 de febrero en Venezuela. Así que, aparte de ser un bonito colgante para nuestra habitación o pared de nuestro hogar, también es una bonita idea para regalar un detalle a un ser querido. Espero que les haya gustado y se animen a elaborarlo.
❤️Hasta la próxima publicación.
✨🐦¡And ready!🐦✨ This is how I made this cute birdhouse pendant, the truth is that when I wrote this post I realized that it is quite a romantic decoration haha and there is just a little left to start with the decorations for the day of love and friendship that is celebrated on February 14 in Venezuela. So, apart from being a nice pendant for our room or wall in our home, it is also a nice idea to give a detail to a loved one. I hope you liked it and are encouraged to make it.
❤️Until the next post.
✨RESULTADO: | ✨RESULT:


!TE DESEO UN GRAN DÏA¡
Todas las fotografías son de mi propiedad.
Separador y Fotos editadas en Canva
!I WISH YOU A GOOD DAY
All photographs are my property.
Photos edited in Canva