✨¡Hola amigos amantes de la creatividad! Espero que estén todos bien.✨
Buenas noches, amigos. Espero que estén pasando una excelente semana. Por mi parte, contenta de pasar por acá a compartir una linda idea con ustedes. En esta ocasión, les comparto el paso a paso para elaborar un lindo dulcero con temática de león. Es mi primera vez elaborando un león en foami en miniatura, jaja. Me causó un poco de gracia al momento de ver las piezas recortadas porque pensé que me quedaría fatal, pero, como dicen por ahí, hay que confiar en el proceso, porque siempre nos sorprende el resultado final, y esta no fue la excepción.
🔸Sin más que añadir, a continuación los dejo con el paso a paso:
✨¡Hello friends who love creativity! I hope you are all well.✨
Good evening, friends. I hope you're having a great week. For my part, I'm happy to stop by to share a lovely idea with you. This time, I'm sharing the step-by-step instructions for making a cute lion-themed candy dish. This is my first time making a miniature foam lion, haha. I was a little amused when I saw the cutout pieces because I thought they would look terrible, but, as they say, you have to trust the process, because we're always surprised by the final result, and this was no exception.
🔸Without more to add, then I leave you with the step by step:

♥️ESPERO QUE TE GUSTE,
¡Empecemos!
♥️I HOPE YOU LIKE IT,
Let's start!

✂️ MATERIALES | ✂️ MATERIALS
- Botella de plástico.
- Foami escarchado salmón.
- Foami escarchado verde.
- Foami marrón.
- Foami crema.
- Foami verde.
- Pinturas y marcadores.
- Hoja blanca.
- Pegamento.
- Regla.
- Tijeras.
- Lápiz.
- Plastic bottle.
- Salmon-colored frosted foam.
- Green frosted foam.
- Brown foam.
- Cream foam.
- Green foam.
- Paints and markers.
- White paper.
- Glue.
- Ruler.
- Scissors.
- Pencil.
🌟 PROCEDIMIENTO | 🌟 PROCESS
✨PASO 1:
Lo primero que hice fue tomar la botella de plástico y recortar solo la parte del pico, la cual tiene una línea justo donde está la etiqueta, por donde uno se puede guiar para recortar con más comodidad. Yo quise utilizar la parte del pico, pero pueden utilizar la parte de la etiqueta y limpiar para retirar el pegamento.
✨STEP 1:
The first thing I did was take the plastic bottle and cut out only the spout, which has a line right where the label is, so you can use it to make cutting easier. I wanted to use the spout, but you can use the label and wipe it off to remove the glue.
 |  |
|---|
✨PASO 2:
Seguidamente, recorté en foami escarchado salmón un cilindro de 12 cm de circunferencia, al cual le recorté a los bordes formas ovaladas, dando una apariencia de flor y, además, recorté una tira de 8 cm x 2 cm en el mismo foami. A la pieza más grande, le recorté en medio una cruz por donde vamos a introducir los dulces y pegué a la parte baja de la botella. También, pegué la tira alrededor de la tapa y un cilindro extra de 2 cm para la parte superior de la tapa.
✨STEP 2:
Next, I cut a 12 cm circumference cylinder out of salmon-colored frosted foam. I cut oval shapes around the edges, giving it a flower-like appearance. I also cut out an 8 cm x 2 cm strip from the same foam. From the largest piece, I cut a cross in the middle where we'll insert the candy and glued it to the bottom of the bottle. I also glued the strip around the lid and an extra 2 cm cylinder for the top of the lid.
 |  |
|---|
✨PASO 3:
Seguidamente, dibujé el diseño del león en una hoja blanca y le quise añadir un accesorio, que en este caso fue una corona porque es el rey de la selva. Al tener el diseño listo, transferí a los colores correspondientes de foami, como explico a continuación:
✨Cabeza y orejas: 4 cm x 3 cm en foami color crema.
✨Cuerpo: 3 cm x 2 cm en foami color crema.
✨Patas delanteras: 2 cm en foami color crema.
✨Patas traseras: 1.5 cm en foami color crema.
✨Melena: 5 cm x 4.5 cm en foami marrón.
✨Corona: 2 cm x 1.5 cm en foami escarchado crema.
✨STEP 3:
Next, I drew the lion design on a white sheet of paper and wanted to add an accessory, which in this case was a crown because he's the king of the jungle. Once I had the design ready, I transferred it to the corresponding colors of foam, as explained below:
✨Head and ears: 4 cm x 3 cm in cream foam.
✨Body: 3 cm x 2 cm in cream foam.
✨Front legs: 2 cm in cream foam.
✨Hind legs: 1.5 cm in cream foam.
✨Mane: 5 cm x 4.5 cm in brown foam.
✨Crown: 2 cm x 1.5 cm in cream frosted foam.

✨PASO 4:
Al tener todas las piezas recortadas, es momento de comenzar a dar color a los bordes. En este caso, utilicé marcadores y difuminé suavemente, con un pañito. Utilicé colores que hicieran contraste o dieran más profundidad, como un tono marrón para el cuerpo y un tono negro para la melena. Al estar secas las piezas, es momento de dar detalles más específicos como los ojos, nariz, parte interna de las orejas, cejas, boca, patas y pelaje.
✨STEP 4:
Once all the pieces are cut out, it's time to start coloring the edges. In this case, I used markers and gently blended with a cloth. I used colors that contrasted or added depth, such as a brown shade for the body and a black shade for the mane. Once the pieces are dry, it's time to add more specific details like the eyes, nose, inside of the ears, eyebrows, mouth, legs, and fur.
 |  |
|---|
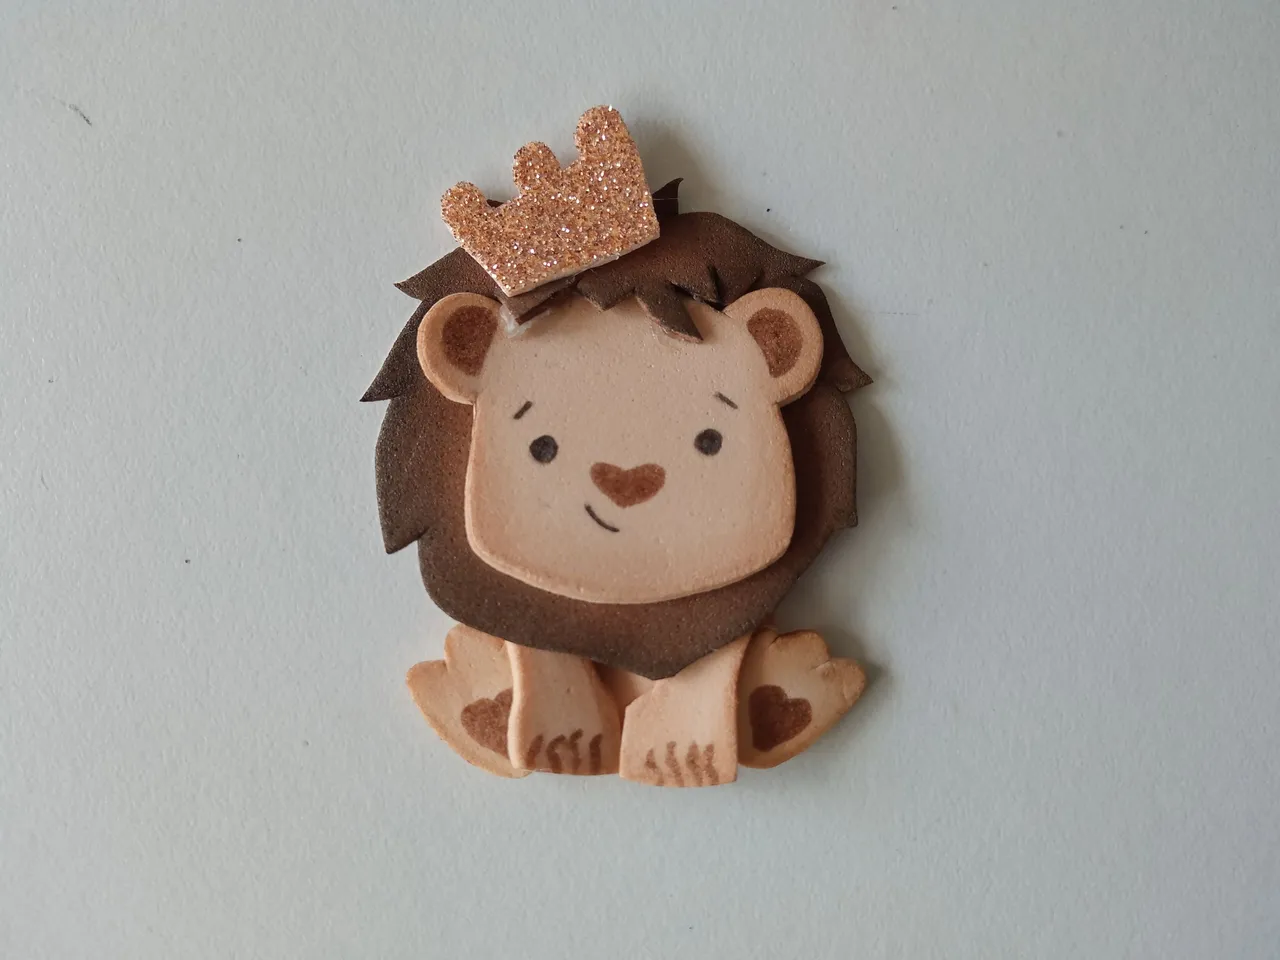
✨PASO 5:
Seguidamente, llegó el momento de comenzar a pegar las piezas y, como siempre, me gusta comenzar por la cabeza, melena, corona y, por último, el cuerpo. Además, pinté las mejillas con rubor y di puntos a las mismas mejillas y algunas partes de la melena con pintura blanca.
✨STEP 5:
Next, it's time to start gluing the pieces together. As always, I like to start with the head, mane, crown, and finally the body. I also painted the cheeks with blush and dotted the cheeks and some parts of the mane with white paint.
 |  |
|---|
✨PASO 6:
Para finalizar, dibujé un par de hojas en foami escarchado verde y en foami liso verde. En el caso del foami liso, le di un poco de color a los bordes y, finalmente, pegué al león justo en el pico, digamos que al lado del borde de la tapa y las hojas justo en medio de la base.
✨STEP 6:
To finish, I drew a couple of leaves on green frosted foam and plain green foam. In the case of the plain foam, I added a little color to the edges and, finally, glued the lion right on the beak, so to speak, next to the edge of the lid, and glued the leaves right in the middle of the base.
 |  |
|---|
✨Y listo, amigos, así es como pueden reutilizar algunos materiales para elaborar un lindo y sencillo dulcero de león o de la temática de preferencia. Para ser la primera vez elaborando un león, me siento muy satisfecha con el resultado y los colores, así que espero que les haya gustado el paso a paso y se animen a elaborarlo.
❤️Hasta la próxima publicación.
✨And that's it, friends! This is how you can reuse some materials to make a cute and simple lion candy dish or one with any theme of your choice. Considering this is my first time making a lion, I'm very pleased with the result and the colors, so I hope you enjoyed the step-by-step instructions and are inspired to try it out.
❤️Until the next post.
✨RESULTADO: | ✨RESULT:
 |  |
|---|

!TE DESEO UN GRAN DÏA¡
Todas las fotografías son de mi propiedad.
Separador y Fotos editadas en Canva
!I WISH YOU A GOOD DAY
All photographs are my property.
Photos edited in Canva