✨¡Hola amigos amantes de la creatividad! Espero que estén todos bien.✨
¡Buenas tardes, amigos! Espero que estén pasando una excelente semana. Por mi parte, estoy contenta de pasar por acá a compartir una linda idea con ustedes. En esta ocasión, les comparto el paso a paso para elaborar un lindo dulcero para el Día de Reyes. Quise hacer este detalle por si desean dar un pequeño presente este día; es bastante sencillo pero lindo. En lo personal, me encanta cómo quedaron los personajes, la combinación de colores y, lo mejor de todo, es que podemos reciclar algunos materiales.
🔸Sin más que añadir, a continuación los dejo con el paso a paso:
✨¡Hello friends who love creativity! I hope you are all well.✨
Good afternoon, friends! I hope you're having a wonderful week. I'm happy to stop by and share a lovely idea with you. This time, I'm sharing the step-by-step instructions for making a cute candy holder for Three Kings Day. I wanted to make this in case you'd like to give a small gift that day; it's quite simple but adorable. Personally, I love how the characters turned out, the color combination, and best of all, we can recycle some of the materials.
🔸Without more to add, then I leave you with the step by step:

♥️ESPERO QUE TE GUSTE,
¡Empecemos!
♥️I HOPE YOU LIKE IT,
Let's start!

✂️ MATERIALES | ✂️ MATERIALS
- Cartulina metalizada roja.
- Caja de cartón.
- Foami rojo.
- Foami amarillo.
- Foami verde.
- Foami blanco.
- Foami marrón.
- Foami negro.
- Foami crema.
- Tela.
- Pinturas y marcadores.
- Pegamento.
- Tijeras.
- Regla.
- Hoja blanca.
- Lápiz.
- Red metallic cardstock.
- Cardboard box.
- Red foam sheet.
- Yellow foam sheet.
- Green foam sheet.
- White foam sheet.
- Brown foam sheet.
- Black foam sheet.
- Cream foam sheet.
- Fabric.
- Paints and markers.
- Glue.
- Scissors.
- Ruler.
- White paper.
- Pencil.
🌟 PROCEDIMIENTO | 🌟 PROCESS
✨PASO 1:
Lo primero que hice fue tomar la caja de cartón, que en mi caso es una caja de bombillo de 12 cm x 6 cm, a la cual le retiré con ayuda de unas tijeras las pestañas de uno de sus lados, más una de las paredes laterales, dejando las tapas.
✨STEP 1:
The first thing I did was take the cardboard box, which in my case is a 12 cm x 6 cm light bulb box. Using scissors, I removed the tabs from one side and one of the side panels, leaving the flaps.
 |  |
|---|
✨PASO 2:
Seguido de esto, pegué las tapas para que la caja quedara estable, recorté un trozo de tela dorada con diseño de textura, de 38 cm x 6.5 cm y pegué para forrar la caja y, para la base, pegué otro trozo de tela de 11 cm x 6 cm.
✨STEP 2:
Next, I glued the flaps on to make the box stable. I cut a 38 cm x 6.5 cm piece of textured gold fabric and glued it to cover the box. For the base, I glued another 11 cm x 6 cm piece of fabric.
 |  |
|---|
✨PASO 3:
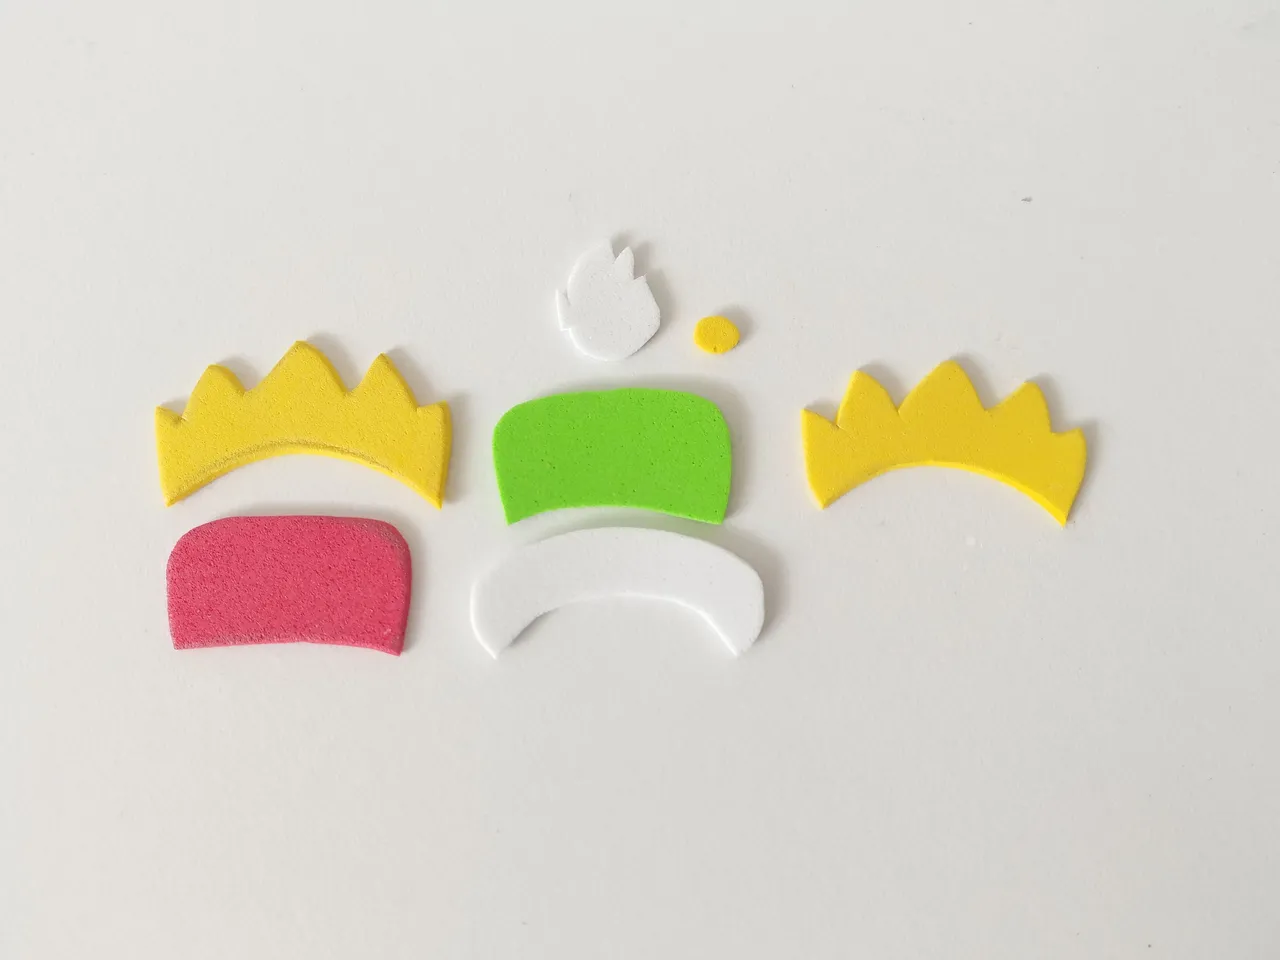
Ahora vamos con los reyes magos, que, para hacerlos, simplemente comencé dibujando el diseño de cada uno, con sus detalles, en una hoja blanca, y al estar listos los diseños, transferí a los colores correspondientes de foami, como explico a continuación:
✨Cabello: 3.5 cm x 1.5 cm en foami blanco.
✨Cabezas: 3 cm x 2 cm en foami crema y foami marrón.
✨Barbas: 3 cm x 2 cm en foami negro, blanco y marrón.
✨Coronas: 3.7 cm x 1.5 cm en foami amarillo.
✨Turbante: 3 cm x 1.5 cm en foami rojo y verde.
✨Parte baja del turbante: 3.7 cm x 1 cm en foami blanco.
✨Bigote: 1.5 cm en foami blanco.
✨STEP 3:
Now let's move on to the Three Wise Men. To make them, I simply started by drawing the design of each one, with all the details, on a white sheet of paper. Once the designs were ready, I transferred them to the corresponding colors of foam, as explained below:
✨Hair: 3.5 cm x 1.5 cm in white foam.
✨Heads: 3 cm x 2 cm in cream and brown foam.
✨Beards: 3 cm x 2 cm in black, white, and brown foam.
✨Crowns: 3.7 cm x 1.5 cm in yellow foam.
✨Turban: 3 cm x 1.5 cm in red and green foam.
✨Bottom of the turban: 3.7 cm x 1 cm in white foam.
✨Mustache: 1.5 cm in white foam.
 |  |
|---|
✨PASO 4:
Al estar listas todas las piezas, es momento de dar color a los bordes del foami con pinturas o marcadores que hagan contraste, como un tono más oscuro que el mismo de la pieza. Al estar secas las piezas, es momento de hacer detalles más específicos con marcadores, como definir mejor las barbas, los turbantes y las coronas.
✨STEP 4:
Once all the pieces are ready, it's time to color the edges of the foam with contrasting paints or markers, such as a darker shade than the piece itself. Once the pieces are dry, it's time to add more specific details with markers, such as defining the beards, turbans, and crowns.
 |  |
|---|
✨PASO 5:
Seguidamente, pegamos hasta formar cada uno de los reyes magos. Esta vez comencé pegando las barbas a la cabeza, seguido del cabello, las coronas y los turbantes. Además, en este momento fue que dibujé los ojos y cejas porque no estaba muy segura de si quedarían bien luego de poner las barbas.
✨STEP 5:
Next, glue the pieces together to form each of the Three Wise Men. This time I started by gluing the beards to the heads, followed by the hair, crowns, and turbans. I also drew the eyes and eyebrows at this point because I wasn't sure if they would look right after adding the beards.
 |  |
|---|
✨PASO 6:
Para finalizar, recorté una pieza de cartulina metalizada roja de 12.5 cm x 10.2 cm, para luego escribir en una hoja blanca “feliz día”, remarcar con marcador negro y algunos detalles extras. Por último, pegué sobre la cartulina metalizada roja; luego este lo pegué en la pared trasera de la caja y los reyes magos en la pared de enfrente.
✨STEP 6:
Finally, I cut a 12.5 cm x 10.2 cm piece of red metallic cardstock. Then I wrote "Happy Day" on a white sheet of paper, outlined it with a black marker, and added a few extra details. Finally, I glued the cardstock onto the red metallic cardstock; then I glued this to the back of the box and the Three Kings to the front.
 |  |  |
|---|
✨Y listo, amigos, así es como pueden elaborar una linda idea de dulcero para el Día de Reyes. Además, pueden elaborarlo con el personaje o lo que deseen como decoración; no tienen que ser solo los reyes magos. Espero que les haya gustado el paso a paso y se animen a elaborarlo.
❤️Hasta la próxima publicación.
✨And that's it, friends! That's how you can make a cute treat box for Three Kings Day. You can also decorate it with any character or anything you like; it doesn't have to be just the Three Kings. I hope you enjoyed the step-by-step instructions and are inspired to make one.
❤️Until the next post.
✨RESULTADO: | ✨RESULT:
 |  |
|---|

!TE DESEO UN GRAN DÏA¡
Todas las fotografías son de mi propiedad.
Separador y Fotos editadas en Canva
!I WISH YOU A GOOD DAY
All photographs are my property.
Photos edited in Canva