👒💄¡Hola amigos de esta hermosa comunidad creativa! Espero que hayas tenido un gran comienzo de semana.💄👒
Hoy les traigo un organizador de maquillaje. Decidí hacer este organizador porque realmente lo necesitaba, tengo mi propio cajón de maquillaje, pero necesitaba uno más pequeño para colocar el maquillaje que utilizo con más frecuencia y tenerlas a la vista. De verdad quede fascinada con el color de cartulina que utilice, ese color dorado metalizado le dio un toque elegante a mi peinadora, combina con mis cortinas y unos toques dorados que tiene mi habitación, guíate por los colores de tu habitación y hagamos un bonito organizador de maquillaje.
🔸A continuación, te dejo con el paso a paso🔸
👒💄¡Hello friends of this beautiful creative community! I hope you had a great start to the week.💄👒
Today I bring you a makeup organizer, I did it because I really needed it, I have my own drawer where I put my makeup, but I needed a smaller one to put the things that I use a little more and have them in sight, Really I was fascinated with the color of cardboard that I used, that metallic gold color gave an elegant touch to my hairdresser, it combines with my curtains and some golden touches that my room has, guide you the colors of your room and let's make a nice makeup organizer that we have watered
Next, he will leave you with the step by step:
🔸Next, he will leave you with the step by step🔸

♥️ESPERO QUE TE GUSTE,
¡Empecemos!
♥️I HOPE YOU LIKE IT,
Let's start!

👒 MATERIALES | 👒 MATERIALS
- Pliego de cartulina metalizada dorada.
- Perlas blancas o lo que gustes para decorar.
- Silicon caliente.
- Tijera.
- Regla.
- Lápiz.
- Sheet of gold metallic cardboard.
- White pearls or whatever you like to decorate.
- hot silicon.
- Scissors.
- Rule.
- Pencil.
👒 PROCEDIMIENTO | 👒 PROCESS
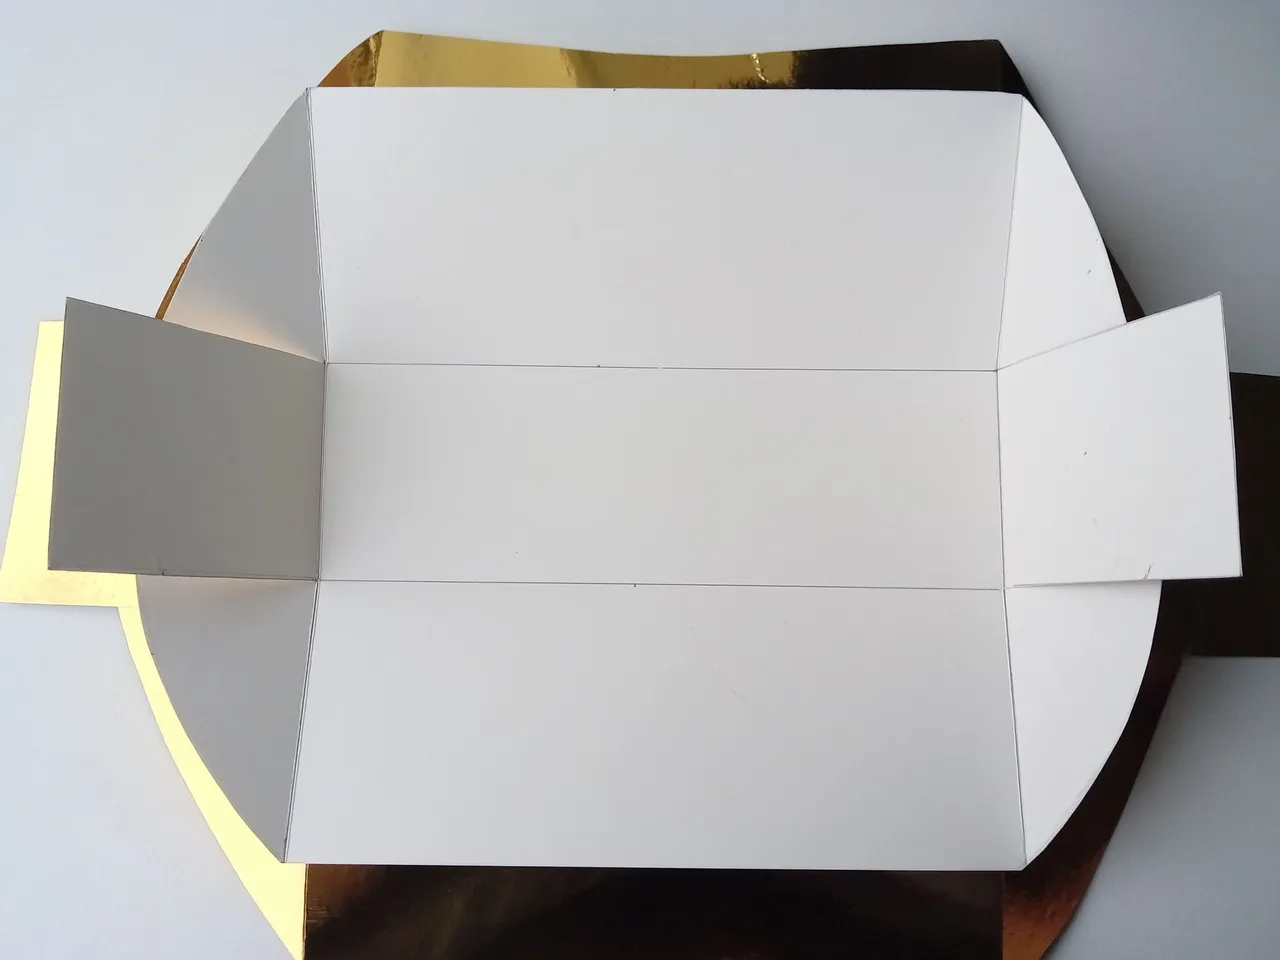
- PASO 1:
Comenzamos trazando las medidas para la caja más grande con la cartulina dorada.
Medidas para la base: 16cm x 7cm. Paredes de la caja: 8cm x 7cm. Líneas de doblaje: para las líneas de doblez quise darle una linda forma de semicírculo, realmente lo hice a pulso, pero en la base le di una medida de 5cm aproximadamente y dibujé el semicírculo. Recorta el patrón de la caja con unas tijeras, dobla las paredes con la ayuda de una regla.
🔸Si se complica, haz un doblez liso de 2cm y listo. igualmente, a continuación, te muestro el paso a paso con fotos por si te quedan dudas.
- STEP 1:
We start by tracing the measurements for the largest box with the gold construction paper.
Measurements for the base: 16cm x 7cm. Box walls: 8cm x 7cm. Dubbing lines: for the fold lines I wanted to give it a nice semicircular shape, I actually did it freehand, but at the base I gave it a measurement of approximately 5cm and I drew the semicircle freehand. Cut out the pattern of the box with scissors, bend the walls with the help of a ruler.
🔸If it gets complicated, make a 2cm smooth fold line and you're done. In the same way, below, I show you the step by step with photos in case there are any doubts.


- PASO 2:
Luego, comenzamos trazando las medidas para la caja mediana.
Medidas para la base: 16cm x 5cm. Paredes de la caja: 6cm x 5cm. Líneas de doblez semicirculares: 4 cm de base.
Nuevamente, Cortar el patrón con las tijeras y dobla las paredes de la caja con ayuda de una regla.
🔸Igualmente, a continuación, te muestro el paso a paso con fotos de las medidas, por si queda alguna duda.
- STEP 2:
Next, we start by plotting the measurements for the medium box.
Measurements for the base: 16cm x 5cm. Box walls: 6cm x 5cm. semicircular fold lines: 4cm base.
Again, Cut the pattern with the scissors and fold the walls of the box with the help of a ruler.
🔸In the same way, below, I show you the step by step with photos of the measurements in case there are any doubts.

- PASO 3:
Por último, trazamos las medidas para la caja pequeña.
Medidas para la base: 16cm x 4.5cm. Paredes de la caja: 3.5cm x 4.5cm. Líneas de doblez Semicircular: 3cm de base.
Por último, Cortar el patrón con las tijeras y dobla las paredes de la caja con ayuda de una regla.
🔸A continuación, te maestro con fotos cómo debes hacerlo.
- STEP 3:
Lastly, we plot the measurements for the small box.
Measurements for the base: 16cm x 4.5cm. Box walls: 3.5cm x 4.5cm. Semicircular bending lines: 3cm base.
Finally, Cut the pattern with scissors and fold the walls of the box with the help of a ruler.
🔸Next, I show you with photos how you should do it.


- PASO 4:
Una vez que hayamos cortado todos nuestros patrones y las paredes dobladas, podemos comenzar a pegar, decidí pegar las líneas de doblez en el exterior de la caja para que la caja tuviera un bonito detalle y no fuera una simple caja lisa, me gustó esto porque la hace lucir más elegante. Ponemos un poco de silicón caliente en una de las líneas de doblez, pegamos por la parte exterior de una de las paredes laterales, ponemos pegamento en la otra y la pegamos encima de la que pegamos anteriormente. Por último , repetimos el proceso con todas las cajas.
- STEP 4:
Once we have all our patterns cut out and the walls folded we can start gluing, I decided to glue the fold lines to the outside of the box so the box would have nice detail and not just be a plain box, I liked this because the makes it look more elegant. We put a bit of hot glue on one of the fold lines, glue on the outside of one of the side walls, put glue on the other and glue it on top of the one we glued earlier. Finally, we repeat the process with all the boxes.


- PASO 5:
Una vez formadas todas nuestras cajas, debemos unirlas una frente a la otra, pegamos la caja más grande con la mediana y estas dos las pegamos a la caja más pequeña. A continuación, recorte 2 cuadrados de 16 cm x 5 cm, pegar uno encima del otro y pegar en el centro de la caja del medio para hacer una pequeña división. Por último, pega unas perlas blancas con un poco de silicón, pega 3 perlas a los lados de las cajas, justo donde se juntan las líneas de doblez y al frente, aplique 4 perlas en las esquinas de la caja más pequeña y un pequeño lazo que tenía.
- STEP 5:
Once all our boxes are formed, we must join them one in front of the other, we glue the largest box with the medium one and these two we glue them to the smallest box. Next, cut out 2 16cm by 5cm squares, glue one on top of the other and glue to the center of the middle box to make a small division. Finally, glue some white pearls with a bit of silicone, glue 3 pearls to the sides of the boxes, right where the fold lines meet and to the front, put 4 pearls in the corners of the smaller box and a small bow what i had.


👒¡Y listo!👒 Tendrás este hermoso organizador para que puedas poner a la vista tus maquillajes o cremas, me encantó y fue muy útil, espero que te sea igual, hasta la próxima.
👒¡And ready!👒 You will have this beautiful organizer so you can put your makeup or creams in sight, I loved it and it was very useful, I hope it will be the same for you, until next time.


!TE DESEO UN GRAN DÏA¡
Todas las fotografías son de mi propiedad.
Separador y Fotos editadas en Canva
!I WISH YOU A GOOD DAY
All photographs are my property.
Photos edited in Canva