✨¡Hola amigos amantes de la creatividad! Espero que estén todos bien.✨
¡Buenas tardes, amigos! Espero estén pasando una excelente semana. Por mi parte, contenta de pasar por acá a compartir una nueva creación con ustedes. En esta ocasión les comparto el paso a paso para elaborar un lindo servilletero con temática navideña. Me encuentro un poco sentimental, pues esta es mi última creación del mes de noviembre y siento que pasó volando. Pero bueno, estoy contenta de las creaciones que he compartido hasta ahora y diciembre también viene cargado de ideas navideñas para ustedes.
Esta vez quise elaborar algo diferente, he pensado muchas veces en compartir este tipo de servilleteros de rollo, así que al final me animé con esta linda idea navideña para que ninguna parte de nuestro hogar quedé sin este toque de magia navideña.
🔸Sin más que añadir, a continuación los dejo con el paso a paso:
✨¡Hello friends who love creativity! I hope you are all well.✨
Good afternoon, friends! I hope you are having a great week. For my part, I am happy to stop by here to share a new creation with you. On this occasion I am sharing with you the step by step to make a nice napkin holder with a Christmas theme. I am feeling a little sentimental, because this is my last creation for the month of November and I feel like it flew by. But hey, I am happy with the creations I have shared so far and December is also full of Christmas ideas for you.
This time I wanted to make something different, I have thought many times about sharing this type of napkin holders from a roll, so in the end I decided to come up with this nice Christmas idea so that no part of our home is left without this touch of Christmas magic.
🔸Without more to add, then I leave you with the step by step:

♥️ESPERO QUE TE GUSTE,
¡Empecemos!
♥️I HOPE YOU LIKE IT,
Let's start!

✂️ MATERIALES | ✂️ MATERIALS
- Cartulina escarchada dorada.
- Rollo de cartón.
- Cartón grueso.
- Foami escarchado blanco y negro.
- Foami blanco, verde y naranja.
- Pinturas y marcadores.
- Pegamento.
- Hoja blanca.
- Regla.
- Tijeras.
- Lápiz.
- Golden frosted cardboard.
- Roll of cardboard.
- Thick cardboard.
- Black and white frosted foam.
- White, green and orange foam.
- Paints and markers.
- Glue.
- White sheet.
- Ruler.
- Scissors.
- Pencil.
🌟 PROCEDIMIENTO | 🌟 PROCESS
✨PASO 1:
Lo primero que hice fue trazar las medidas de la base en cartón grueso, en este caso las medidas del cuadrado fueron de 15 cm en total y para dar un estilo más bonito, recorté las puntas redondeadas. Luego, tomé el rollo y le recorté 4 cm de ancho para luego hacerlo mucho más delgado.
✨STEP 1:
The first thing I did was trace the measurements of the base on thick cardboard, in this case the measurements of the square were 15 cm in total and to give it a nicer style, I cut off the rounded ends. Then, I took the roll and cut it 4 cm wide to make it much thinner.


✨PASO 2:
Seguidamente, pegué los bordes del rollo, forré con foami negro, pero pueden pintarlo con pinturas al frío y en la parte superior, pegué un círculo con cartulina dorada para cubrir el agujero. También, forré la base con cartulina escarchada dorada por ambos lados. Al estar listas ambas piezas, pegué el rollo en el centro de la base, de forma vertical.
✨STEP 2:
Next, I glued the edges of the roll, covered it with black foam, but you can paint it with cold paints and on the top, I glued a circle with gold cardboard to cover the hole. Also, I covered the base with gold frosted cardboard on both sides. When both pieces were ready, I glued the roll in the center of the base, vertically.


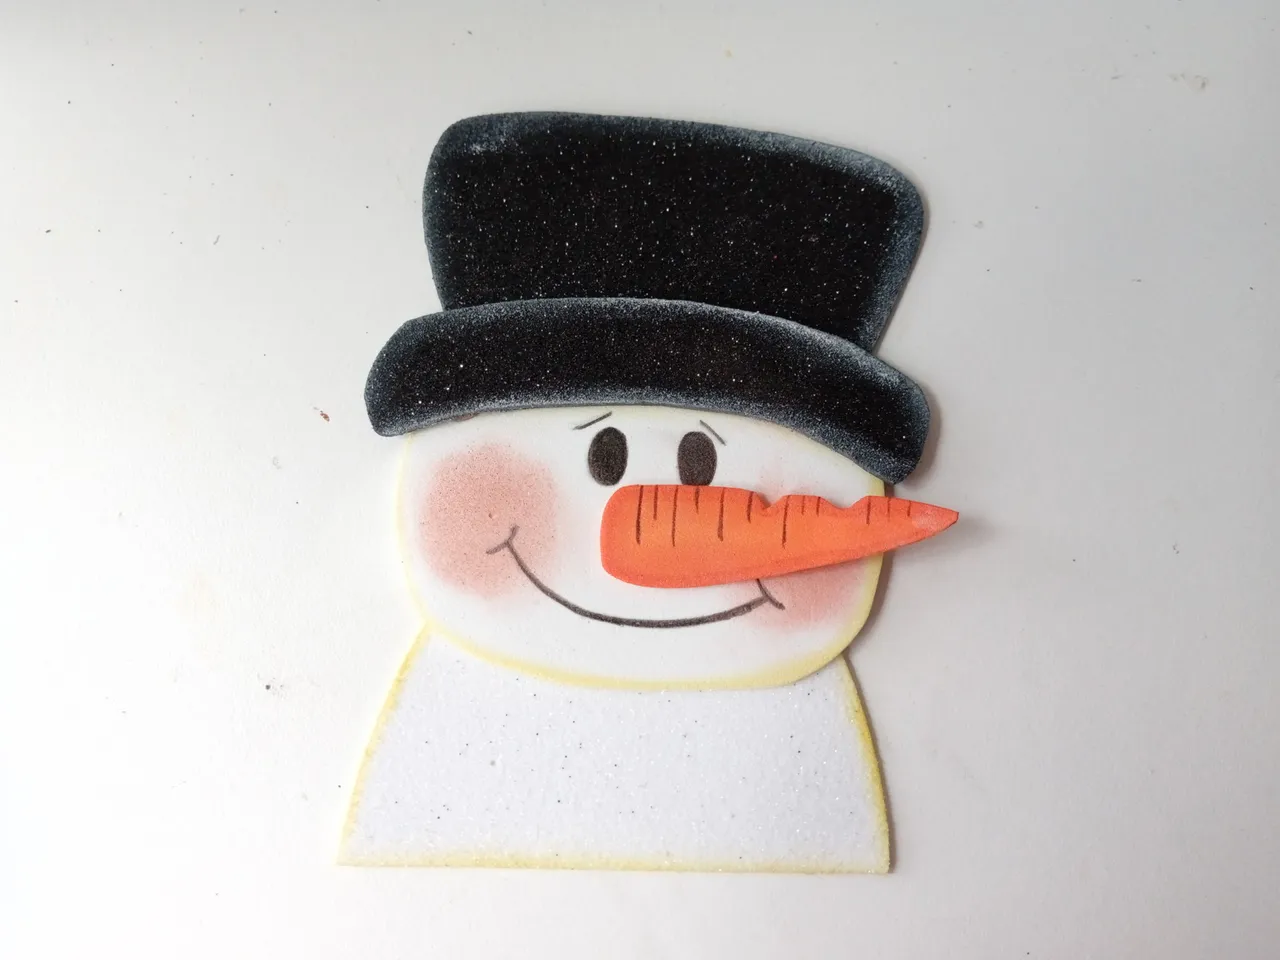
✨PASO 3:
Al estar lista la base del servilletero, comencé a elaborar la decoración, así que dibujé el patrón del muñeco de nieves en una hoja blanca y luego transferí cada una de las piezas a los colores correspondientes de foami, como explico a continuación:
- Cabeza en foami blanco.
- Cuerpo y copo de nieve en foami escarchado blanco.
- Sombrero en foami escarchado negro.
- Nariz de zanahoria en foami naranja.
- Hojas en foami verde.
- Frutos en foami rojo.
✨STEP 3:
Once the napkin holder base was ready, I started to make the decoration, so I drew the snowman pattern on a white sheet and then transferred each of the pieces to the corresponding colors of foam, as explained below:
- Head in white foam.
- Body and snowflake in white frosted foam.
- Hat in black frosted foam.
- Carrot nose in orange foam.
- Leaves in green foam.
- Fruits in red foam.


✨PASO 4:
Al tener todas las piezas de la decoración listas, comencé a dar color a los bordes con pinturas que hicieran contraste con cada una de las piezas y luego di más detalles al rostro con marcador negro, a las hojas y a la zanahoria.
✨STEP 4:
Once I had all the decoration pieces ready, I began to color the edges with paints that contrasted with each of the pieces and then I gave more details to the face with a black marker, to the leaves and to the carrot.


✨PASO 5:
Al estar secas todas las piezas, fui pegando las partes del cuerpo y aproveché de pintar las mejillas con rubor. Seguidamente, pegué las decoraciones extras al sombrero y añadí una bufanda con tela, pero pueden hacerla con foami.
✨STEP 5:
Once all the pieces were dry, I glued the body parts and took the opportunity to paint the cheeks with blush. Next, I glued the extra decorations to the hat and added a scarf with fabric, but you can make it with foam.

✨PASO 6:
Para finalizar, di puntos de luz con pintura blanca a los ojos, mejilla, nariz, sombrero y hojas. Al estar seco, pegué sobre cartulina escarchada dorada y recorté dejando solo un borde de 0.5 cm, para luego pegar en uno de los bordes laterales de la base.
✨STEP 6:
To finish, I gave points of light with white paint to the eyes, cheek, nose, hat and leaves. When it was dry, I glued it on gold frosted cardboard and cut it out leaving only a 0.5 cm border, then glued it on one of the side edges of the base.


✨Y listo, de esta manera es como pueden elaborar un lindo servilletero, en este caso con temática navideña, para que no quede ningún espacio de nuestro hogar sin decorar jaja. Espero les haya gustado el paso a paso y se animen a elaborar esta linda decoración.
No me voy sin antes extender la invitación de esta linda iniciativa a mis amigas 

❤️Hasta la próxima publicación.
✨And that's it, this is how you can make a nice napkin holder, in this case with a Christmas theme, so that no space in our home is left undecorated haha. I hope you liked the step by step and are encouraged to make this nice decoration.
I'm not leaving without first extending the invitation to this nice initiative to my friends
❤️Until the next post.
✨RESULTADO: | ✨RESULT:


!TE DESEO UN GRAN DÏA¡
Todas las fotografías son de mi propiedad.
Separador y Fotos editadas en Canva
!I WISH YOU A GOOD DAY
All photographs are my property.
Photos edited in Canva