¡Bienvenidos, amigos creativos! 🎨
Welcome, creative friends!🎨 We begin a new week in which I hope and wish you all the best✨


Como ya les he mencionado trabajar en foami es una de mis cosas favoritas sumado a eso necesitaba una alfombra para el mouse de la computadora y como sé que este en foami se desliza muy bien decidí buscar algunas opciones para hacer, vi muchas que me encantaban hasta que me decidí por una y puse manos a las obras, por supuesto quise compartir el proceso con ustedes🤗, sin más los materiales utilizados son:

As I have already mentioned to you working in foami is one of my favorite things added to that I needed a rug for the computer mouse and as I know that this in foami slides very well I decided to look for some options to make, I saw many that I loved until I decided on one and I put hands to work, of course I wanted to share the process with you🤗, without further ado the materials used are:
 |
|---|
| 🐭🖱️ Foami / Foami. |
| 🐭🖱️ Hoja blanca / White sheet |
| 🐭🖱️ Pinturas al frío /Cold paints |
| 🐭🖱️ Silicón / Silicone |
| 🐭🖱️ Pincel / Brush |
| 🐭🖱️ Tijera / Scissor |
| 🐭🖱️ Puntero / Pointer |
| 🐭🖱️ Marcador / Marker |

🐭🖱️ Paso 1: Ya seleccionado el dibujo que quería lo plasmé en varias hojas blancas (Exactamente utilicé 4 hojas tamaño carta para que el dibujo fuese grande ya que es necesario que el mouse se desplace muy bien). Seguidamente recorte.
🐭🖱️ Step 1: Once I had selected the drawing I wanted, I drew it on several white sheets (I used exactly 4 letter-size sheets so that the drawing would be large, since it is necessary for the mouse to move very well). Then I cut it out.

🐭🖱️ Paso 2: Recorté cada parte del dibujo para transferirlos al foami de color correspondiente, es decir recorte las orejas, cuerpo y cola para usarlas de molde en el foami color gris. Y las otras partes de las orejas en rosadas (De la forma en que se puede observar en la imagen siguiente)
🐭🖱️ Step 2: I cut out each part of the drawing to transfer them to the corresponding color foami, that is to say, I cut out the ears, body and tail to use them as a mold in the gray foami. And the other parts of the ears in pink (as you can see in the following image).

🐭🖱️ Paso 3:
He aquí mi parte favorita!!!😍
Darle vida y forma al dibujo en foami realizado. Para este paso comencé por pintar los ojos usando pinturas al frío color blanco, azul y negro seguí con la nariz y la boca.
🐭🖱️ Step 3:
Here is my favorite part!!!😍
Giving life and shape to the foami drawing. For this step I started by painting the eyes using white, blue and black cold paints, followed by the nose and mouth.

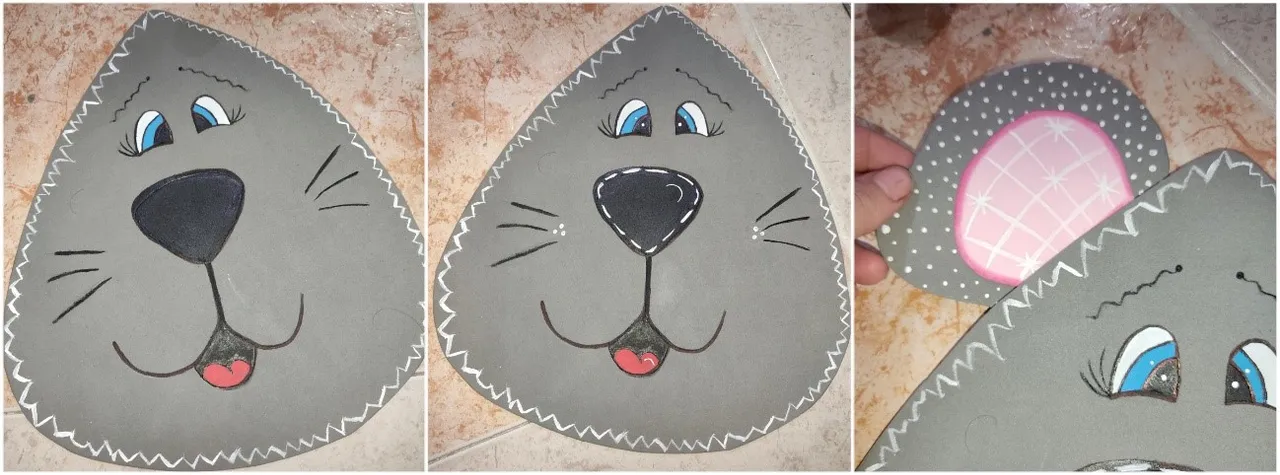
🐭🖱️ Paso 4: Mientras dejaba secar la parte de la cara, fui avanzando con el interior de las orejas en el cual comencé por difuminar con marcador rosa el borde de las mismas, posterior a eso con ayuda de un pincel finito y pintura al frío blanca realice líneas y algunas equis de la forma en que se aprecia en la imagen.
🐭🖱️ Step 4: While I let the part of the face dry, I moved on to the inside of the ears where I started by blurring with pink marker the edge of the ears, after that with the help of a fine brush and white cold paint I made lines and some X's as you can see in the image.

🐭🖱️ Paso 5: Para dar tiempo a que lo anterior se secara procedí en hacerle decoraciones a la cola en forma de espirales y puntos.
🐭🖱️ Step 5: To allow time for the above to dry, I proceeded to decorate the tail in the form of spirals and dots.

🐭🖱️ Paso 6: Después que estuviera totalmente seca la pintura pegue la parte rosa de la oreja en la gris, y luego decore haciendo muchos puntos con la pintura blanca.
🐭🖱️ Step 6: After the paint was completely dry glue the pink part of the ear on the gray one, and then decorate by making many dots with the white paint.

🐭🖱️ Paso 7: Terminé en retocar la cara para que el color de la pintura se viera muy nítido, también realice delineado en forma de zigzag en todo el borde. Luego culmine por dar luz a la parte de la nariz y boca.
🐭🖱️ Paso 8: Finalmente Ya teniendo todas las piezas comencé a pegarlas y armar la alfombra😍
🐭🖱️ Paso 8: Finalmente Ya teniendo todas las piezas comencé a pegarlas y armar la alfombra😍
🐭🖱️ Step 7: I finished by retouching the face to make the color of the paint look very sharp, I also made a zigzag outline around the edge. Then I finished by giving light to the nose and mouth.
🐭🖱️ Step 8: Finally, once I had all the pieces, I began to glue them together and assemble the carpet😍.
🐭🖱️ Step 8: Finally, once I had all the pieces, I began to glue them together and assemble the carpet😍.


Con esta frase me despido:
With this sentence I say goodbye:
Let go of what weighs you down, love what you have and be grateful for what comes to you❤️
Mil gracias por leerme una vez
Nos vemos en una próxima publicación.
Bendiciones y abrazos digitales🤗
Thank you very much for reading me once
See you in an upcoming post.
Blessings and digital hugs🤗

