
Hice estos cuadros con diseños divertidos, tiernos, modernos y muy chic, para la habitación de mi hija, que dan un gran impacto en su ambiente de estudio. Los realicé con pocos materiales, colores hermosos y femeninos, y como característica cuando los vemos de lado son hermosos ya que sus bordes combinan y resaltan todo, aportando color y alegría.
I made these **cute, modern and very chic ** funny patterned paintings for my daughter's room, which give a great impact to her study environment. I made them with few materials, beautiful and feminine colors, and as a characteristic when we see them from the side they are beautiful since their edges combine and highlight everything, providing color and joy.

Hola a todos y todas en esta hermosa Comunidad Hive Blog y en general a todos y todas los Hivers y visitantes de nuestra hermosa Blockchain.
Es increíble lo que hace Hive Blog en mi estado de ánimo, me conecta con mi creatividad, con mi deseo de crear cosas hermosas, con mi deseo de compartir, de enseñar y de aprender. Ahora veo siempre un espacio de mi casa y pienso que puedo hacer algo por mejorarlo y embellecerlo, y esa energía es maravillosa.
Hoy les presento un Diy o Tutorial sobre estos cuadros con formas redondas, que hice para la habitación de mi hija. Es muy sencillo, solo necesitas tener amor, disposición y darle tu toque personal. Bueno, ahora los invito cordialmente a leer mi Publicación, deseo que les guste.
Hello everyone in this beautiful Community Hive Blog and in general to all the Hivers and visitors of our beautiful Blockchain.
It's amazing what Hive Blog does for my mood, it connects me with my creativity, with my desire to create beautiful things, with my desire to share, to teach and to learn. Now I always see a space in my house and think that I can do something to improve and beautify it, and that energy is wonderful.
Today I present to you a Diy or Tutorial about these round shaped paintings, that I made for my daughter's room. It's very simple, you just need to have love, disposition and give it your personal touch. Well, now I cordially invite you to read my Post, I wish you like it.
Los Materiales / The Materials

- Cartón reciclado.
- Hojas blancas.
- Cartulina.
- Pinturas al frio.
- Pega blanca.
- Silicón caliente - Marcador - Compás - Tijera -
Pinceles - Regla.
- Recycled carton.
- White sheets.
- Cardboard.
- Cold paints.
- White glue.
- Hot silicone - Marker - Compass - Scissors -
Brushes - Ruler.
El Paso a Paso / The Step by Step
Paso 1: Con el compás en una hoja en blanco, realicé una plantilla que es un círculo de 19cms de diámetro. Este será el patrón, de manera que se recorta para utilizarlo.
Step 1: With the compass on a blank sheet of paper, I made a template that is a 19cm diameter circle. This will be the pattern, so cut it out to use it.

Paso 2: Con mi plantilla o patrón corté en cartón reciclado y en hojas en blanco.
Step 2: With my template or pattern I cut out of recycled cardboard and blank sheets.

Paso 3: Trabajaré con cuatro círculos blancos, comencé haciendo unas figuras a manera de manchas, con la pintura al frio en los colores rosado, amarillo, gris y azul. Dejé secar muy bien.
Step 3: I will work with four white circles, I started by making some figures as spots, with cold paint in the colors pink, yellow, gray and blue. I let it dry very well.


Así quedaron mis cuatro círculos, estos colores que utilicé son claros pero bien saturados, me gustan mucho para decorar el cuarto de mi hija.
This is how my four circles turned out, these colors that I used are light but well saturated, I like them a lot to decorate my daughter's room.

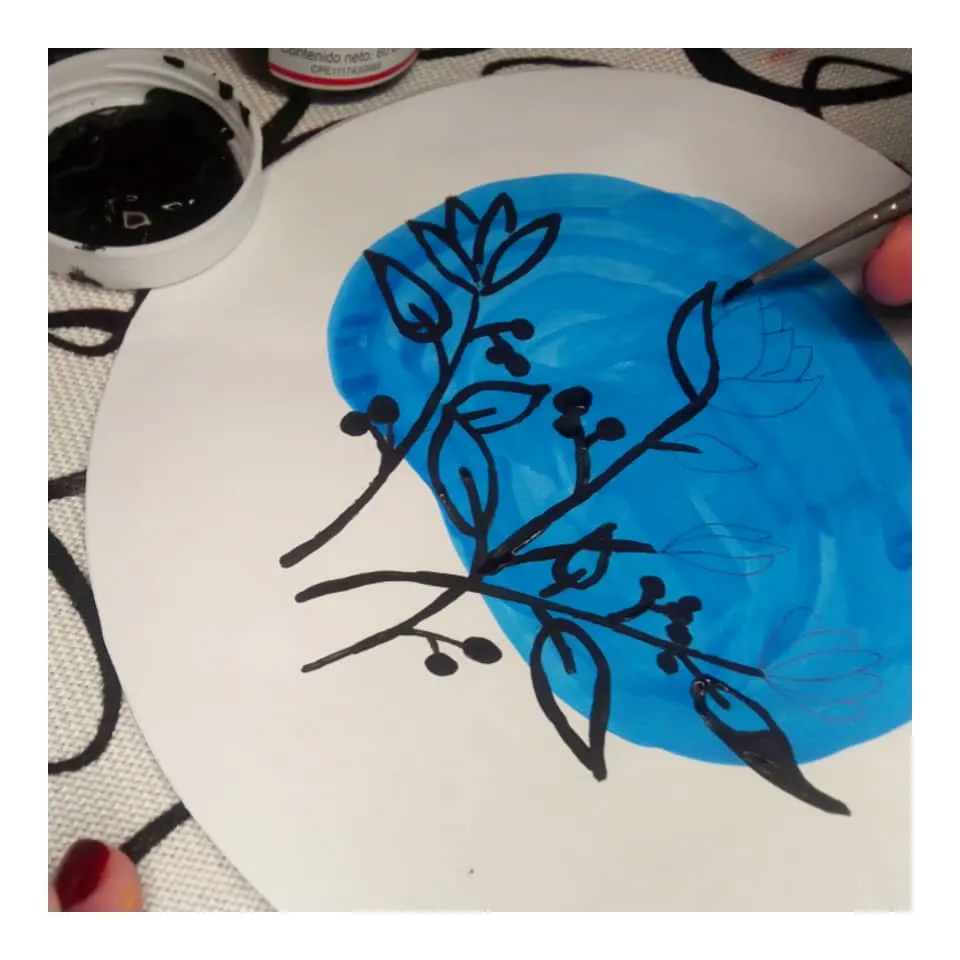
Paso 4: Tomé mi pincel delgado y con la pintura negra, y realicé mis diseños que básicamente fueron flores con líneas, muy sencillas y le adicioné algunos puntos en algunos espacios en blanco.
Step 4: I took my thin brush with the black paint and made my designs which were basically flowers with lines, very simple and I added some dots in some blank spaces.

Así fui realizando los diferentes diseños, son diferentes pero tienen como conexión el mismo estilo y sencillez.
This is how I made the different designs, they are different but they have the same style and simplicity as a connection.
Paso 5: Corté en la cartulina unas tiras de 1,5cms de ancho por 60cms de largo, con ellas realizaré el borde de los círculos. Pinté con los colores que pinte las manchas anteriores, con la finalidad de usarlos con su mismo color.
Step 5: I cut strips of 1.5cm wide by 60cm long in the cardboard, with them I will make the border of the circles. I painted with the colors that I painted the previous stains, in order to use them with the same color.


Paso 6: Ahora con la pega blanca, pegué mis círculos blancos con los diseños en los círculos de cartón, tratando de pegar bien centrado todo.
Step 6: Now with the white glue, I glued my white circles with the designs on the cardboard circles, trying to glue everything well centered.

Paso 7: Ahora voy a usar mis tiras para fijarlas en las bases de mis diseños, para ello utilicé la pistola de silicón caliente, colocando poca cantidad para que no se desborde y pego toda la tira alrededor. Esto lo hice cada tira con el diseño de su mismo color.
Step 7: Now I am going to use my strips to fix them on the bases of my designs, for this I used the hot glue gun, placing a small amount so that it does not overflow and glue the entire strip around it. I did this for each strip with the same color design.


Aquí pueden apreciar como se ven mis círculos, me parecen adorables, me encantaron los colores y el contraste con el color blanco de las hojas, las cuales no quise añadirles un color de fondo precisamente para que se destacaran más los diseños.
Here you can see how my circles look, I find them adorable, I loved the colors and the contrast with the white color of the leaves, which I did not want to add a background color precisely so that the designs would stand out more

El borde de cartulina es lo suficientemente firme y rígido para que el mismo sirva para fijar estos cuadros en la pared, de manera que no fue necesario realizarles una pieza para ello. Además no pesan casi nada, así que se estabilizan fácilmente.
The cardboard edge is firm and rigid enough for it to be used to fix these paintings on the wall, so it was not necessary to make a piece for it. They also weigh almost nothing, so they are easily stabilized.

Deseo que les haya gustado este tutorial, yo disfrute mucho crear este contenido para ustedes al mismo tiempo que hice feliz a mi hija, quien no se esperaba que estos diseños iba para su cuarto, pero ella al verlos inmediatamente me los pidió y por supuesto que me hace muy feliz complacerla.
Les envío un abrazo, les agradezco por leer esta publicación y los invito a la próxima...
I wish you liked this tutorial, I really enjoyed creating this content for you at the same time that I made my daughter happy, who did not expect these designs to go to her room, but when she saw them she immediately asked me for them and of course It makes me very happy to please her.
I send you a hug, I thank you for reading this publication and I invite you to the next one...
Las fotos las tomé con mi teléfono SSmoth 6.5 y las edité en la App InShot y son de mi propiedad 
También edité con https://www.canva.com/
Utilicé el Traductor Google


I took the photos with my SSmoth 6.5 phone and edited them in the InShot App and they are my property
I also edited with https://www.canva.com/
I used Google Translate
My social networks:
Discord: YennysYaneth#0189
Twitter:
Instagram: