
Saludos a todos ❤️❤️ Hice una Funda para Taza, que ayuda a mantener la temperatura de mi bebida favorita, un portataza para proteger mi escritorio o mesa y también una Tapa que igualmente ayuda a mantener la temperatura y protege la taza de cualquier agente externo.
Tocó consentirme y darme un poco de cariño, y es que cuando hacemos más bonito nuestro lugar de trabajo, nos sentimos más agradables, inspirados y concentrados. Este proyecto de hoy es sobre mejorar la forma en la que uso mi infaltable Taza con Café con Leche y hago que la experiencia sea más eficiente en mis rutinas largas frente a la computadora. Y es que nunca falta un taza para acompañarme, y ahora con este Diy puedo mantener mi bebida a gusto por más tiempo y cuidar mi escritorio.
Me complace mucho presentar otro proyecto en esta bella Comunidad de Hive Diy, soy Yennys Fernández y te invito a ver esta Publicación donde les muestro cómo hice estos pequeños detalles, para estar más relajada, durante todas las horas que paso frente a la pc.
Si te interesa saber cómo lo hice, a continuación te regalo el Paso a Paso, deseo que lo disfrutes.
Hello everyone ❤️❤️ I made a Cup Cover that helps keep my favorite drink warm, a cup holder to protect my desk or table and also a Lid that also helps maintain the temperature and protect the cup from any external agent.
He had to pamper me and give me a little love, because when we make our workplace more beautiful, we feel more pleasant, inspired and focused. This project today is about improving the way I use my must-have Latte Mug and make the experience more efficient in my long computer routines. And it is that a cup is never missing to accompany me, and now with this Diy I can keep my drink comfortable for longer and take care of my desk.
I am very pleased to present another project in this beautiful Community of Hive Diy, I am Yennys Fernández and I invite you to see this Post where I show you how I did these little details, to be more relaxed, during all the hours I spend in front of the PC.
If you are interested in knowing how I did it, then I give you the Step by Step, I hope you enjoy it.

- Taza de tu preferencia
- Hoja blanca, compás y bolígrafo
- Tela estampada
- Fieltro
- Cinta métrica
- Tijera y alfileres
- Máquina de coser e hilo
- Elástica y Botones con diseños.
- Cup of your choice
- White sheet, compass and pen
- Printed cloth
- felt
- Measuring tape
- Scissors and pins
- Sewing machine and thread
- Elastic and Buttons with designs.


Diy Funda para Taza
Para la Funda de mi Taza, tomé con la cinta métrica, las medidas del largo de mi taza y el contorno. Cabe señalar que, tanto el largo como el ancho deben ser un poco menos que las medidas que dieron para que pueda funcionar sin entorpecer la funda. Pero dado que al coser me voy a consumir precisamente 1 cms por el márgen de costura, entonces lo dejo igual, sin hacer reducciones.
For the Cover of my Cup, I took with the tape measure, the measurements of the length of my cup and the contour. It should be noted that both the length and width must be a little less than the measurements given so that it can work without hindering the cover. But since when sewing I am going to consume precisely 1 cm for the seam allowance, then I leave it the same, without making reductions.

Corté en la tela estampada de cuadros, dos piezas de 11 cms por 31 cms. y en fieltro, pero en éste si reduje 1 cms por todos lados, con la finalidad de que no moleste el fieltro a la hora de coser.
Me introduje la pieza de fieltro entre las dos piezas de tela, doblé todos los bordes alrededor de la tela y aseguré todo con alfileres.
I cut two pieces of 11 cm by 31 cm from the checkered patterned fabric. and in felt, but in this one I did reduce 1 cm on all sides, in order not to disturb the felt when sewing.
I inserted the piece of felt between the two pieces of fabric, folded all the edges around the fabric and secured everything with pins.

Corté dos tiras elásticas de 17 cms cada una, las até para asegurarlas y las introduje en uno de los extremos de la pieza que estoy armando, fijando muy bien con los alfileres.
I cut two elastic strips of 17 cm each, tied them to secure them and inserted them into one of the ends of the piece that I am putting together, fixing very well with the pins.

Ahora cosí por todo el alrededor, con la máquina de coser en costura recta, y me quedó de esta forma:
Now I sewed all around, with the sewing machine in straight seam, and it turned out like this:

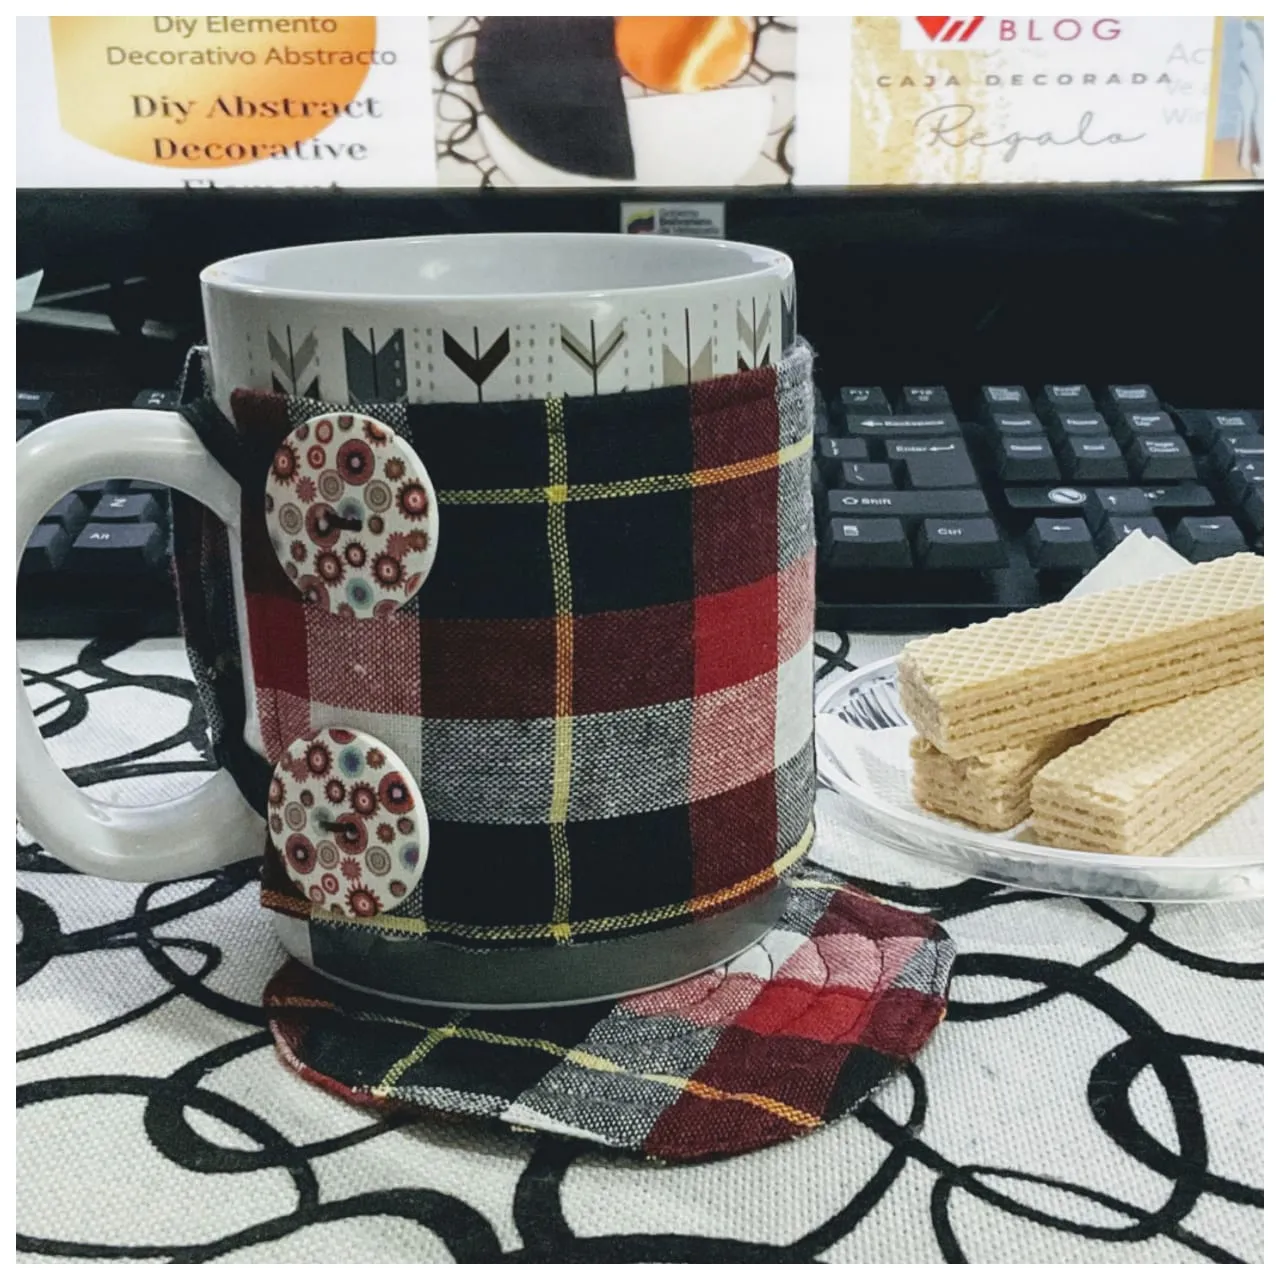
En el otro extremo de la pieza de mi Funda, coloqué los dos botones con diseño, los cosí a mano con aguja e hilo.
Y listo, ya está terminada la Funda para Taza, ahora mi Café con Leche estará más caliente por más tiempo y además no me quemaré las manos ya que la taza siempre se caliente y puede ocasionar un accidente.
Y la puedo retirar muy fácilmente para lavar mi taza, o lavar la misma Funda si es necesario.
Quedó hermosa..!
On the other end of my Cover piece, I attached the two patterned buttons, hand-sewing them with a needle and thread.
And that's it, the Cup Cover is finished, now my Coffee with Milk will be hotter for longer and also I won't burn my hands since the cup always gets hot and can cause an accident.
And I can remove it very easily to wash my cup, or wash the Cover itself if necessary.
she was beautiful..!

Diy Funda para Posataza y Tapa / Diy Cup Holder Cover and Lid
Las planitllas o moldes los hice a partir de mi taza preferida, la que uso regularmente. Consideré un espacio adicional para darle amplitud a lo que serán el Posataza y La Tapa de mi taza en este caso fue de 13 cms, de manera que hice un círculo con el compás con este diámetro, y lo recorté.
I made the templates or molds from my favorite cup, the one I use regularly. I considered an additional space to give width to what will be the Posataza and The Lid of my cup in this case it was 13 cms, so I made a circle with the compass with this diameter, and cutout.

Así quedaría en mi taza, como ven en el collage. Luego, corté esta plantilla en mi tela principal, que es una de cuadros, aseguré con alfileres, y saqué dos piezas para el posataza y dos piezas para la tapa.
También corté un círculo para cada proyecto, de fieltro pero con 1 cm menos en su diámetro, esto es para que no moleste a la hora de coser.
This is how it would look on my cup, as you can see in the collage. Then I cut this template out of my main fabric, which is a plaid, pinned it in place, and took out two pieces for the cup holder and two pieces for the lid.
I also cut a circle for each project, of felt but with 1 cm less in its diameter, this is so that it does not bother when sewing

Primero tomé uno de los círculos de tela y fijé al fieltro, que es más pequeño, en su centro, hice una costura recta en forma de cruz, para asegurarlo a la pieza.
Luego, puse cara con cara las dos piezas de tela estampada, y cosí por todo el alrededor usando mi margen de costura, el cual no me ocasionó ningún contratiempo.
Importante Dejar de coser un espacio de 4 cms para poder voltear la pieza.
First I took one of the fabric circles and pinned the smaller felt to its center, making a straight cross stitch to secure it to the piece.
Then, I placed the two pieces of patterned fabric face to face, and sewed all the way around using my seam allowance, which didn't cause me any trouble.
Important Stop sewing a space of 4 cm to be able to turn the piece.

Aquí se ve claramente mi apertura o espacio. En todo su borde hice unos piquetes, que son necesario hacer cuando se trata de formar curvas en la costura.
Y ahora por la apertura, volteo la pieza.
My opening or space is clearly seen here. Along its entire edge I made some pickets, which are necessary when it comes to forming curves in the seam.
And now for the opening, I flip the piece.

Despúes de voltear la pieza, acomodo bien la apertura y la coso con costura recta.
After turning the piece over, adjust the opening well and sew it with a straight seam.

Para darle algo más de diseño y rigidez a esta pieza, di varias vueltas equidistantes usando como márgen de costura, el pie de la máquina de coser.
To give this piece a little more design and rigidity, I made several equidistant turns using the foot of the sewing machine as a seam allowance.

Para la Tapa de la Taza hago el paso a paso del Posataza exactamente igual, la diferencia es que al voltear la pieza, en la apertura coloqué una tira de tela y la cosí, con la finalidad de que sirva de agarradera.
For the Cup Lid I do the Posataza step by step exactly the same, the difference is that when I turned the piece over, I placed a strip of fabric in the opening and sewed it, so that serve as a handle

Listo, ya todo el Set está bello y funcional, te invito a hacerlo y consentirte. También lo puedes regalar y vas a quedar muy bien.
Ready, the whole Set is already beautiful and functional, I invite you to do it and pamper yourself. You can also give it as a gift and you will look great.
Tres accesorios tan sencillos, puede hacer tu vida más feliz...
Three accessories so simple, it can make your life happier...

---------- ❤️❤️❤️❤️ ----------
Las fotos las tomé con mi teléfono SSmoth 6.5 y las edité en la App InShot y son de mi propiedad 
También edité con https://www.canva.com/
Utilicé el Traductor Google


I took the photos with my SSmoth 6.5 phone and edited them in the InShot App and they are my property
I also edited with https://www.canva.com/
I used Google Translate
My social networks:
Discord: YennysYaneth#0189
Twitter:
Instagram: