
Hola a todos y todas en nuestra bella Comunidad Hive Diy, que bueno poder seguir interactuando en nuestra Blockchain Hive Blog cada día mejor posicionada, cada día suena más y amo ser parte de su crecimiento.
Hoy les traigo un Diy buenísimo que me hizo muy feliz, porque fui a una librería a comprar unas barras de silicón y de pronto vi una hermosa Cartulina Dorada , que brillaba muchísimo, como un espejo, y me dije tengo que llevarla y tengo que hacer un Diy con ella.
Hello everyone in our beautiful Community Hive Diy, it's good to be able to continue interacting in our Blockchain Hive Blog better positioned every day, every day sounds more and I love being part of its growth.
Today I bring you a great Diy that made me very happy, because I went to a bookstore to buy some silicone bars and suddenly I saw a beautiful Golden Card, which shone a lot, like a mirror, and I told myself I have to take it and I have to make a Diy with it.
De manera que, llegué a mi casa y rápido me llegó la idea de hacer un Portarretrato Dorado inspirada en esos portarretratos que son tan costosos en dorado... Me emocioné mucho por este hermoso material, pero tengo que confesarles que el proceso para su elaboración se ve más fácil de lo que es, porque es muy delicado, se mancha fácilmente con silicón y hasta con los dedos de las manos, así que hay tener mucho tacto, porque no es difícil, pero si es muy delicado. Pero les digo que el resultado vale la pena, porque tener un detalle en color dorado en nuestra decoración, eleva todo...
Ahora, vamos con el Tutorial...
So, I got home and the idea quickly came to me to make a Golden Portrait inspired by those expensive gold photo frames... I was very moved by this beautiful material, but I have to confess that the The process for its elaboration looks easier than it is, because it is very delicate, it is easily stained with silicone and even with the fingers of the hands, so you have to be very tactful, because it is not difficult, but it is very delicate. But I tell you that the result is worth it, because having a detail in gold in our decoration elevates everything...
** Los Materiales / The Materials**

- Cartón reciclado.
- Cartulina Dorada.
- Silicón caliente.
- Lápiz o bolígrafo, regla y cuter.
- Una fotografía a elección.
- Recycled carton.
- Gold Cardstock.
- Hot silicone.
- Pencil or pen, ruler and cutter.
- A photograph of your choice.
** El Tutorial / The Tutorial**
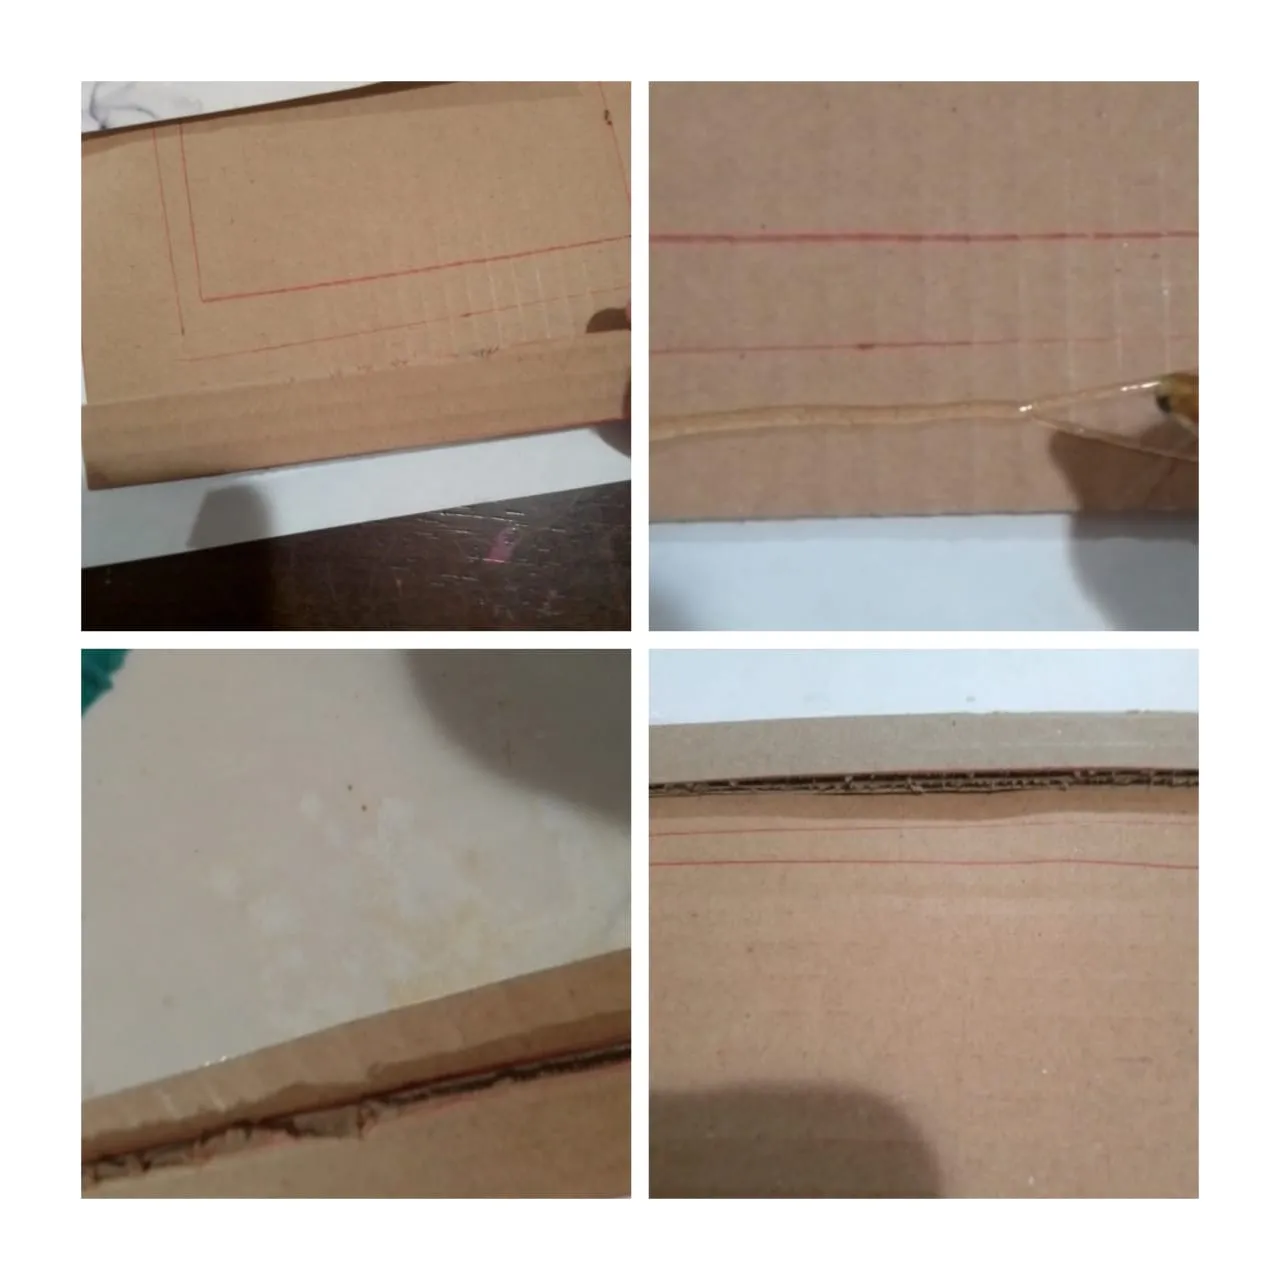
Paso 1: Tomé la fotografía que elegí para este proyecto, la marqué en una pieza de cartón reciclado, marcando su tamaño o borde con el bolígrafo; y dejando un márgen de 4cms por todo el alrededor.
Step 1: I took the photograph I chose for this project, marked it on a piece of recycled cardboard, marking its size or border with the pen; and leaving a margin of 4cms all around.

Paso 2: Ahora marqué 1cm hacia adentro de la marca de la foto, esto con la finalidad de que la apertura o el visor del portarretrato no quede más grande que la foto. Una vez hecho, retiré el interior utilizando un cuter y regla.
Step 2: Now I marked 1cm inside the mark of the photo, this in order that the opening or the viewfinder of the photo frame is not larger than the photo. Once done, I removed the inside using a cutter and ruler.

Así debe quedar este diseño inicial del Portarretrato.
This is how this initial design of the Portrait should look.

Paso 3: Ahora corté en la espectacular Cartulina Dorada, el marco que realicé en el paso anterior. Importante colocar en la esquina de la cartulina para ahorrar material. Luego, cortar con el exacto para lograr un corte más prolijo que con la tijera.
Step 3: Now I cut in the spectacular Gold Cardstock, the frame that I made in the previous step. Important to place in the corner of the cardboard to save material. Then cut with the exact one to achieve a neater cut than with scissors.

Paso 4: Ahora continúo con el cartón reciclado, marco la parte externa de mi portarretrato y corto con el exacto o cuter.
Step 4: Now I continue with the recycled cardboard, I mark the outside of my photo frame and cut with the exact or cutter.

Paso 5: En el cartón reciclado corté unas tiras de 1,5 cms, con ellas voy a garantizar que la foto no se salga involuntariamente del marco y al mismo tiempo voy a dar más espesor al borde del portarretrato.
Step 5: In the recycled cardboard I cut some 1.5 cm strips, with them I will guarantee that the photo does not involuntarily come out of the frame and at the same time I will thicken the edge of the frame.

Paso 6: Con la pistola de silicón caliente voy colocando las tiras de cartón reciclado, en el borde de la marca de la foto en la pieza central, específicamente en el borde inferior, y los dos laterales.
Importante: No colocar en el borde superior, ya que por esa parte se cambiará la foto cuando quiera.
Step 6: With the hot glue gun I place the strips of recycled cardboard, on the edge of the photo mark on the central piece, specifically on the bottom edge, and the two sides.
Important: Do not place on the top edge, since that is where the photo will be changed whenever you want.
Paso 7: Ahora coloqué el marco de cartón reciclado a la base. Ya se puede ver bien la forma que vamos logrando.
Step 7: Now I attached the recycled cardboard frame to the base. You can already see well the way we are achieving.

Paso 8: Y ahora coloqué arriba igualmente, la cartulina dorada en el marco.
Step 8: And now I also placed the gold cardboard on top of the frame.

Paso 9: Tomé las medidas de la parte interna que me dió 1cms y en la parte exterior 1,50 cms. Y en la cartulina dorada corté unas tiras para trabajar colocándola en los borde del portarretrato. Este paso es demasiado importante para darle calidad al proyecto.
Step 9: I took the measurements of the internal part that gave me 1 cm and in the external part 1.50 cm. And in the gold cardboard I cut some strips to work by placing it on the edges of the frame. This step is too important to give quality to the project.


Aquí pueden ver como ya luce demasiado bien el portarretratos, se nota claramente que se trata de una pieza decorativa de calidad.
Here you can see how the frame already looks too good, it is clearly noticeable that it is a quality decorative piece.

Paso 10: Introducí la foto por el borde supérior que está libre para meter y sacar la foto.
Importante: En el borde superior puedes colocar una tira de la cartulina dorada, con la finalidad que todo quede elaborado. Pero la puedes poner con unos puntos apenas de silicón, para que cuando lo desees puedas cambiar la foto sin problemas.
Step 10: I inserted the photo by the upper edge that is free to insert and remove the photo.
Important: On the upper edge you can place a strip of gold cardboard, so that everything is elaborated. But you can put it with just a few silicone dots, so that when you want you can change the photo without problems.

Paso 11: Me gusta colocar una tira de cartón en la parte posterior del portarretrato o del cuadro, ya que me parece que es más cómodo, pero muchísimo más cómodo para fijar en un clavo en la pared y buscar la alineación. Me parece más cómodo porque el espacio es más amplio para trabajarlo en lugar de un arito. Pero todo depende de tu gusto.
Step 11: I like to put a strip of cardboard on the back of the picture frame or painting, as I find it to be more comfortable, but much more comfortable to pin to a nail in the wall and look for alignment. It seems more comfortable to me because the space is wider to work it instead of an earring. But it all depends on your taste.

Listo, ya pueden ver que el resultado es hermoso, se ve de calidad, la cartulina luce demasiado, el contraste que se hacen en la pared y el portarretratos es de lujo, da destellos y brillos con la luz que no he podido captar con mi cámara, pero es más hermoso que en esta foto, y muy importante es que resultó muy económico hacerlo.
Deseo que te haya gustado, y que te animes a hacerlo porque no es una manualidad para esconder, esto queda tan bello que lo puedes disponer en un lugar bien social y transitado que nunca te va a dejar mal, se ve hermoso...
Gracias por leer mi Publicación, y te invito cordialmente a ver el próximo...
Done, you can see that the result is beautiful, it looks of quality, the cardboard looks too much, the contrast that is made on the wall and the photo frame is luxurious, it sparkles and shines with the light that I have not been able to capture with my camera, but it is more beautiful than in this photo, and very importantly, it was very cheap to do it.
I wish you liked it, and that you are encouraged to do it because it is not a craft to hide, this is so beautiful that you can have it in a well-traveled and social place that will never let you down, it looks beautiful...
Thank you for reading my publication, and I cordially invite you to see the next...


Las fotos las tomé con mi teléfono SSmoth 6.5 y las edité en la App InShot y son de mi propiedad 
También edité con https://www.canva.com/
Utilicé el Traductor Google


I took the photos with my SSmoth 6.5 phone and edited them in the InShot App and they are my property
I also edited with https://www.canva.com/
I used Google Translate
My social networks:
Discord: YennysYaneth#0189
Twitter:
Instagram: