I needed a holder to charge my cell phone in any outlet, without having to have a table nearby. Also that I could close it and take advantage of its structure to store it in my bag. This was the premise that moved me to make today's project, and of course I also wanted it to be cute and easy to make on my sewing machine. As always, what is made with love looks great, and this has turned out with commercial quality and fulfilling all my expectations. I invite you to see this super easy and quick project....
Necesitaba un Soporte para poner a cargar el teléfono móvil en cualquier tomacorriente, sin necesidad de tener una mesa cerca. También que pudiera cerrarlo y aprovechar su estructura para guardarlo en el bolso. Esta fue la premisa que me movió a hacer el proyecto del día de hoy, y por supuesto que quería que también fuese lindo y fácil de realizar en mi máquina de coser. Como siempre lo que se hace con amor queda muy bien, y es que esto me ha quedado con calidad comercial y cumpliendo todas mis expectativas. Te invito a ver este super fácil y rápido proyecto...

I'm not exaggerating friends, you can also do it because it has very few materials, just the fabric I used a red semi leather that I had saved and a couple of plastic clips, and it has already been very beautiful, I already have orders, because it really serves a need that is not an emergency as such, but we are always looking for a place to charge our cell phone and sometimes it is a low wall outlet or far from a table and we don't want our equipment to be at risk of being hit or stepped on, so when you see its functionality you want it in your life. .. Let's go with the tutorial, I show you how to do it:
Es que no exagero amigos y amigas, tu también puedes hacerlo porque tiene muy pocos materiales, apenas el género que usé un semicuero rojo que tenía guardado y un par de broches plásticos, y ya ha quedado muy bello, ya tengo encargos, porque realmente atiende una necesidad que no es una Urgencia como tal, pero es que siempre estamos buscando donde cargar el móvil y a veces es un tomacorrientes bajo en la pared o lejos de una mesa y no queremos que nuestro equipo esté en riesgo de ser golpeado o pisado, así que cuando ves su funcionalidad pues lo quieres en tu vida... Vamos con el tutorial, les enseño a hacerlo:

The Materials / Los Materiales

- Semi-leather (or any other fabric)
- Snap clips
- Plastic snaps
- Sewing machine, thread, needle and scissors
- Blank sheet of paper and pen to make the pattern making
- Semicuero (o cualquier otro género)
- Clips de presión
- Broches plásticos
- Máquina de coser, hilo, aguja y tijera
- Hoja en blanco y bolígrafo para hacer el patrón
Tutorial / Tutorial
- To make the pattern take a sheet of paper and cut a rectangle a little wider than your cell phone and leave a space at the top about 9cms or 10cms. * I used the lining of my phone to take the measurements.
I also marked a line to make the pocket for the holder, which I wanted to be a little lower than the phone measurement. - The top part is to place the charger itself, so I mark its shape on the paper or pattern.
- Para hacer el patrón toma una hoja y corta un rectángulo un poco más ancho que tu teléfono móvil y deja un espacio arriba como de 9cms o 10cms. * * Yo usé la forro de mi teléfono para tomar las medidas.
También marqué una línea para hacer el bolsillo del soporte, el cual quería que fuese un poco más abajo que la medida del teléfono.- La parte de arriba es para colocar el propio cargador, así marco su forma en el papel o patrón.

This is how the Design of this Bag-Support looks like: A space to place the load (I cut it out). All that upper part will be folded over what will be the pocket to be closed with a clasp.
To soften the corners so they are not so rigid, with a round shape, I used a thread, I drew the circular shape as you can see in the image. And ready the pattern of the Design, now let's make it.
Así queda el Diseño de este Bolso-Soporte: Un espacio para colocar el cargado (lo recorté). Toda esa parte superior se va a doblar sobre lo que será el bolsillo para cerrarse con un broche.
Para suavizar las esquinas y que no queden tan rígidas, con alguna forma redonda, yo usé un hilo, dibujé la forma circular como puedes ver en la imagen. Y listo el patrón del Diseño, ahora vamos a confeccionar.

I cut in the red semi leather that I had available: 2 complete pieces of the pattern, and 1 piece with the size of the pocket. With only these 3 pieces we will make the Support, as you can see it is very little material that is used and you can do it even in fabric.
Corté en el semicuero rojo que disponía: 2 piezas completas del patrón, y 1 pieza con el tamaño del bolsillo. Con solo estas 3 piezas haremos el Soporte, como puedes ver es muy poco material el que se usa y puedes hacerlo incluso en tela.

I prepare my sewing machine with thread of the same color and start sewing the upper edge of the piece that will be the pocket, with a fold, fixed with the pressure clips and straight stitching.
Preparo mi máquina de coser con hilo del mismo color y empiezo a coser el borde superior de la pieza que será el bolsillo, con un doblez , fijo con los clips de presión y paso costura recta.

This is how the top edge of the pocket looks like, which once ready I place on one of the whole pieces to effectively form the pocket.
Así queda el borde superior del bolsillo, el cual una vez listo ubico en una de las piezas enteras para que efectivamente formen el bolsillo.

I secure it with the pressure clips and pass a straight stitch all the way around. In the following image you can already see how the bracket will work in relation to the size of the phone.
Aseguro con los clips de presión y paso una costura recta por todo el alrededor. En la siguiente imagen ya puedes ver como va a funcionar el soporte en relación al tamaño del teléfono.

I place the other complete piece, right side to right side and on top I place my pattern to mark the shape where the charger is going to be placed. I fix it with the pressure clips, mark with the pen, remove the pattern and now I stitch a seam in the drawing.
Coloco la otra pieza completa, derecho con derecho y arriba ubico mi patrón para marcar la forma donde va a colocarse el cargador. Fijo con los clips de presión, marco con el bolígrafo, retiro el patrón y ahora paso una costura en el dibujo.

Now I cut the rectangle where the charger will be placed, and I will flip the pieces through this hole, so that the rights of the half leather are towards the outside, as follows:
Ahora recorto el rectángulo donde va a colocarse el cargador, y voy a voltear las piezas por este agujero, de manera que queden los derechos del semicuero hacia la parte externa, de la siguiente forma:

I make a straight seam to smooth this rectangle so that it is better presented.
Hago una costura recta para repisar este rectángulo y que quede mejor presentado.

Now the easiest part of this whole design, I'm going to zig zag stitch all the way around to finish the stitching. As the thread is the same color it gives it a better finish, just make the stitching very tight so that it looks nice and even, and that's it with the stitching..... This was really easy ❤️❤️❤️
Ahora lo más fácil de todo este diseño, paso una costura de zig zag por todo el alrededor para terminar con la costura. Al ser el hilo del mismo color le da mejor acabado, solo haz la costura muy cerrada para que quede bien uniforme, y es todo con el tema de la costura... Esto fue muy fácil de verdad ❤️❤️❤️

I like it when I have an excuse to use my Plastic Pin Pliers, I love this machine and I acquired it with Hive's resources, precisely to raise the quality of these small projects, it is a good investment and I love using it.
I mark where the snaps will be placed, both on the lapel and on the pocket, I use the punch for this and punch to place the snaps easily.
Me gusta cuando tengo una excusa para usar mi alicate para Broches plásticos, amo esta máquina y la adquirí con los recursos de Hive, precisamente para elevar la calidad de estos pequeños proyectos, es una buena inversión y adoro usarla.
Marco donde va a estar ubicados los broches, tanto en la solapa como en el bolsillo, uso para esto el punzón y perforo para colocar los broches fácilmente.

The procedure is to place the piece of the brooch that has the tip on the inside of the pocket so that the tip comes out to the front, then I place one of the pieces on the outside, using the corresponding pliers.
El procedimiento es colocar la pieza del broche que tiene la punta en la parte interna del bolsillo para que la punta salga hacia al frente, luego coloco una de las piezas de afuera, usando el alicate correspondiente.

The same on the upper flap of the bracket, to place the other part of the brooch. And that's it, I've finished this bracket.
Lo mismo en la solapa superior del soporte, para colocar la otra parte del broche. Y listo, ya terminé este soporte.

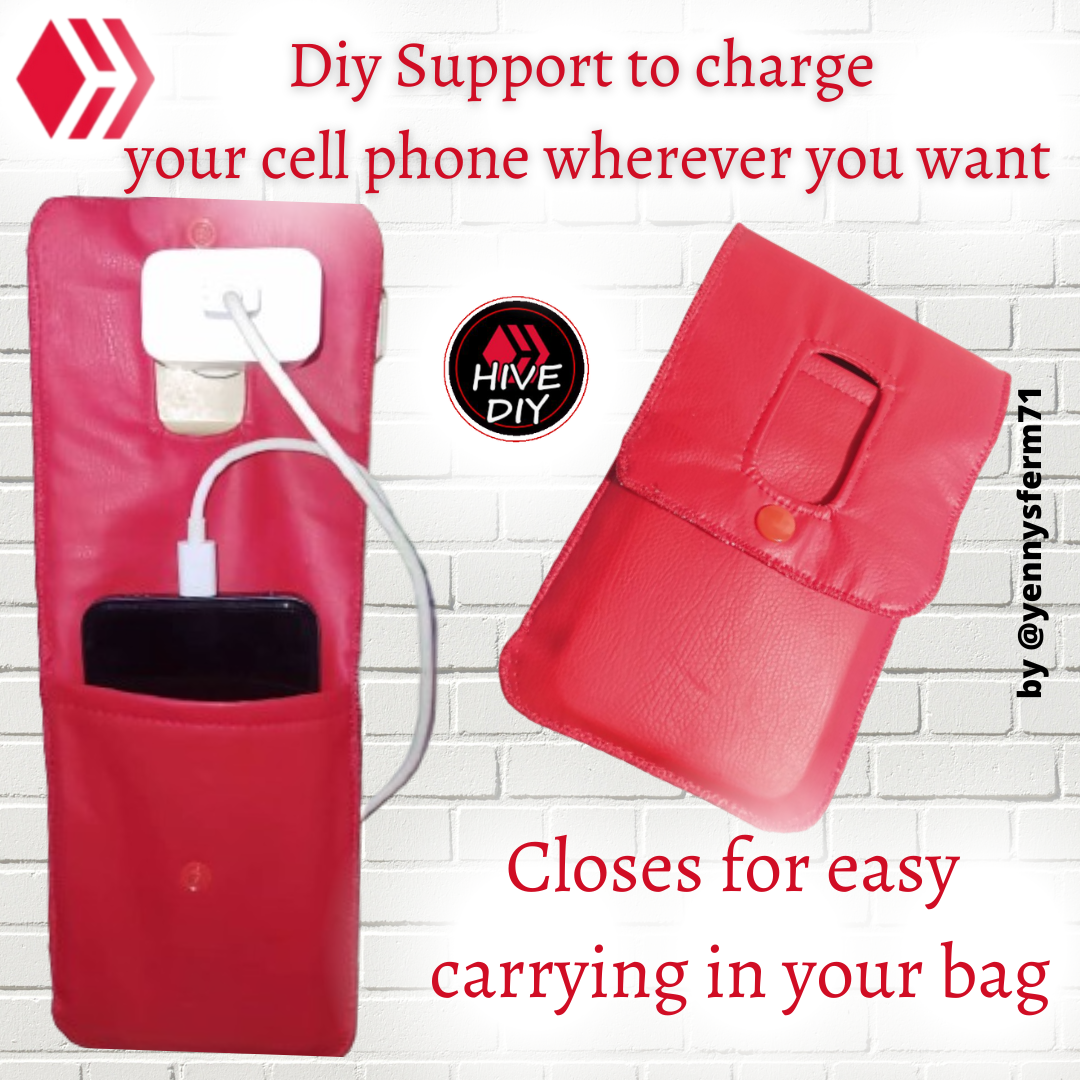
This way it looks closed with the clasps, and it is ideal to put the phone in the wallet or sports bag, without getting hurt or scratched, plus it is very easy to get the phone. My daughter is an athlete and her phone is always among many things in her gym bag, now she will be able to find it very easily after training, because as always my projects have owner very quickly and she already has it in her possession.
Así luce cerrado con los broches, y es ideal para meter el teléfono en la cartera o bolso deportivo, sin que se lastime o raye, además que es muy fácil conseguir el teléfono. Mi hija es deportista y su teléfono siempre está entre muchas cosas en su bolso de gimnasio, ahora podrá encontrarlo muy fácil luego de entrenar, porque como siempre mis proyectos tienen dueña rapidísimo y ella ya lo tiene en su poder.

Here you can see that the design works perfectly, I place the charger in the rectangle, to plug it into the outlet and the cell phone fits perfectly in the pocket, but there is a part exposed to be able to take it out very easily. The holder is quite stable and secure, now you can charge it anywhere, carry it in your bag at all times, and it looks great too.
Aquí puedes ver que el diseño funciona perfecto, el cargador lo ubico en el rectángulo, para conectarlo en el tomacorriente y el celular cabe perfecto en el bolsillo, pero queda una parte expuesto para poder sacarlo con mucha facilidad. El soporte se mantiene bastante estable y seguro, ahora puede cargarse en cualquier parte, llevarlo en el bolso siempre, y además se ve genial.


I hope you liked this DIY project, it is very easy, fast, with few materials, looks very nice, is very functional and practical.
I cordially invite you to my next publication.... Best regards
Deseo que les haya gustado este proyecto DIY, es muy fácil, rápido, con pocos materiales, luce muy lindo, es muy funcional y práctico.
Los invito cordialmente a mi próxima publicación... Un abrazo
I took the photos with my Redmi Note 8 phone
Apps I used:
Canva for the Cover
Inshot for the Collage
I used Deepl Translate
My social networks:
Discord: YennysYaneth#0189
Twitter:
Instagram:


---------- ❤️❤️❤️❤️ ----------
Las fotos las tomé con mi teléfono Redmi Note 8
Apps que utilicé:
Canva para la Portada
Inshot para los Collage
Utilicé el Traductor Deepl
Mi redes sociales:
Discord: YennysYaneth#0189
Twitter:
Instagram: