Esta Pulsera de Ojo Turco que les traigo hoy, es hermosa y combina con todos los outfits. Mi hija compró las cuentas de colores y me pidió que le hiciera pulseras con alambre dorado. Hoy se las hice y fue realmente rápido y fácil, y el resultado me gustó mucho porque de verdad que quedan bien con casi todo, ya que tienen varios colores y el dorado del alambre las hace ver de buena calidad.
Saludos a todos, me encanta poder presentarles otro proyecto en mi comunidad preferida, en Hive DIY
This Turkish Eye Bracelet that I bring you today is beautiful and combines with all outfits. My daughter bought the colored beads and asked me to make her bracelets with gold wire. Today I made them for him and it was really quick and easy, and I really liked the result because they really look good with almost everything, since they have several colors and the gold of the wire makes them look of good quality.
Greetings everyone, I am delighted to be able to present you with another project in my favorite community, in Hive DIY

Esta pulsera se realiza con tan solo dominar dos técnicas básicas del Alambrismo, que consisten en manipular el alambre para preparar las piedras y realizar las argollas que sirven para conectar las piezas. Solo con saber esas dos técnicas pueden realizar hermosas piezas, pero siempre necesitas imaginación para crear diseños.
Aunque parezca que es lo más sencillo, digo eso de tener algo de imaginación, confieso que ese fue el principal factor que me hizo durante un tiempo, no emprender estos proyectos de bisutería. Cuando iba a las mercerías me abrumaba ante tantos insumos, piedras, colores, tamaños, brillos, formas, etc. Eso me paralizaba, no sabía que comprar o las cantidades. Lo que hacía era solo comprar lo que veía bonito, pero sin ningún plan de qué iba a diseñar, para posteriormente cuando me llegara la inspiración, pues trabajar con lo que tenía en casa.
Mi mejor consejo es que hagan piezas, y si pueden las repiten con otros colores, y luego van cambiando las piezas o modelo de piedras o insumos que usen. Luego, poco a poco se atreven con otra cosa más complicada, y así progresivamente para que se vayan activando, agarren confianza y tienen experiencia. Ya después, sin que se den cuenta van a ir teniendo la confianza y la imaginación para crear diseños propios, de hacer cosas que sean diferentes y hasta tener tu sello personal en tus piezas.
This bracelet is made by simply mastering two basic techniques of Alambrismo, which consist of manipulating the wire to prepare the stones and making the rings that serve to connect the pieces. Just knowing those two techniques can make beautiful pieces, but you always need imagination to create designs.
Although it seems that it is the simplest thing, I say that of having some imagination, I confess that that was the main factor that made me for a while, not undertake these jewelry projects. When I went to haberdashery I was overwhelmed by so many supplies, stones, colors, sizes, glitter, shapes, etc. That paralyzed me, I didn't know what to buy or the quantities. What I did was only buy what I saw as nice, but without any plan of what I was going to design, for later when inspiration struck, then work with what I had at home.
My best advice is to make pieces, and if you can, repeat them with other colors, and then change the pieces or model of stones or supplies that you use. Then, little by little they dare with something more complicated, and so progressively so that they become active, gain confidence and have experience. Later, without realizing it, they will have the confidence and imagination to create their own designs, to do things that are different and even have your personal stamp on your pieces.
Bueno, ahora sin más les presento mi Tutorial de la Pulsera Ojo Turco, deseo que les guste.
Well, now without further ado I present my **Turkish Eye Bracelet Tutorial,** I hope you like it.
Los Materiales / The Materials

- Pinzas Básicas de Bisutería: de Corte, Redondad y Plana.
- Alambre.
- Piedras Ojo Turco (11 para cada pulsera)
- Un broche.
- Basic Jewelry Tweezers: Cut, Round and Flat.
- Wire.
- Turkish Eye Stones (11 for each bracelet)
- A brooch.
El Paso a Paso / The Step by Step
Paso 1: Preparamos las piedras para ello metemos una piedra u ojo turco en el alambre y con nuestra pinza redonda formamos un aro.
Step 1: We prepare the stones for this we put a stone or Turkish eye in the wire and with our round pliers we form a ring.

Luego, en el otro extremo del alambre medimos 2,5cms aproximadamente, yo uso la medida de mi dedo meñique para establecer ese espacio más o menos; y con la pinza de corte, cortamos el alambre. Ahora con la pinza redonda formamos el segundo arito. Esto lo hice con todas las piedras, que en este diseño fueron 11 piedras en cada pulsera.
Then, at the other end of the wire we measure approximately 2.5cms, I use the measurement of my little finger to establish that space more or less; and with the cutting pliers, we cut the wire. Now with the round clamp we form the second earring. I did this with all the stones, which in this design were 11 stones in each bracelet.

Paso 2: Realizamos los aros para ello, tomamos el alambre y con la pinza redonda vamos girando y formando como un resorte en la pinza. Luego, con la pinza de corte vamos cortando en la misma dirección.
Step 2: We make the rings To do this, we take the wire and with the round clamp we turn and form a spring in the clamp. Then, with the cutting clamp we cut in the same direction.
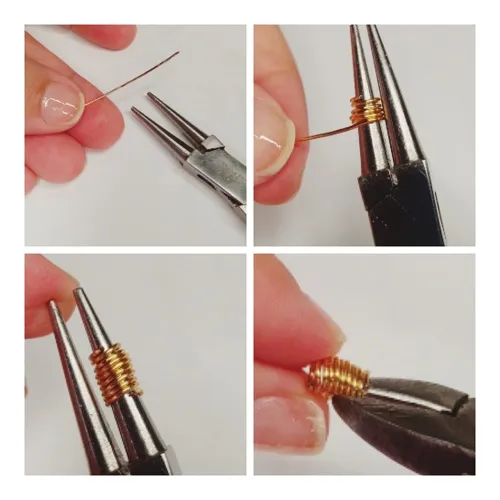
Verás que los aros van cayendo uno a uno. Cabe señalar que, siempre puedes hacer aros y guardarlos para otros proyectos y así avanzas más rápido en lo que vayas a realizar en el futuro.
You will see that the rings are falling one by one. It should be noted that you can always make hoops and save them for other projects so you can move faster in what you are going to do in the future.

Paso 3: Comenzamos a hacer la Pulsera vamos a abrir un aro con nuestras pinzas redonda y plana, separando hacia los lados, nunca hacia afuera porque se deformaría el aro. Insertamos dos piedras, y nuevamente con las pinzas cerramos el aro.
Step 3: We begin to make the Bracelet We are going to open a ring with our round and flat tweezers, separating towards the sides, never outwards because the ring would be deformed. We insert two stones, and again with the tweezers we close the ring.

Esto lo hacemos hasta tener el largo de la pulsera que desees, en este caso la pulsera se llevó 11 piedras, de manera que repetimos en todas las piedras el mismo procedimiento.
We do this until we have the length of the bracelet that you want, in this case the bracelet took 11 stones, so we repeat the same procedure on all the stones.

Paso 4: Colocamos el broche igualmente con las pinzas abrimos el último aro y metemos el broche y lo cerramos. Cabe señalar que, el otro extremo de la pulsera debe terminar en un aro, que servirá para que funcione con el broche.
Step 4: We place the brooch also with the tweezers we open the last ring and put the brooch and close it. It should be noted that the other end of the bracelet must end in a ring, which will work with the clasp.

Este es el resultado, como ven queda muy elegante y chic. Mi pensado era hacer una, pero mi hija quiso otra ya que quedaban varias piedras todavía, y realmente resultó bien porque con dos pulseras queda más bonito.
This is the result, as you can see it is very elegant and chic. My plan was to make one, but my daughter wanted another one since there were still several stones left, and it really turned out well because with two bracelets it looks more beautiful.


Deseo que te haya gustado este diseño, y te agradezco por leer mi publicación. No vemos en el siguiente contenido.
I wish you liked this design, and I thank you for reading my publication. We do not see in the following content.

Las fotos las tomé con mi teléfono SSmoth 6.5 y las edité en la App InShot y son de mi propiedad 
Utilicé el Traductor Google
I took the photos with my **SSmoth 6.5** phone and edited them in the **InShot** App and they are my property


My social networks:
Discord: YennysYaneth#0189
Twitter:
Instagram: