
Muy buenas noches, amigos creativos de esta hermosa comunidad. Deseo y espero que se encuentren muy bien; por mi parte, me siento feliz y agradecida con Dios por un nuevo amanecer para mi familia y para mí.
🌵 Good evening, creative friends of this beautiful community. I hope you are all doing well. For my part, I feel happy and grateful to God for a new dawn for my family and me.
Se acerca el mes del amor y ya realicé mi primer proyecto dedicado a esta fecha tan bonita para todos. Esta vez quise realizar dos cactus enamorados. Realmente me encantan los cactus, no solo por lo bonitos y únicos que son y porque se adaptan a cualquier ambiente fácilmente; siento una conexión especial con ellos, ya que muchas veces yo me he sentido una mujer cactus, y en ocasiones herimos o pinchamos sin querer a personas que amamos, pero porque no aceptan que todos no podemos ser iguales. A pesar de que podemos hacer daño siendo quienes somos, todos tenemos otro lado maravilloso que no todos saben llegar a ver, tal como los cactus, esas preciosas plantas que nos pueden llegar a enseñar a ver la vida de una manera más entendible.
🌵 The month of love is approaching, and I have already completed my first project dedicated to this beautiful time of year for everyone. This time, I wanted to make two cacti in love. I really love cacti, not only because they are beautiful and unique and because they adapt easily to any environment; I feel a special connection with them, since I have often felt like a cactus woman, and sometimes we hurt or prick the people we love without meaning to, but because they do not accept that we cannot all be the same. Even though we can hurt others by being who we are, we all have another wonderful side that not everyone can see, just like cacti, those beautiful plants that can teach us to see life in a more understandable way.
Hoy quiero compartirles el tutorial de cómo estuve realizando esta belleza en nombre del amor. Así que, sin más preámbulos, les muestro el paso a paso.
🌵 Today I want to share with you the tutorial on how I made this beauty in the name of love. So, without further ado, here is the step-by-step guide.
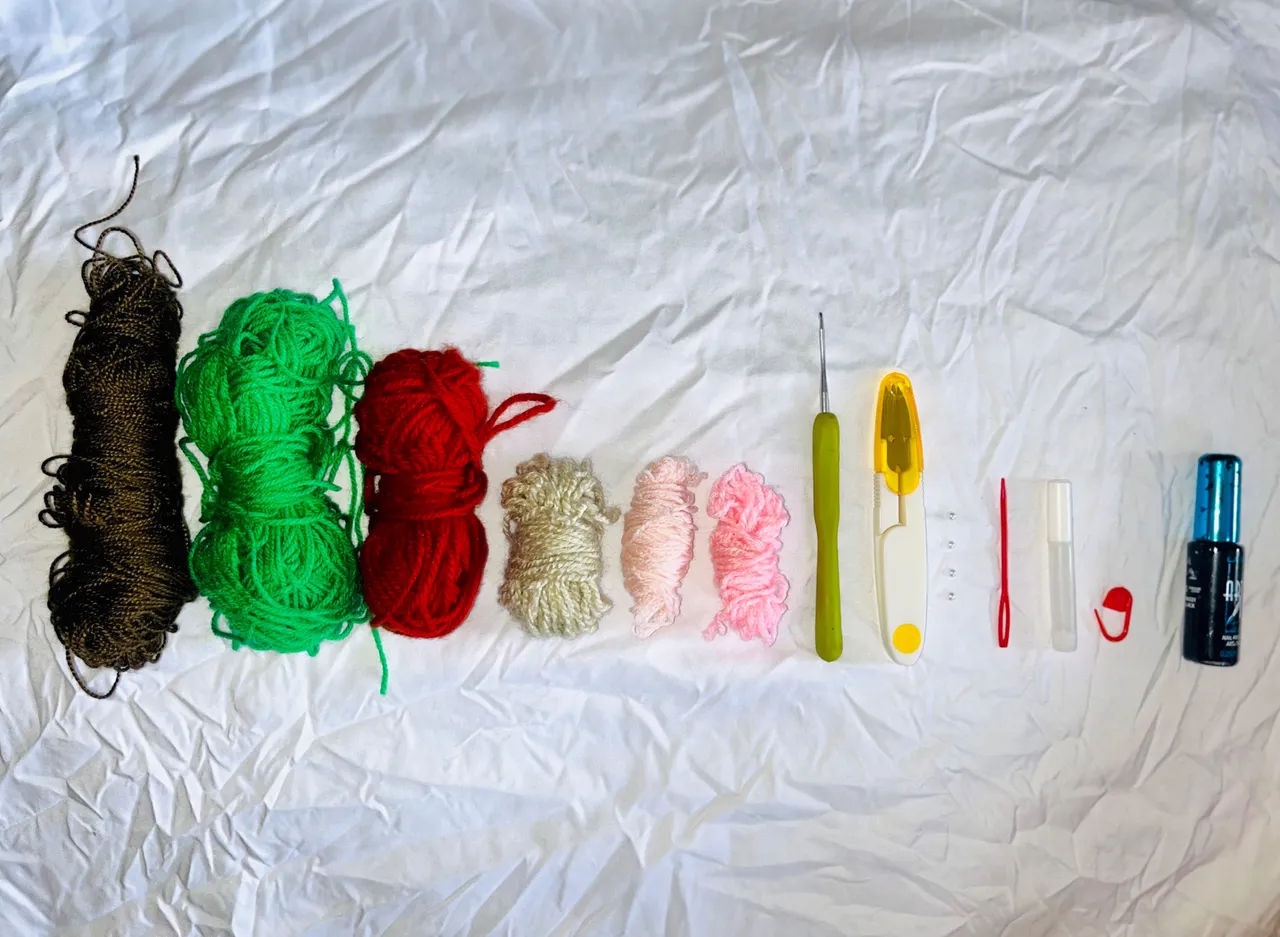
🌵❤️ Materiales ❤️🌵
- Lana de color gris, rosado, carmelita, verde y rojo.
- Agujeta.
- Tijera.
- Aguja lanera.
- Marcador.
- Relleno.
- Perlas.
- Pintura negra.
- Pincel.
🌵❤️ Materials ❤️🌵
Gray, pink, brown, green, and red yarn.
Needle.
Scissors.
Yarn needle.
Marker.
Filling.
Beads.
Black paint.
Paintbrush.
🌵❤️ Paso a paso ❤️🌵
🌵❤️ Step by step ❤️🌵
🌵❤️ Maceta ❤️🌵
V1- Comenzamos con anillo mágico y dentro hacemos 6 puntos bajos, jalamos hilo para cerrar y cerramos con punto deslizado.
V2- Subimos una cadena y en ese mismo punto hacemos aumento y continuamos hasta el final con 6 aumentos y un total de 12 puntos bajos.
🌵❤️ Siempre subimos con una cadena y el primer punto lo realizamos en ese mismo punto.
V3- Hacemos secuencia de 1 punto bajo más 1 aumento y tendremos un total de 18 puntos bajos.
V4- Hacemos secuencias de 2 puntos bajos más 1 aumento y tendremos un total de 24 puntos bajos.
V5- Vamos a realizar estos 24 puntos bajos sin aumentos, ni disminuciones, tomando solo la hebra trasera.
V6- Vamos a continuar realizando estos 24 puntos bajos sin aumentos, ni disminuciones, tomando las dos hebras.
V7- V9- Vamos a continuar realizando estos 24 puntos bajos tal como en la V6.
V10- Cambiando a lana color rosa, vamos a realizar 24 puntos medios.
Cerramos con punto deslizado.
🌵❤️ Pot ❤️🌵
V1- We start with a magic ring and make 6 single crochets inside, pull the yarn to close and close with a slip stitch.
R2- We go up one chain and at that same point we make an increase and continue to the end with 6 increases and a total of 12 single crochets.
🌵❤️ We always go up with a chain and make the first stitch at that same point.
R3- We make a sequence of 1 single crochet plus 1 increase and we will have a total of 18 single crochets.
R4- We make sequences of 2 single crochets plus 1 increase and we will have a total of 24 single crochets.
R5- We are going to make these 24 single crochets without increases or decreases, taking only the back loop.
R6- We are going to continue making these 24 single crochets without increases or decreases, taking both loops.
R7- R9- Continue working these 24 single crochets as in R6.
R10- Changing to pink yarn, we are going to make 24 single crochet stitches.
We close with a slip stitch.

|

|

|

|
🌵❤️ Tierra ❤️🌵
V1- Realizamos 12 cadenas, cerramos con punto deslizado, subimos 1 cadena y realizamos 18 puntos bajos y cerramos con punto deslizado.
V2- Subimos con 1 cadena y realizamos secuencias de 2 puntos bajos + 1 aumento quedando un total de 24 puntos bajos y cerramos con punto deslizado.
V3- Subimos con 1 cadena y realizamos secuencias de 3 puntos bajos + 1 aumento quedando un total de 30 puntos bajos y cerramos con punto deslizado.
Cortamos hilo.
🌵❤️ Earth ❤️🌵
R1- Work 12 chains, join with a slip stitch, chain 1, work 18 single crochets, and join with a slip stitch.
R2- Chain 1, work sequences of 2 single crochet stitches + 1 increase for a total of 24 single crochet stitches, and close with a slip stitch.
R3- Chain 1, work sequences of 3 single crochet stitches + 1 increase for a total of 30 single crochet stitches, and close with a slip stitch.
Cut the yarn.

|

|
🌵❤️ Cactus varón ❤️🌵
V1- Comenzamos con anillo mágico y dentro hacemos 6 puntos bajos, alamos hilo para cerrar.
V2- En el primer punto hacemos aumento y marcamos ese primer punto con un marcador y continuamos hasta el final con 6 aumentos y un total de 12 puntos bajos.
🌵❤️ Siempre marcamos el primer punto de cada vuelta ya que ahora no vamos a cerrar con punto deslizado, ni vamos a subir con una cadena.
V3- Hacemos secuencia de 1 punto bajo más 1 aumento y tendremos un total de 18 puntos bajos.
V4- V6- Vamos a realizar estos 18 puntos bajos sin aumentos, ni disminuciones.
V7- Vamos a realizar secuencias de 1 punto bajo más 1 disminución quedando un total de 12 puntos bajos.
V8- V12- Vamos a realizar estos 12 puntos bajos sin aumentos ni disminuciones.
🌵❤️ Rellenamos.
V13- Realicé 6 disminuciones.
V14- Realice 3 disminuciones y cerramos con punto deslizado.
🌵❤️ Male cactus ❤️🌵
R1- Start with a magic ring and work 6 single crochet stitches inside, pull the yarn to close.
R2- Increase in the first stitch and mark that first stitch with a marker, then continue to the end with 6 increases and a total of 12 single crochet stitches.
🌵❤️ Always mark the first stitch of each round, as we are not going to close with a slip stitch or chain stitch.
R3- Work a sequence of 1 single crochet plus 1 increase, giving a total of 18 single crochets.
R4-R6- Work these 18 single crochets without increases or decreases.
R7- We will work sequences of 1 single crochet plus 1 decrease, leaving a total of 12 single crochets.
R8- R12- We will work these 12 single crochets without increases or decreases.
🌵❤️ We fill.
R13- I worked 6 decreases.
R14- Work 3 decreases and close with a slip stitch.

|

|

|

|
🌵❤️ Cactus hembra ❤️🌵
De la V1- V9 hacemos exactamente igual al cactus varón.
V10- Hacemos secuencias de 2 pb + 1 disminución quedando un total de 9 puntos bajos.
V11- Realizanos estos 9 puntos bajos sin aumentos ni disminuciones.
V12- Hacemos 3 disminuciones y cerramos con punto deslizado.
🌵❤️ Female cactus ❤️🌵
From R1-R9, we do exactly the same as for the male cactus.
R10- We make sequences of 2 sc + 1 decrease, leaving a total of 9 single crochets.
R11- We make these 9 single crochets without increases or decreases.
R12- Make 3 decreases and close with a slip stitch.

🌵❤️ Flor ❤️🌵
V1- Realizamos un anillo mágico y dentro hacemos secuencias de 1 punto bajo + 1 punto alto + 1 punto bajo + 1 punto deslizado por 5 veces. Alamos hilo para cerrar y listo.
🌵❤️ Flower ❤️🌵
R1- Make a magic ring and inside make sequences of 1 single crochet + 1 double crochet + 1 single crochet + 1 slip stitch 5 times. Fasten off and you're done.

🌵❤️ Corazón ❤️🌵
V1- Comenzamos haciendo anillo mágico y dentro hacemos 6 puntos bajos.
V2- Hacemos 6 aumentos quedando un total de 12 puntos bajos.
V3- V4- Realizamos estos 12 puntos bajos sin aumentos ni disminuciones.
Cerramos con punto deslizado y cortamos hilo.
🌵❤️ Hacemos dos piezas exactamente iguales, pero en esta segunda no cortamos hilo, sino que unimos las dos piezas con punto deslizado en el último punto que realizamos de cada una.
V5- Ahora realizamos 12 puntos bajos en cada una de las piezas, quedando un total de 24 puntos bajos.
V6- Ahora hacemos 6 puntos bajos + 1 disminución por 3 veces.
V7- Ahora hacemos 5 puntos bajos + 1 disminuciones por 3 veces.
V8- Ahora hacemos 4 puntos bajos + 1 disminución por 3 veces.
🌵❤️ Paramos y rellenamos
.
V9- Ahora hacemos 3 puntos bajos + 1 disminución por 3 veces.
V10- Ahora hacemos 2 puntos bajos + 1 disminución por 3 veces.
V11- Ahora hacemos 1 punto bajo + 1 disminución por 3 veces.
Ahora cerramos con la ayuda de una aguja lanera.
🌵❤️ Heart ❤️🌵
R1- Start by making a magic ring and working 6 single crochet stitches inside it.
R2- Work 6 increases, leaving a total of 12 single crochet stitches.
R3- R4- Work these 12 single crochet stitches without increases or decreases.
Close with a slip stitch and cut the yarn.
🌵❤️ Make two pieces that are exactly the same, but in the second one, do not cut the yarn. Instead, join the two pieces with a slip stitch in the last stitch of each piece.
R5- Now work 12 single crochets in each piece, for a total of 24 single crochets.
R6- Now work 6 single crochets + 1 decrease 3 times.
R7- Now work 5 single crochets + 1 decrease 3 times.
R8- Now work 4 single crochets + 1 decrease 3 times.
🌵❤️ Stop and fill.
V9- Now make 3 single crochet stitches + 1 decrease 3 times.
V10- Now make 2 single crochet stitches + 1 decrease 3 times.
V11- Now make 1 single crochet stitch + 1 decrease 3 times.
Now close with the help of a wool needle.

|

|

|

|
🌵❤️ Terminación ❤️🌵
1- Ahora solo nos queda rellenar la maceta y unir las piezas.
2- La tierra la cosemos por toda la orilla.
3- Luego unimos de esta manera los dos cactus y damos una puntada con lana de la base de la maceta, la sacamos con el agujero de la tierra, pasamos entre los dos cactus la lana y volvemos a dar otra puntada en la base de la maceta. Esto lo hacemos tres veces para que queden seguros los cactus.
4- Luego le pegamos la flor al cactus hembra
5- Luego agregamos el corazón al diseño.
🌵❤️ Finishing ❤️🌵
1- Now we just have to fill the pot and join the pieces.
2- Sew the soil around the edge.
3- Then join the two cacti together in this way and sew a stitch with wool from the base of the pot, pull it out through the hole in the soil, pass the wool between the two cacti and sew another stitch at the base of the pot. Do this three times to secure the cacti.
4- Then we glue the flower to the female cactus.
5- Then we add the heart to the design.

|

|

|

|

|

|
🌵❤️ Y listo amigos, así queda terminada esta preciosa maceta con cactus enamorados. Hermoso detalle para regalar este 14 de febrero, lo mejor es que es realizado con nuestras propias manos, es decir con el corazón ♥️.
🌵❤️ And that's it, friends! This beautiful pot with cacti in love is now complete. It's a lovely gift for February 14, and the best part is that it's made with our own hands, that is, with our hearts ♥️.

|

|
🌵❤️ Cuéntame en los comentarios si te gustó tanto como a mí. Gracias de antemano por leerme hasta aquí. Bendiciones miles 😍, abrazos virtuales 🤗 y hasta una nueva publicación 🥰.
🌵❤️ Let me know in the comments if you liked it as much as I did. Thank you in advance for reading this far. Thousands of blessings 😍, virtual hugs 🤗, and see you in my next post 🥰.

|

|
Recurso/ Resourse
Fuente/ Sourse
Edición / Edition :
Imágenes / Pictures : IPhone 13
Traductor / Translator : Deepl Translate
Corrector / Proofreader : Language Tool
