
On to the battlefield! Make way for her highness, Nectar Queen!
Hello guys! I present to you my entry for Splinterlands Art Contest Week 241.
This time, I have chosen Nectar Queen as a subject for my new animated 3D digital artwork. The main challenge in creating this artwork will be its fur as I have not yet experienced working with hairs.
The resulting animation got a very large file that's why I have created a simple one. But I will still be leaving here the links for the original and this entry since GIF keeps on pausing even though the file is already compressed. I highly recommend visiting the links below for you to view the final results at the intended resolution.
Nectar Queen Entry Alternative
Medium and Software:
Hardware: Personal Laptop
Software: Autodesk Maya and Adobe Photoshop 2021
Steps:
Here are the steps on how I made my 3D animated Artwork:
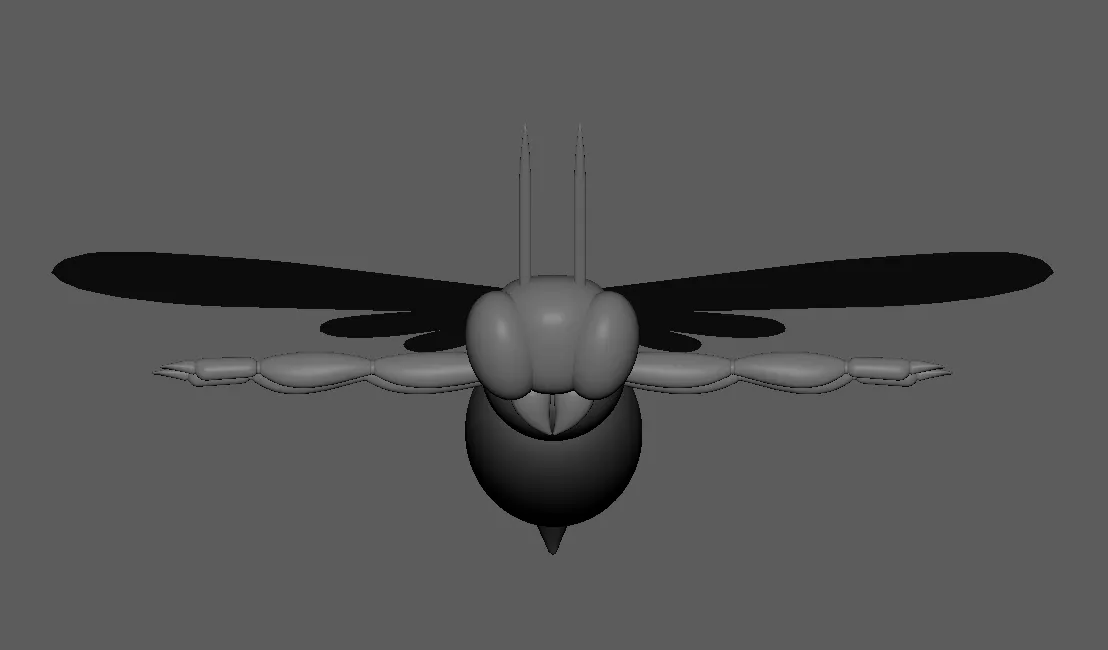
First, before creating the model, I familiarized myself on the basic parts of a bee. After that, I started working with its head, its eyes, and its mandibles. According to some sources, bees have other "eyes" on top of their head. But for now, I will work based on what is shown from the Nectar Queen Card.


Then I have created its thorax, its abdomen, and its stinger. I haved made it close to how it is depicted in the card.


I then created its foreleg and duplicated it for its middle and hind legs. I also created its wings. Unlike what is stated on some sources which says that bees normally have two (2) pairs of wings -Forewing and Hindwing, Nectar Queen has three (3) pairs of wings.


The model for the Nectar Queen is then completed.


I have added the base color for the Nectar Queen.

I have created the its fur. Now, this is where it got a little complicated. I have made the model so that all sharp edges are smoothened. This resulted to many divisions on the mesh. Creating hair on mesh with many divisions then resulted to many hair clumps causing very slow performace of my laptop. As I will still be adding animation, which will further make my device perfor slower, I have recreated some parts of the model and find other ways to make the fur denser even when working with few divisions on mesh.

After fixing the fur, I have started creating the skeleton for the animation. This is where my progress got slower as this process requires much attention to details. After this step, I started working with its animation.


I then added background for and started positioning the camera.

The following are some of the resulting images.


This is by far one of the most satisfying one I have created. As some of you may have noticed, I am just a beginner when it comes to 3D modeling and animation. Joining this contest makes me enjoy and learn at the same time! And working with this kind of artworks still take a lot of time for me that's why I really doubt I can join Weekly. But I will try and join as much as I can!
As a beginner, it would be a great boost of confidence if you can upvote and reblog my post! You may also leave your ideas on the comment section. I would be willing to read your thoughts about my works. If you are interested, you may also visit my page to view my other works.
See you again next time!
Reference:
Background created using Outdoor HDRI 044 Material from ambientCG.com, licensed under the Creative Commons CC0 1.0 Universal License.