Hi Hive Community!

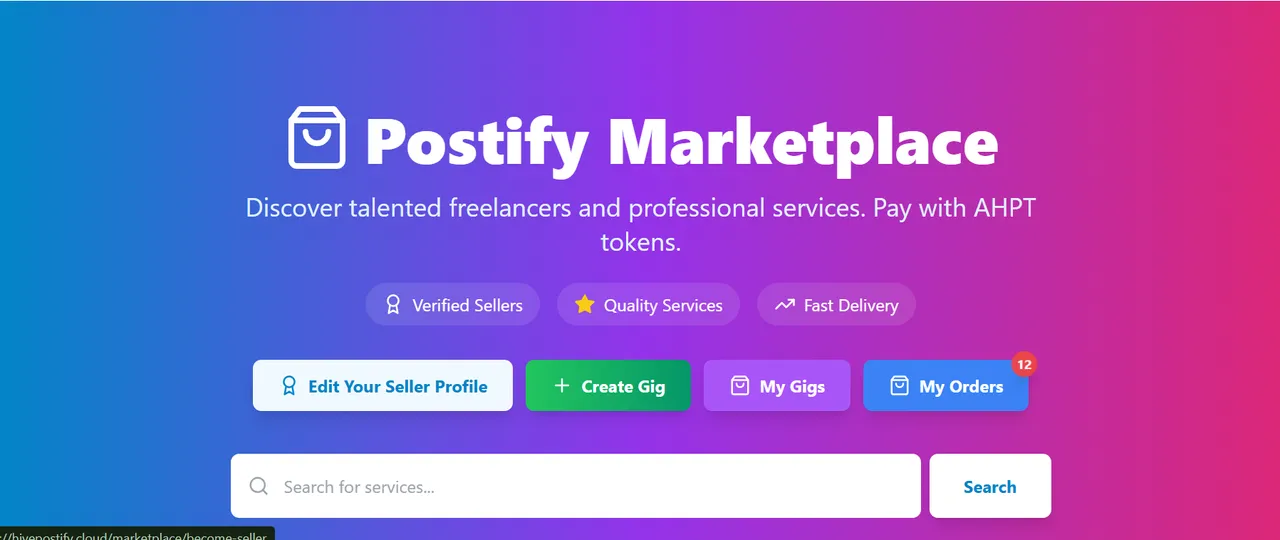
Thank you for joining HivePostify.cloud, Pakistan's first ever Web3-based Social and Freelancing Ecosystem. Tailored to the needs of freelancers, creators, and businesses, this ecosystem fosters secure decentralized relationships where community members can connect, showcase, and monetize their skills and services.


Upon visiting the marketplace at HivePostify.cloud, you will be able to peruse various services, including the following, which are among the most requested:

🌐 Development of Websites
🎨 Creation of Logos
🎬 Editing of Videos
📈 Services for SEO
✍️ Writing of Content
🎙️ Voice Overs
🤖 Development of AI
📱 Marketing on Social Media
📚 Publishing of Books
🏛️ Designing of Architecture
Others
Additionally, you can find and offer services in many other categories. With HivePostify.cloud, you can work with freelancers to access top-quality services in more than 700 categories.

Here are benefits of using HivePostify.cloud:
Easy to Use: Encounter an interface that is simple to use and connects you with the ideal freelancers.
Quality and Budget: Get great work done fast and at any price point.
Pay When Happy: Withhold payment until you are happy with the work.
You are able to browse services offered by freelancers by category:

- Programming and Tech
- Graphics and Design
- Digital Marketing
- Writing and Translation
- Video and Animation
- AI Services
- Music and Audio
- Business
- Consulting
Finding and providing services at HivePostify.cloud is straightforward.
How to Create a Seller Account on HivePostify.cloud MarketPlace.
Start by signing into your HivePostify.cloud account.
Next, go to the HivePostify Marketplace.
Once there, you should see a sidebar on the left. You can use this for easier navigation.
To begin, find the button that says, “Become A Freelancer.”
After you click on it, you will go to a page where you can start the Seller registration process: Become a Seller.
If you have already signed up to become a seller, you will see an “Edit Profile” button instead of the seller registration form.

How to Complete Your Seller Profile

Once on this page, you will need to provide information for each of the seller profile fields. Below is the breakdown.
Hive Username (Your Identity): This is the username for your verified Hive account, and is permanent.
Display Name: This is the name that the public will see for your seller account. You can make it a business name or something that describes the service you provide. This name is different from your Hive name.
Profile Image URL: Link to your profile picture. Example:
https://images.hive.blog/DQmeY2T4z9Z6KbC2TmJYswf9UyS8VBPEVDDEsnwCCASzoRU
Short Bio: Give a brief introduction about yourself (150 characters maximum).
Full Description: Describe your skills, experience, and what services you offer (2000 characters maximum).
Languages: List the languages that you are able to work in such as English, Spanish, etc.

Skills: Specify your skills such as Logo Design, SEO, Web Development, and so on.
Once your profile is completed, you can start selling and creating gigs.
How HivePostify Marketplace Works
It is very easy to become a freelancer on HivePostify.cloud. Here is how it works.
Create Profile: Fill in your seller profile and include your skills, experience, and what services you offer.
Make Gigs: Add services you provide, along with your pricing, how long your delivery time is, and write a description.
Get Orders: Customers find your gigs and can order directly in the platform.
Get Paid: Once you finish the order, you can get paid in AHPT tokens, Hive, or USDT.
Payment Details:
AHPT Token: This is the platform’s native token, and it is worth 1 AHPT = 1 USD.
Hive and USDT: You can also get paid directly in Hive and USDT.
This system makes sure you get paid fast and safely for the freelance work you did.
How to Make a Gig on HivePostify.cloud
This is where you need to create a gig to offer your services as a seller.
Note: You can only create a gig after completing your seller profile. You can still browse services and make orders without your seller profile.
To make a gig, head over to the HivePostify Marketplace.
Here, you can find the “Create Gig” button. Press it to make your gig.
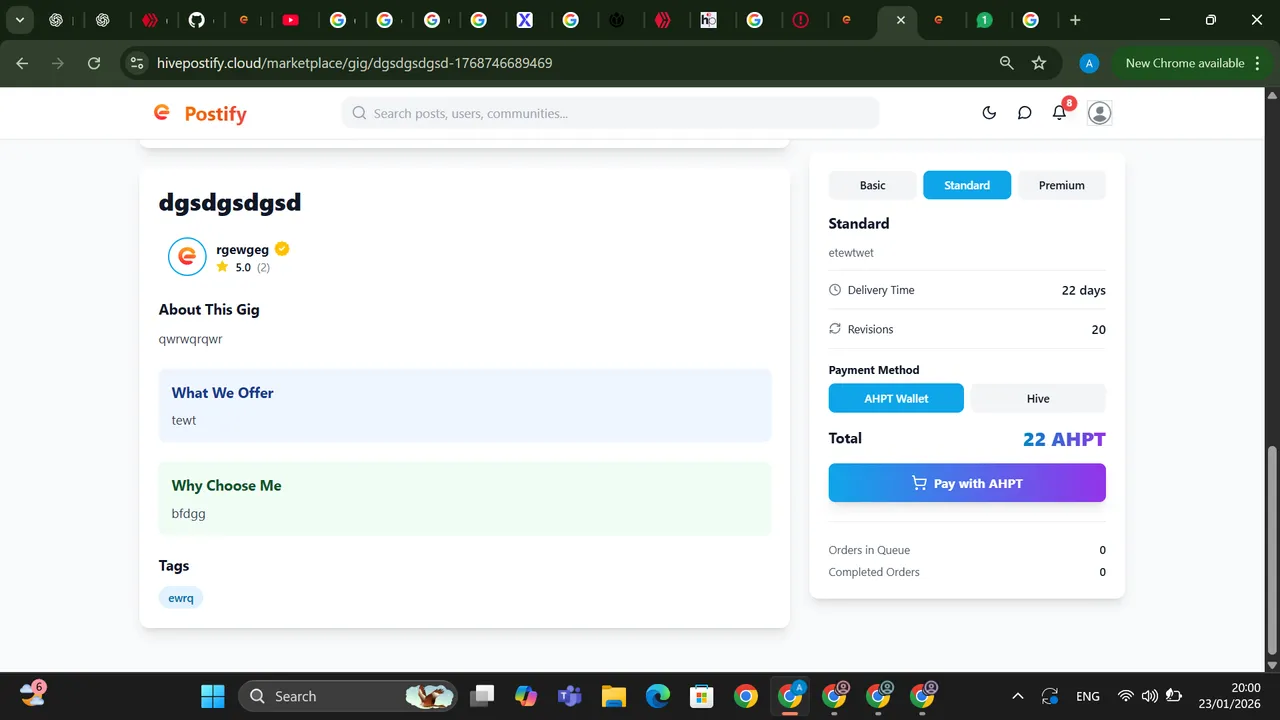
Making a Gig
This is the “Create New Gig” page and its components you need to fill out.

Gig Title: Make a neat and concise title for your service. E.g.
Professional Logo Design Creation
(100 character limit)
Category & Subcategory: Pick the category and subcategory that describes your service best.
Short Description: Describe your service briefly (maximum 150 characters)
Full Description: Describe in detail what you provide (maximum 5000 characters). Write about your skills, the process, what’s in it for the customer, and what your end product will be.

Pictures (Web addresses): Include pictures to demonstrate your work. Use direct links to images from Google Drive, Imgur, or other hosting services. You may include several images.
Demo Video URL (Optional): If applicable, provide a link to a video demonstration of your service, using Google Drive or YouTube.
Tags: Add pertinent tags to your gig. Hit Enter after each tag to submit it.

Pricing Packages
Your gig may contain a maximum of three packages: Basic, Standard, and Premium. Each package has to include:

Package Description: What this package offers.
Price (AHPT): Specify the price in AHPT tokens.
Delivery (Days): Specify the delivery time.
Revisions: State the number of revisions you'll permit the buyer to make.
Additional Gig Details

What We Offer: Summarize up to 1000 characters the main selling points, outcomes, and the differentiating factors of your product.
Why Choose Me: You have 1000 characters to explain the main reasons why buyers should choose your gig, focusing on your years of experience, expertise, and a promise on quality.

Frequently Asked Questions (FAQ): Include some questions and answers to provide greater clarity on your service to buyers.
SEO Optimization
To make your gig easier to find:

Meta Title: Title of the gig that is search engine optimized.
Meta Description: Short description that will show up in search results.
SEO Keywords: Mention keywords that would help in making the search easier for your gig.
When all information is complete, press Create Gig.
Publish Fee: Some AHPT (≈ equivalent HIVE).
Your gig is now live, and buyers can discover your services, place orders, and you can start earning immediately. Fee remove scaming.
Publishing Your Gig & Going Live
The next step after creating your gig is to pay the publishing fee. This can be done using either Hive or AHPT tokens.


Once the fee is paid, your gig will immediately be published to the HivePostify Marketplace, where it can be seen by buyers.
Things to remember:
- This is the only fee you will pay to publish your gig.
- This fee helps to combat scams, as well as to ensure that only genuine and committed sellers publish their gigs.
- You can edit or update your gig and it will not cost you anything.
When your gig goes live, buyers can see it and will be able to review the packages, prices, and delivery timelines.
How You Receive Orders


Customers can go to your gig and choose their preferred plan to buy (Basic, Standard, or Premium). Once they’ve selected a plan, they will be able to place an order through the platform.
You will get a notification when an order is placed and you will see the order in the My Orders section of your dashboard.
Handling Orders via the My Orders Page
All order management is done from the My Orders page:
https://hivepostify.cloud/marketplace/my-orders
This page shows detailed statistics about your orders, including:
Active Orders
Pending Orders
Late Orders
Delivered Orders
Orders as Buyer
Orders as Seller
Order Status Categories
The dashboard shows how you track your orders using different statuses.


📦 All Orders
🛒 Buying
💼 Selling
⚡ Active
📬 Delivered
🔄 Revision
⏰ Late
✅ Completed
❌ Cancelled
With these statuses you can communicate, revise, deliver, and complete all from the same place.
Earnings & Withdrawals


All your earnings are in AHPT tokens and are credited to you as soon as your order is done.
Withdrawal Options
In Pakistan you can withdraw instantly via local payment wallets and Binance Pay ID.
You can also transfer AHPT into Hive via Binance Pay.
More and more payment agents will come to HivePostify.cloud as it becomes more popular.
Soon we will have international payment gateways so users from all over the world can use it.
This is why users can withdraw, earn, and work all over the world.
This section completes the seller journey.
Gig publishing & fee
Order placement
Order management
Earnings & withdrawals
I Love You #Pakistan
--
I Love You #Pakistan
Final Words
Thank you for exploring HivePostify.cloud with us! For this post, we have outlined the entire journey of seller onboarding, gig creation, order management, and AHPT token earning.
In the next part, we will cover two of HivePostify.cloud’s unique features that will enhance your earning potential. Thank you for building your freelance career on Pakistan’s first Web3 social and freelancing platform!