Holas mis queridos amigos de HIVE, cómo están?. Espero que esten pasando un momento relajante en esta plataforma, leyendo los asombrosos blog que nos llaman la atención. Hoy quise mostrarles, como hice mi horario de clases, en realidad en bastante sencillo de hacer por que esta vez no tuve tanto tiempo de dibujarlo como realmente quería, me encanta hacer el horario en el cuaderno, primero porque está a la mano y pues, esto lo hace super accesible a la hora de ver que sigue en el día, muchas personas le gusta mas tenerlo en el teléfono, pero , a mi verdaderamente no me gusta, me pasa igual cuando tengo que estudiar o leer algo, prefiero tenerlo en físico que tenerlo en el teléfono, ya que sufro de la vista y también porque no me concentro bien. Sin más que decir, empecemos 🥳
Primero debemos elegir nuestra hoja de cuaderno y la forma en que la vayamos a realizar, a mi me gusta mucho más hacerlas de forma horizontal, porque me deja un poco mas de espacio para dibujar al rededor. Luego vamos a trazar con una regla cuatro filas, en este orden, la primera de 5cm de ancho, la segunda de 3cm, la tercera de 10cm y la cuarta de 5cm. Luego trazaremos de forma horizontal 10 columnas y asi ya tendremos nuestro cuadro listo para rellenarlo. Ahora en la primera columna vamos a escribir, las siguientes palabras: Día, Hora, Materias, Prof ( Profesores) dentro de cada unos de los primeros espacios de la fila. Una vez hecho esto si quieren colorearlo por dentro , lo pueden hacer con colores o con resaltadores de colores, también solo si quieren, pueden remarcar los cuadros son marcadores permanentes
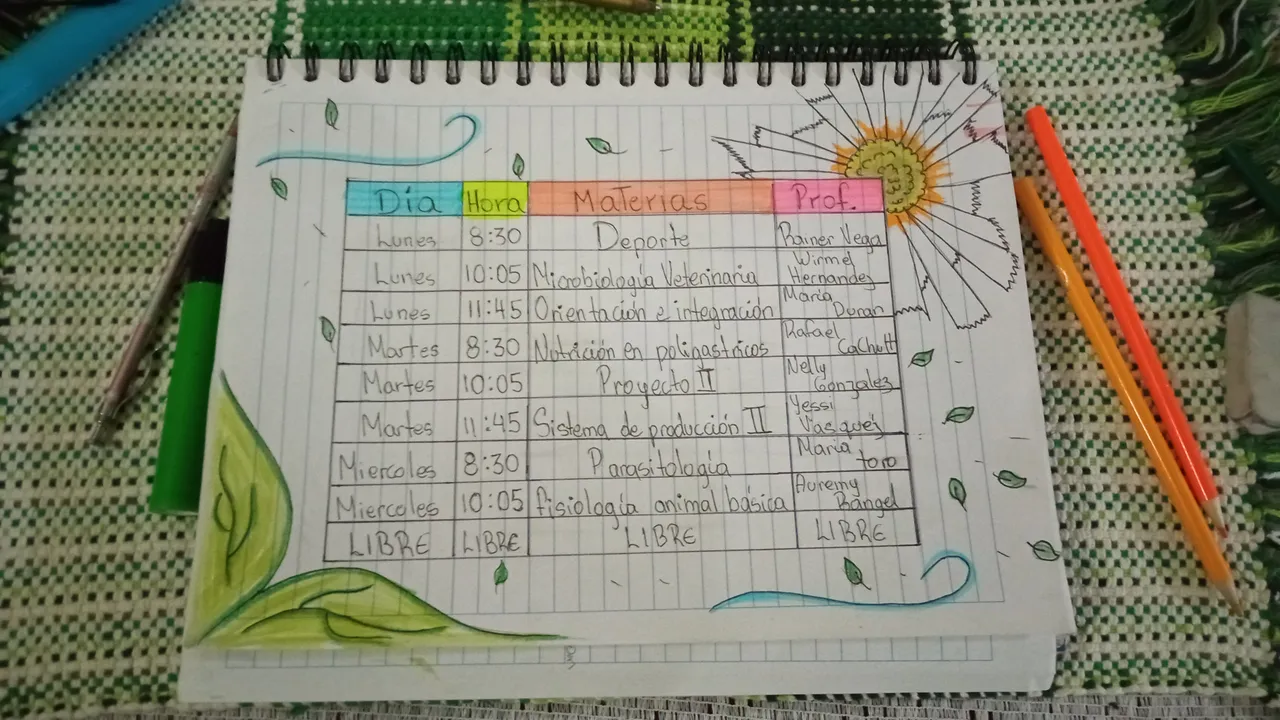
Hello my dear friends of HIVE, how are you doing? I hope you are having a relaxing time on this platform, reading the amazing blogs that catch our attention. Today I wanted to show you how I made my class schedule, actually it's quite simple to do because this time I didn't have as much time to draw it as I really wanted, I love to make the schedule in the notebook, first because it's at hand and well, this makes it super accessible when it's time to see what's next in the day, Many people like to have it on the phone, but, I really don't like it, it happens to me the same when I have to study or read something, I prefer to have it in physical than having it on the phone, since I suffer from eyesight and also because I don't concentrate well. Without more to say, let's get started 🥳.
First we must choose our notebook sheet and the way we are going to make it, I like much more to make them horizontally, because it leaves me a little more space to draw around. Then we are going to draw with a ruler four rows, in this order, the first one of 5cm wide, the second one of 3cm, the third one of 10cm and the fourth one of 5cm. Then we will draw horizontally 10 columns and we will have our picture ready to fill it. Now in the first column we are going to write the following words: Day, Time, Subjects, Prof (Teachers) in each of the first spaces of the row. Once this is done if you want to color it inside , you can do it with colors or with colored highlighters, also just if you want, you can highlight the boxes are permanent markers.

empezamos a realizar los dibujos por fuera del cuadro, lo primero que vamos a hacer es, en la parte superior de la derecha y esquina de arriba del cuadro vamos a realizar una flor. Lo que debemos de hacer es el medio de la flor, alrededor de la esquina del cuadro vamos a hacer un círculo con forma de nube para simular el centro de la flor, luego pasamos a hacer los pétalos, que ya vendrían siendo líneas rectas paralelas pero desprolijas, con esto quiero decir que una sea larga y la otra sea corta, para luego unir las líneas con otra línea que tenga forma de zigzag.
Ahora en la parte inferior, del cuadro de lado izquierdo vamos a realizar dos hojas grandes que salgan del borde de la hoja en qué estamos haciendo cuadro y terminé al borde de la misma hoja. Luego en la parte que queda en blanco, alrededor del cuadro vamos a realizar y una línea curva que simula viento y varias hojas individuales que simulen hojas secas que se las lleva el viento. Ahora que tenemos el diseño ya listo, con un marcador negro punto fino vamos a remarcar todo lo dibujo que realizamos
we start to make the drawings on the outside of the picture, the first thing we are going to do is, in the upper right and top corner of the picture we are going to make a flower. What we have to do is the middle of the flower, around the corner of the picture we are going to make a circle in the shape of a cloud to simulate the center of the flower, then we go on to make the petals, which would already come to be parallel straight lines but untidy, by this I mean that one is long and the other is short, and then join the lines with another line that has a zigzag shape.
Now in the lower part, on the left side of the frame we are going to make two large leaves that come out from the edge of the sheet in which we are making the frame and end at the edge of the same sheet. Then in the part that is left blank, around the frame we are going to make a curved line that simulates wind and several individual leaves that simulate dry leaves that are carried away by the wind. Now that we have the design ready, with a black fine point marker we are going to highlight all the drawing that we made.


Por último, nada mas queda pintar a nuestro gusto, con los colores que mas nos guste, yo en el medio de la margarita le coloque un poco de color amarillo con dorado, y luego le pasé el borrador con movimientos circulares , porque cuando le coloque el color dorado se veía muy oscuro y bueno esa es una técnica que ví por internet, es muy factible, se las recomiendo, también con el color naranja le hice como un difuminado alrededor del círculo, para darle una forma mas linda a la flor.
Con el color verde remarque las hojas que dibujamos por dentro y luego con un resaltador verde rellené todo el espacio que quedaba, me gusta bastante remarcar primero y luego rellenar con resaltadores porque, el dibujo se ve mas nitido y mas realizado, no soy experta ni nada pero si siento que le da un toque especial, que pintarlo todo del mismo color
Espero que les haya gustado ver este blog, muchas gracias por leer ☺️
Finally, nothing more remains to paint to our taste, with the colors that we like, I put a little yellow with gold in the middle of the daisy, and then I passed the eraser with circular movements, because when I put the gold color it looked very dark and well that is a technique that I saw on the internet, it is very feasible, I recommend it, also with the orange color I did as a blur around the circle, to give a nicer shape to the flower.
With the green color I highlighted the leaves that we drew inside and then with a green highlighter I filled all the space that was left, I like to highlight first and then fill with highlighters because, the drawing looks sharper and more accomplished, I am not an expert or anything but I feel that it gives a special touch, than painting it all in the same color.
I hope you liked to see this blog, thank you very much for reading ☺️


