¡Hola queridos usuarios de Hive ✨💕!
Hi dear Hive users ✨💕!
Hace algún tiempo les estuve mostrando por acá como hacer un bolso mensajero de lona 😁, era un diseño fácil de hacer y que no requería demasiados materiales 😄😉, el día de hoy les traigo un nuevo diseño, bastante parecido al anterior en cuento a forma 🤔, pero con nuevos detalles y con un nivel de dificultad un poco más elevado 😲, he de decir que queda hermoso con cualquier outfit 💕 y cuenta con bastante espacio 👏🏻, así que sin más que decir, comencemos 👇🏻.


🧵 MATERIALES || MATERIALS 🧵
- Semi Cuero.
- Tela de Forro.
- 1 cierre de 30cm.
- 1 cierre de 15cm.
- 1 docena de Tachuelas (aproximadamente).
- 1 cuadrante y 1 trabilla.
- 2 m de cordón (aproximadamente).
- Patrones.
- Tijera, Hilo y Cinta Métrica.
- Máquina de Coser.
- Semi Leather.
- Lining fabric.
- 1 zipper of 30cm.
- 1 zipper of 15cm.
- 1 dozen Tacks (approximately).
- 1 quadrant and 1 belt loop.
- 2 m of cord (approximately).
- Patterns.
- Scissors, thread and tape measure.
- Sewing machine.

🧵 MANOS A LA OBRA || GET TO WORK 🧵
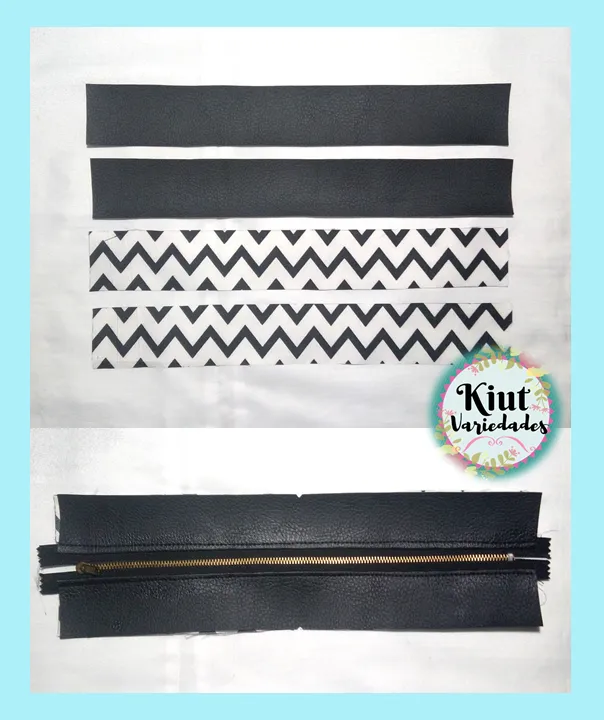
Comenzamos cortando todas las piezas indicadas en los patrones, en sus telas correspondientes, además vamos a cortar dos tiras de semi cuero, una que tenga 7 cm de ancho por 1,40 m de largo (esta será el asa del bolso) y la otra 3 cm de ancho por el mismo largo que la anterior, así mismo cortaremos un pequeño rectángulo que tenga 7 cm de ancho por 9 cm de largo.
We begin by cutting all the pieces indicated in the patterns, in their corresponding fabrics, in addition we will cut two strips of semi-leather, one that is 7 cm wide by 1.40 m long (this will be the handle of the bag) and the other 3 cm wide by the same length as the previous one, likewise we will cut a small rectangle that is 7 cm wide by 9 cm long.


También cortaremos en la tela de forro una tira de 4 cm de ancho por aproximadamente 90 cm de largo, este la usaremos de sesgo.
We will also cut a strip of 4 cm wide by approximately 90 cm long in the lining fabric, this we will use as a bias.

Comenzamos cosiendo el pequeño rectángulo de semi piel, al cual le doblaremos 1 cm a cada lado, y luego los doblaremos a la mitad para coser por ambos bordes, lo mismo haremos con la tira que será el asa, es decir la más larga de 7 cm de ancho. Estas piezas las reservaremos para después.
We begin by sewing the small rectangle of half skin, which we will fold 1 cm on each side, and then fold them in half to sew on both edges, the same will be done with the strip that will be the handle, ie the longest 7 cm wide. These pieces will be reserved for later.

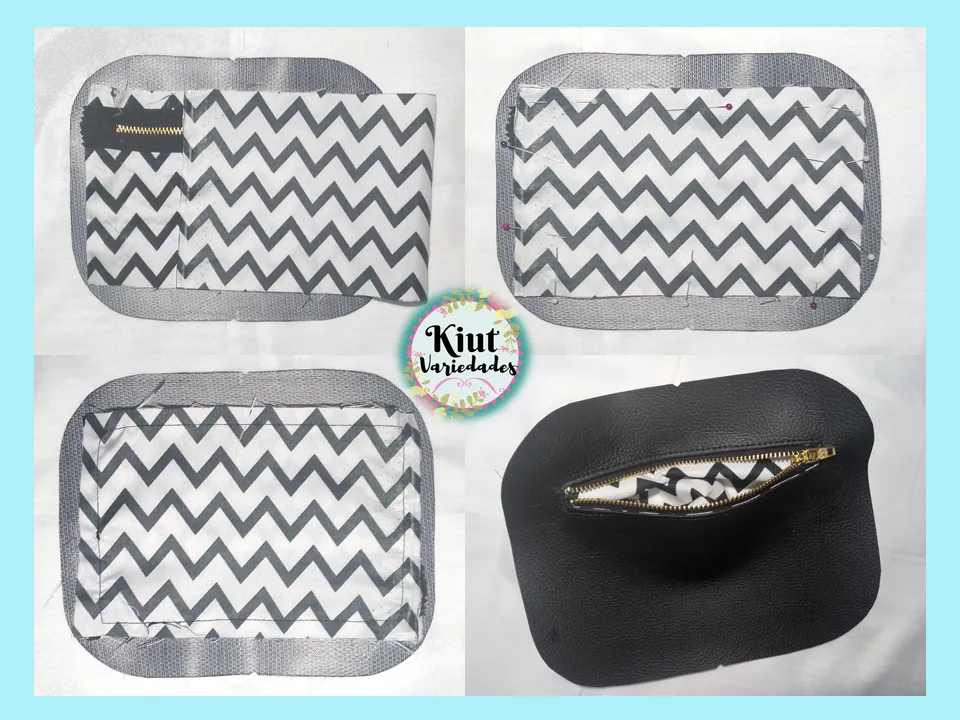
Continuamos con las tapas externas del bolso, por el lado del revés de una de las tapas vamos a dibujar líneas cruzadas que tengan de separación aproximadamente 5 cm, estas líneas las vamos a coser así como se muestra en las imágenes, y en cada punto de cruce vamos a colocar una tachuela.
We continue with the external covers of the bag, on the reverse side of one of the covers we will draw crossed lines that are approximately 5 cm apart, these lines will be sewn as shown in the images, and at each crossing point we will place a tack.


Para colocar las tachuelas solo debemos ubicarla en el lugar donde la queremos, presionarla contra la tela hasta que sus patitas salgan por el otro lado, y luego con la punta de la tijera, doblamos las patitas hacia adentro. Haremos esto con cada tachuela.
To place the tacks we only have to place it in the place where we want it, press it against the fabric until its legs come out on the other side, and then with the tip of the scissors, we fold the legs inwards. We will do this with each tack.

La otra tapa llevara un bolsillo con cierre, para ello tomaremos las piezas del bolsillo externo que cortamos en la tela de forro, tomamos una de ellas y por el revés vamos a medir 2 cm a cada lado y 2 cm desde la parte superior, y dibujaremos un rectángulo de 1cm de ancho, el cual llevara una línea por toda la mitad.
The other cover will have a pocket with a zipper, for this we will take the pieces from the external pocket that we cut in the lining fabric, we take one of them and from the back we will measure 2 cm on each side and 2 cm from the top, and we will draw a rectangle of 1 cm wide, which will have a line through the middle.

Ubicamos esta pieza en la tapa externa (con los derechos de tela enfrentados) y vamos a coser por todo el alrededor del rectángulo que hemos dibujado. Cortaremos por la línea del medio hasta 1 cm antes de los extremos, y cortaremos en diagonal formando unos triángulos (aquí hay que tener precaución de no cortar los hilos de la costura).
We place this piece on the outer cover (with the fabric rights facing each other) and we will sew all around the rectangle we have drawn. We will cut along the middle line up to 1 cm before the ends, and cut diagonally forming some triangles (here we must be careful not to cut the sewing threads).

Introducimos la tela del forro por el espacio que ha quedado abierto y nos ayudamos con alfileres para formar el rectángulo por donde ira el cierre. Colocamos el cierre, lo sujetamos con alfileres y cosemos lo más cercano al borde del rectángulo que podamos.
We introduce the fabric of the lining through the space that has been left open and we help each other with pins to form the rectangle where the closure will go. We place the zipper, hold it with pins and sew as close to the edge of the rectangle as we can.

Tomamos la otra pieza del bolsillo y cosemos solo las telas de forro, haciendo coincidir los derechos de las mismas. Y así tenemos formado nuestro bolsillo externo.
We take the other piece from the pocket and sew only the lining fabrics, matching the rights to them. And so we have our external pocket formed.
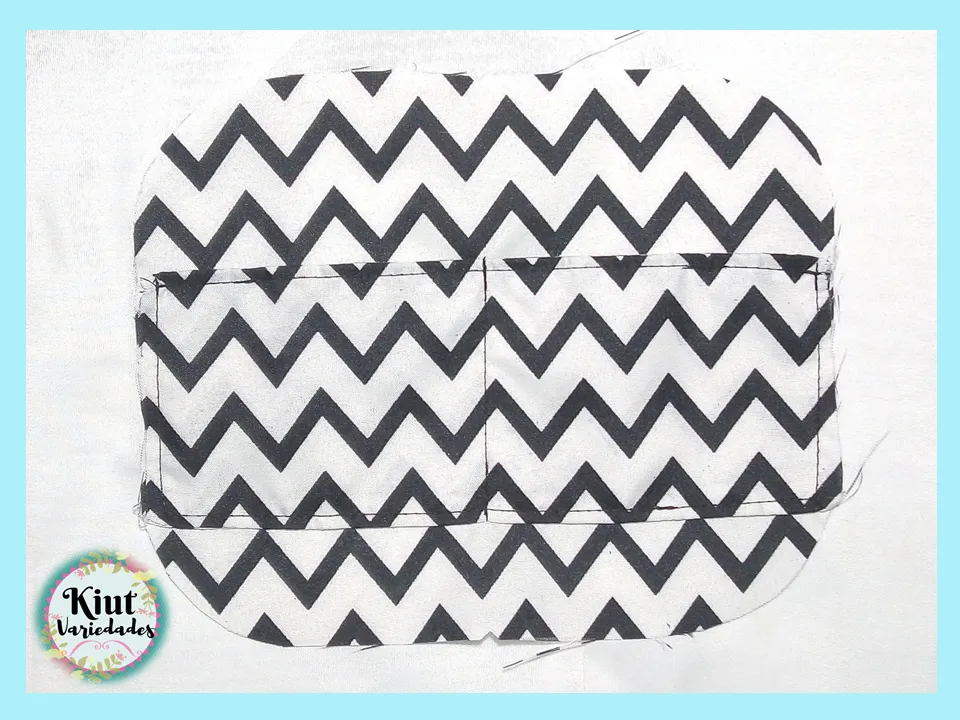
Ahora nos pasamos a las tapas internas, tomamos las piezas del bolsillo interno y enfrentando el derecho de la tela, coseremos por los lados más largos, luego voltearemos la pieza y haremos una costura de asentamiento en uno solo de los lados que acabamos de coser, esta será la parte superior del bolsillo.
Now we go to the internal covers, we take the pieces from the internal pocket and facing the right side of the fabric, we will sew on the longer sides, then we will turn the piece over and make a settlement seam on only one of the sides that we have just sewn, this will be the top of the pocket.


Ubicamos esta pieza en una de las tapas internas, y la coseremos por los laterales y la parte inferior, y luego haremos una costura en el medio para así formar dos bolsillos.
We place this piece on one of the internal covers, and sew it on the sides and bottom, and then make a seam in the middle to form two pockets.

Uniremos las tapas internas y externas haciendo coincidir el revés de las telas, y cosiendo lo más cercano al borde que podamos, así lograremos formar dos piezas con un derecho que es la semi piel, y un revés que es la tela de forro.
We will join the internal and external covers by matching the back of the fabrics, and sewing as close to the edge as we can, so we will manage to form two pieces with a right side which is the semi-skin, and a back side which is the lining fabric.

Tomamos los laterales superiores, tanto el de semi piel como el de forro, y los cortaremos justo a la mitad, luego coseremos el cierre.
We take the upper sides, both the semi-skin and the lining, and cut them right in half, then sew the closure.
Traemos de vuelta el asa, la cual cosimos al principio, y pasaremos uno de los extremos por la trabilla y coseremos. Luego pasaremos el otro extremo del asa por el cuadrante y después por la trabilla nuevamente. Seguidamente tomaremos la pequeña tira que cosimos al principio también, y la coseremos al otro lado del cuadrante.
We bring back the handle, which we sewed at the beginning, and pass one of the ends through the loop and sew. Then we will pass the other end of the handle through the quadrant and then through the loop again. Then we will take the small strip that we sewed at the beginning too, and sew it on the other side of the quadrant.


Ubicamos ahora el asa en la pieza del cierre, el extremo del cuadrante del lado donde finaliza el cierre, y el otro extremo del lado del inicio del cierre. Encima de esto colocaremos la pieza lateral inferior y del otro lado (el lado del forro) haremos lo mismo. Coseremos y una vez listo lo volteamos, para luego hacer una costura lo más cerca al borde, por todo el alrededor de esta pieza.
We now place the handle on the latch piece, the end of the quadrant on the side where the latch ends, and the other end on the side where the latch starts. On top of this we will place the lower side piece and the other side (the side of the lining) we will do the same. We will sew and once ready we will turn it over, and then make a seam as close to the edge as possible, all around this piece.


Llego el momento de coser el vivo; el vivo es una pequeña tira que llevan la mayoría de los bolsos por el borde externo y que tiene como función darle forma y dureza al bolso, usualmente está compuesto por un “tubito” de plástico que se encuentra envuelto en tela, pero a mí personalmente me gusta más hacerlo con cordón, cumple la misma función y además a mi máquina le agrada más.
Para hacerlo, tomaremos el cordón y lo introduciremos en la tira que cortamos de 3cm de ancho, y coseremos lo más cerca al cordón que nos permita nuestra prénsatelas, obteniendo una tira como la que se muestra en la imagen.
The time has come to sew the buck; the buck is a small strip that most bags carry on the outside edge and its function is to give shape and hardness to the bag, usually it is composed of a plastic "tube" that is wrapped in fabric, but I personally like to do it with a cord, it fulfills the same function and also my machine likes it more.
To do it, we will take the cord and we will introduce it in the strip that we cut 3cm wide, and we will sew the closest to the cord that our presser foot allows us, obtaining a strip like the one shown in the picture.


Tomamos el vivo y lo ubicaremos en el centro inferior de la tapa, dejaremos aproximadamente 1,5 cm de vivo sin coser a la tapa y comenzaremos a coser por todo el alrededor.

El 1,5 cm de vivo que hemos dejado sin coser debe estar completamente abierto y cortaremos el cordón que está dentro en este espacio, pues aquí vamos a terminar de introducir el vivo para terminarlo de coser a la tapa, así no habrá ningún espacio de la tapa que se quede sin vivo y además no se verán los extremos del mismo, pues recordemos que esto quedara visible. Este procedimiento lo haremos con ambas tapas principales.
The 1.5 cm of burr that we have left without sewing must be completely open and we will cut the cord that is inside in this space, because here we are going to finish introducing the burr to finish sewing it to the lid, so there will not be any space of the lid that will be left without burr and also the ends of it will not be seen, because let's remember that this will be visible. This procedure will be done with both main covers.


Ahora coseremos las tapas a la pieza del lateral, igual que siempre haciendo coincidir los derechos de la tela, para este punto ya estamos trabajando con demasiada tela, así que los alfileres no podrán ayudarnos, sin embargo si tenemos de estas pinzas podemos usarlas. Yo he cosido de una vez con el sesgo, pero es porque ya tengo experiencia, pero te recomiendo de primero unas las tapas con el lateral del bolso y luego pases a coser el sesgo, es más trabajoso, pero se van a complicar menos.
Now we will sew the covers to the side piece, the same as always matching the rights of the fabric, for this point we are already working with too much fabric, so the pins will not be able to help us, however if we have these pincers we can use them. I have sewed at once with the bias, but it is because I already have experience, but I recommend you to first sew the covers with the side of the bag and then go to sew the bias, it is more laborious, but it will be less complicated.

El sesgo lo coseremos de la misma forma que he explicado anteriormente, de esta forma cubriremos todas las costuras de unión, daremos un mejor acabado y además le dará aún mas forma y fuerza a la bandolera.
The bias will be sewn in the same way I explained before, this way we will cover all the seams of union, give a better finish and also give even more shape and strength to the shoulder bag.

LISTOOOOO!!!!👏👏, ya tenemos totalmente terminada nuestra bandolera de semi piel con tachuelas 💕. Sinceramente este proyecto a mí me llena de mucho orgullo 😍, porque cuando comparo ésta con la primera bandolera que aprendí a hacer me doy cuenta de cuanto he mejorado en técnicas y acabado 🥺, y creo que eso a cualquiera lo haría sentir orgulloso de su trabajo 😏. Consideraciones finales que debo darles, primero no recomiendo que si recién estas comenzando con la costura esta sea la primera bandolera que hagas 🤔, te recomendaría más la bandolera que explique hace unos meses 😉, esta es un poco más ruda y necesitas mucho control de la máquina de coser 🤷🏻♀️ (y sé por experiencia propia lo que cuesta agarrarle confianza a la maquina 😂); segundo, cuando estas cosiendo por el lado derecho de la semi piel es normal que se te tranque la máquina 🤦🏻♀️, para solucionarlo puedes echarle un poquito de aceite a la tela o al prénsatelas 👍🏻 (yo utilizo aceite para bebé), de hecho si notan en algunas fotos se nota el aceite sobre la tela 🤣.
READY!!!!👏👏, we have already completely finished our semi-leather shoulder bag with studs 💕. Sincerely this project fills me with a lot of pride 😍, because when I compare this with the first shoulder bag I learned to make I realize how much I have improved in techniques and finish 🥺,and I think that would make anyone proud of their work 😏. Final considerations that I must give you, first I do not recommend that if you are just starting with the sewing this is the first bag you make 🤔, I would recommend more the bag I explained a few months ago 😉, this is a little tougher and you need a lot of control of the sewing machine 🤷🏻♀️ (and I know from my own experience what it takes to get confidence in the machine 😂); second, when you are sewing on the right side of the half skin is normal that you lock the machine 🤦🏻♀️, to solve this you can add a little oil to the fabric or the presser foot 👍🏻(I use baby oil), in fact if you notice in some photos you can see the oil on the fabric 🤣.


Te invitamos igual que siempre a que intentes este proyecto por tu cuenta y nos cuentes en los comentarios 👇 como es tu experiencia.
We invite you as always to try this project on your own and tell us in the comments 👇 as is your experience..


Síguenos en todas nuestras redes sociales… || Follow us on all our social networks ...
Facebook:KiutVariedades
Instagram:@Kiut_variedades
Twitter:@Kiut_variedades