¡Hola queridos usuarios de Hive ✨💕!
Hi dear Hive users ✨💕!
A lo largo de un tiempo, les he venido trayendo diferentes publicaciones acerca de patronaje básico, les explique el básico sin pinzas de blusa para dama, falda básica, el básico infantil, y el día de hoy les estaré mostrando la realización del patrón básico de pantalón para dama, la verdad es muy sencillo de hacer y de este se pueden hacer diferentes transformaciones para diferentes modelos de pantalón. En esta oportunidad estaré trabajando a media escala 🤔, porque el patrón de pantalón es bastante grande y es un poco complicado fotografiar y que cada detalle se pueda percibir, así que no se asusten si ven en las fotos que el patrón es pequeño 🤣.
Over a period of time, I have been bringing you different publications about basic pattern making, I explained the basic without clips for ladies blouse, basic skirt, the basic for children, and today I will be showing you the realization of the basic pattern for ladies pants, the truth is very simple to do and from this you can make different transformations for different models of pants. In this opportunity I will be working at medium scale 🤔, because the pants pattern is quite big and it is a little complicated to photograph and that every detail can be perceived, so don't be scared if you see in the photos that the pattern is small 🤣.


📐📏 MATERIALES || MATERIALS 👖👩
- Hojas.
- Marcador o lápiz.
- Cinta Métrica y Regla.
- Tijera de papel.
- Reglas de patronaje (solo si las posees).
- Sheets.
- Marker or pencil.
- Tape Measure and Ruler.
- Paper scissors.
- Pattern making rules (only if you have them).

📐📏 COMENCEMOS CON EL TRAZO || LET'S START WITH THE TRACE 👖👩
Las medidas que necesitaremos son:
- Contorno de Cintura
- Contorno de Cadera
- Altura o Largo de Cadera
- Largo de Rodilla: se mide desde la cintura hasta el punto más prominente de la rodilla.
- Contorno de Rodilla: se toma por todo el alrededor de la rodilla, nuevamente por su parte más prominente, incluso si es necesario se puede flexionar levemente la misma.
- Contorno de Tobillo: se toma por todo el alrededor del tobillo.
- Largo total del Pantalón: este se toma desde la cintura hasta el piso, para tomar esta medida se recomienda que la persona esté usando el zapato más bajito que tenga. Se toma de esta forma pues de esta manera se añaden de inmediato los 3cm de dobladillo.
The measures we will need are:
- Waist Contour
- Hip Contour
- Hip height or length
- Knee length: is measured from the waist to the most prominent point of the knee.
- Knee Contour: is taken all around the knee, again on its most prominent part, even if it is necessary to bend it slightly.
- Ankle: is taken all around the ankle.
- Total length of the pants: it is taken from the waist to the floor, to take this measure it is recommended that the person is using the lowest shoe you have. It is taken in this way because in this way the 3cm of hem is added immediately.
We begin by making a right angle, from the top down we will measure the length or height of shot, which is ¼ part of the hip contour + 3cm. From left to right we will measure ¼ of the hip contour and form a rectangle.


La línea de la derecha, es decir la que acabamos de trazar, será nuestra línea central de la parte superior, desde esta línea hacia afuera, siguiendo la línea de altura de tiro, vamos a medir la pestaña del tiro delantero, esta medida es ¼ de contorno de cadera + 3cm = el resultado / 6. Una vez hagamos esta marca, hacemos la curva del tiro.
The line on the right, that is, the one we just drew, will be our center line at the top, from this line out, following the line of height of shot, we will measure the tab of the front shot, this measurement is ¼ of hip contour + 3cm = the result / 6. Once we make this mark, we make the curve of the shot.

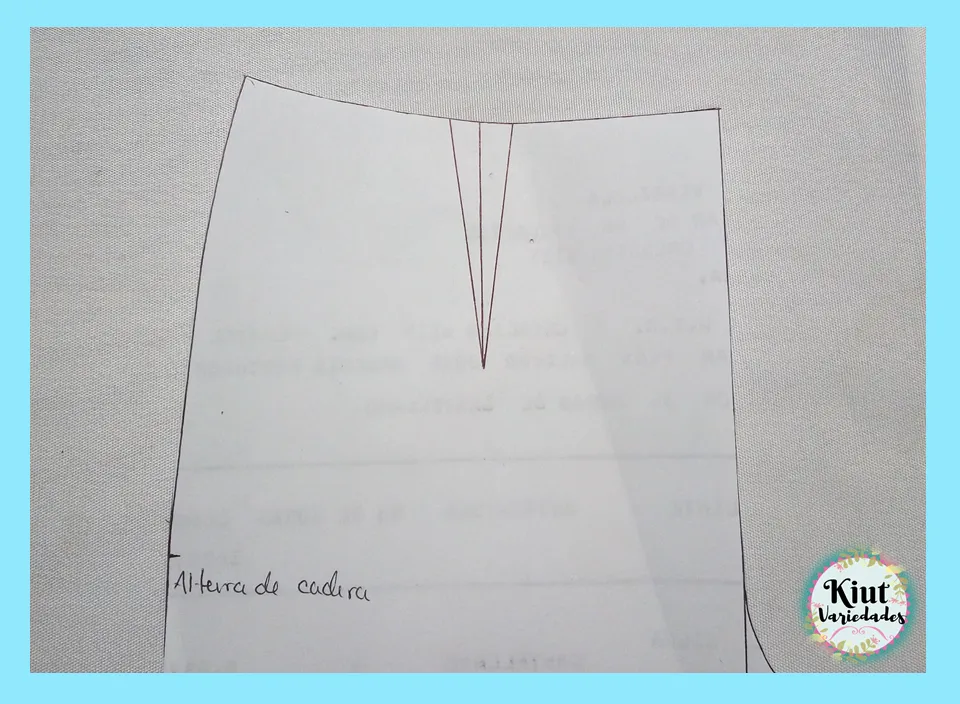
En la línea superior vamos a medir desde la línea central hacia la izquierda, ¼ de contorno de cintura + 3cm que serán de pinza. Ahora vamos a medir desde la esquina superior hacia abajo, la altura de cadera y uniremos este punto al de la cintura con una curva suave.
On the top line we will measure from the center line to the left, ¼ of waist outline + 3cm that will be of clip. Now we will measure from the top corner down, the height of the hip and join this point to the waist with a smooth curve.


Ubicamos el centro de la cintura y haremos una marca, a cada lado de esta marca mediremos 1,5cm y formaremos la pinza de 12cm de largo.
We locate the center of the waist and make a mark, on each side of this mark we will measure 1.5cm and form the 12cm long clip.

Medimos la línea de tiro (incluyendo la pestaña del tiro) y ubicamos el centro. Desde la cintura hacia abajo vamos a medir el largo del pantalón, y luego escuadramos hasta abajo la marca que habíamos hecho anteriormente. Esta línea que acabamos de trazar, se le conoce como línea de quiebre.
We measure the line of shot (including the shot tab) and locate the center. From the waist down we measure the length of the pants, and then we square down the mark we had made previously. This line that we have just drawn, is known as the break line.

Desde la cintura hacia abajo medimos la altura de rodilla, aquí mediremos a cada lado de la línea de quiebre, ¼ del contorno de rodilla. Unimos esta marca con línea recta a la cadera, y con curva suave al tiro.
From the waist down we measure the knee height, here we will measure on each side of the break line, ¼ of the knee outline. We join this mark with a straight line to the hip, and with a soft curve to the shot.


En la línea del largo total vamos a subir 3cm (que son los correspondientes al dobladillo), y en esta nueva línea haremos lo mismo que en la rodilla, mediremos a cada lado de la línea de quiebre ¼ del contorno de tobillo, unimos estas marcas con línea recta a la rodilla. Lo que resta es recortar el patrón.
In the line of the total length we are going to raise 3cm (which are the corresponding to the hem), and in this new line we will do the same as in the knee, we will measure on each side of the break line ¼ of the contour of the ankle, we join these marks with a straight line to the knee. What remains is to cut the pattern.


Para hacer el patrón trasero vamos a utilizar el patrón delantero, así que lo sujetaremos con alfileres en el centro del papel. Vamos a medir nuevamente el resultado que nos dio para la pestaña del tiro delantero, desde la punta del tiro hacia afuera, y haremos una pequeña marca, desde este punto que acabamos de hacer, vamos a bajar 1cm, y esta será la marca con la que nos quedaremos.
To make the back pattern we are going to use the front pattern, so we will hold it with pins in the center of the paper. We will measure again the result you gave us for the front shot tab, from the tip of the shot outwards, and we will make a small mark, from this point we just made, we will go down 1cm, and this will be the mark we will keep.


Desde la parte central superior (por la línea de la cintura) vamos a medir hacia adentro 3cm, y desde ahí vamos a subir 3cm, y este último punto será con el que nos quedaremos.
From the upper central part (by the line of the waist) we will measure inwards 3cm, and from there we will go up 3cm, and this last point will be the one we will stay with.


En el lateral vamos a medir otros 3cm hacia afuera (estos son los que tuvimos que quitar en el paso anterior). Además en la curva del tiro vamos a medir 1,5cm hacia afuera.
On the side we will measure another 3cm out (these are the ones we had to remove in the previous step). Also in the curve of the shot we will measure 1.5cm out.

Procedemos a unir todo los puntos de la siguiente forma, los 3 puntos que forman el tiro los uniremos con una curva y los dos puntos de la cintura los uniremos con una línea recta.
We proceed to join all the points in the following way, the 3 points that form the shot will be joined with a curve and the two points of the waist will be joined with a straight line.

Formamos la nueva curva de la cadera, y además unimos el nuevo punto de tiro a la rodilla con una curva suave. El resto se calca de la misma forma.
We formed the new hip curve, and also joined the new point of pull to the knee with a smooth curve. The rest of the body fits in the same way.

En la cintura trazamos la pinta de la misma manera que lo hicimos en el delantero, y recortamos el patrón.
At the waist, we drew the paint in the same way as we did on the front, and cut out the pattern.

Lo último que queda por hacer es bajar 2cm en el centro superior del delantero y unir esta marca al lateral con una curva suave. Para recortar esta parte debemos primero cerrar la pinza y luego recortar, así se formara un piquito (a mí se me olvido este paso y recorte, así que no sean como yo 🤣).
The last thing left to do is to go down 2cm in the upper center of the front and join this mark to the side with a smooth curve. To cut this part we must first close the clamp and then cut, so it will form a little bit (I forgot this step and cut, so don't be like me 🤣).

LISTOOOOO!!!!👏👏, nuestros patrones están terminados, como ya se lo he mencionado en publicaciones anteriores, a los patrones básicos no se les hacen ningún tipo de modificación ni se le agregan márgenes de costura, pues ellos sirven como guía para diferentes transformaciones, en este caso este básico nos servirá para hacer diferentes modelos de pantalón, como por ejemplo pantalones de vestir, palazzo, coulet, incluso bragas o enterizos, así que de verdad espero este post les sea de mucha utilidad 😉.
READY!!!!👏👏, our patterns are finished, as I mentioned in previous publications, the basic patterns are not made any kind of modification or add sewing margins, because they serve as a guide for different transformations, in this case this basic will serve us to make different models of pants, such as dress pants, palazzo, coulet, even panties or whole, so I really hope this post is very useful 😉.


Espero este post haya sido de tu agrado 👍 💕, si realizas por tu cuenta lo aquí explicado, no olvides contarme en los comentarios 👇 como ha sido tu experiencia.
I hope this post has been to your liking 👍 💕, if you do on your own what is explained here, do not forget to tell me in the comments 👇 how has been your experience.


Síguenos en todas nuestras redes sociales… || Follow us on all our social networks ...
Facebook:KiutVariedades
Instagram:@Kiut_variedades
Twitter:@Kiut_variedades