
Hola que tal, gente de HIVE BLOG en estos momentos les traigo varias plantillas para hacer un
dibujo de los ojos y la boca de una calabaza de HALLOWIN acompañada de cuadros y flechas a su
al rededor que le dan un toque elegante al dibujo lo que hace muy llamativo, y ustedes
mismos pueden decorar o personalizar a su gusto.
Hello, how are you, people from HIVE BLOG at the moment I bring you several templates to make a
drawing of the eyes and mouth of a HALLOWIN pumpkin accompanied by pictures and arrows at its
around that give an elegant touch to the drawing which makes it very striking, and you
They can decorate or personalize to your liking.
¡BIEN EMPEZEMOS!-WELL LET'S GET STARTED!
Materiales necesarios para elaborar las plantillas:
TRES HOJAS DE MAQUINA BLANCAS (tambien pueden ser de reciclajes)
LAPIZ,GOMA O BORRADOR, SACA-PUNTAS
JUEGO DE GEOMETRIAS
UN EXACTO O UNA OJILLA (no recomiendo tigeras)
UNA O DOS HOJAS DE PAPEL CARBON
Materials needed to make the templates:
THREE WHITE MACHINE SHEETS (they can also be recycled)
PENCIL, GUM OR ERASER, POINT REMOVER
GAME OF GEOMETRIES
AN EXACT OR AN EYELET (I do not recommend tigeras)
ONE OR TWO SHEETS OF CHARCOAL PAPER
Bueno una vez reunido todos lo materiales tomaremos una hoja blanca la dividimos o cortamos por la
mitad y en una mitad empezaremos dibujando la calabaza paso por paso
Well, once all the materials are gathered, we will take a white sheet, divide it or cut it at the
half and half we will start drawing the pumpkin step by step
1._Empezamos hacer la boca de la calabaza-We started making the pumpkin mouth


2._Una vez terminada la boca empezamos hacer la nariz y los ojos-Once the mouth is finished we start making the nose and eyes


En esta parte de los ojos y la nariz pueden usar una regla o escuadra para que quede mejor-In this part of the eyes and nose you can use a ruler or square to make it better


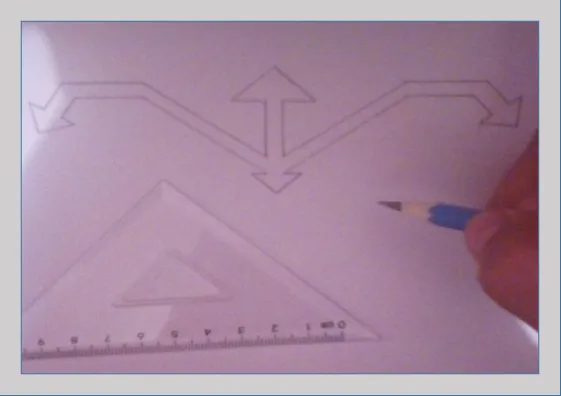
3._Ya terminado los ojos y la boca procederemos con las flechas - Already finished the eyes and the mouth we will proceed with the arrows

3._Como ven, en esta imagen, tomaran un transportador y
lo colocaran encima de la punta de la flecha pequeña y luego del lado derecho marcaran con un punto los 140 grados y del la izquierdo unpunto en los 40 grados y una vez hecho eso trasaran una linea recta - As you can see, in this image, they will take a protractor and
They will place it on top of the tip of the small arrow and then on the right side they will mark a point at 140 degrees and on the left side a point at 40 degrees and once that is done they will trace a straight line.

Bien, ya terminadas la flechas empezaremos a dibujar cuadros de diferentes tamaños - Well, once the arrows are finished we will begin to draw squares of different sizes


Habiendo terminado este lado aran lo mismo pero del otro lado de la hoja, quedando el dibujo completo de la siguiente manera - Having finished this side, they will do the same but on the other side of the sheet, leaving the complete drawing as follows

Ya elaborado todo el dibujo tomaremos las otras dos hojas blancas las cortaremos por la mitad y
obtendremos cuatro mitades en la cuales vamos a carquear con la hoja de carbon las partes del
dibujo de la siguiente manera.
Agarramos una mitad en blanco le colocamos encima la de papel carbon y ensima de las mismas
colocaremos el dibujo elaborado anteriormente y la ajustamos por cada borde para que todas las
plantillas cocuerden.(NOTA:este metodo va con todas las partes que van a carquear).
Once the whole drawing has been made, we will take the other two white sheets, cut them in half and
we will obtain four halves in which we are going to carck with the carbon sheet the parts of the
drawing as follows.
We grab a blank half, we place the carbon paper on top and on top of them
We will place the drawing made previously and adjust it for each edge so that all the
Templates match. (NOTE: this method goes with all the parts to be loaded).

Bien ya teniendo todas las plantillas empezamos a cortar, con un exacto o una ojilla cortaremos
lo que hemos carqueado en la parte interna de cada dibujo para que al momento de poner en accion
las plantillas sea eso lo que deje plasmado, y los cortariamos de la siguiente manera:
Well, already having all the templates we begin to cut, with an exact or an eyelet we will cut
what we have carqueado in the internal part of each drawing so that at the moment of putting into action
the templates whatever I leave reflected, and we would cut them as follows:

Bueno ya cortadas las plantillas estarian listas, lo que se viene ahora seria comprobarlas con
pintura al frio, en aereosol o como ustedes perfieran, lo que harian es poner la primera plantilla
y pintarla o rociarla y luego esperaran a que seque, una vez secada la pintura utilizaras la
segunda y a si hasta completar todo el dibujo.
Well already cut the templates would be ready, what comes now would be to check them with
cold paint, in aerosol or as you outline, what you would do is put the first template
and paint or spray it and then wait for it to dry, once the paint is dry you will use the
second and yes until the entire drawing is completed.

Y BUENO ESO SERIA TODO EPERO LES AYA GUSTADO Y TAMBIEN ESPERO TENER EL APOLLO DE TODOS USTEDES
¡GRACIAS! ¡HASTA LA PROXIMA!
AND GOOD THAT WOULD BE EVERYONE BUT THEY ALREADY LIKED AND I ALSO HOPE TO HAVE THE APOLLO OF ALL OF YOU
THANK YOU! UNTIL NEXT TIME!