
How about friends, I hope you're doing great and had a good start to the week. A few days ago I was playing around with Photoshop to see what was the easiest way to match colors from two different pictures, and I discovered that the fastest or "easiest" way is by using the Curve Matching tool.

Que tal amigos, espero que se encuentren excelente y que hayan tenido un buen inicio de semana. Hace unos días estaba jugando un poco con Photoshop para ver cual era la manera mas sencilla para igualar colores de dos fotografías distintas, y descubrí que la manera mas rápida o "sencilla" es mediante la herramienta de Ajuste de Curvas.
For that I used only two resources and a photograph of one of the sexiest and most beautiful models in this community 
Para eso utilice solo dos recursos y una fotografía de una de las modelos mas sexys y hermosas de esta comunidad


¡You can access the source of the images by clicking on it or looking for the links I will leave at the end of this publication!
¡Puedes acceder a la fuente de las imágenes dándole clic sobre ella o buscando a los enlaces que dejare al final de esta publicación!

The main thing I did was to make a cut to eliminate the natural background of the photograph and to be able to make a total change of scenery, with Ctrl + T I decreased its size to adjust the background, which would be the place where she would be at the dock. To make it exactly in the place I had to lower the transparency of the new background a little and it would be like this.
Lo principal que realice fue hacer un recorte para eliminar el fondo natural de la fotografía y poder hacer un cambio de escenario total, con Ctrl + T disminuí su tamaño para ajustarla fondo, que vendría siendo el lugar donde estaría ella en el muelle. Para que quede exactamente en el lugar tuve que bajar un poco la transparencia del nuevo fondo y vendría quedando de esta manera.

The second thing was the color matching of the two images, for this I created a new curve adjustment layer over the photo layer, I created a layer cut out so that this adjustment only affects the cut out photo and not the background image.
Lo segundo fue la igualación de colores de las dos imágenes, para esto cree una nueva capa de ajuste de curvas sobre la capa de la fotografía, cree un recorte de capa para que este ajuste solo afecte la fotografía recortada y no a la imagen de fondo.
👇🏻👇🏻👇🏻

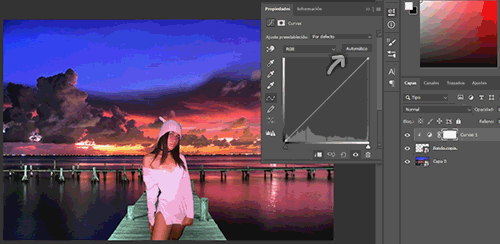
Then doing Alt + Click on the Auto button at the top right of the window will bring up a color correction window. I clicked on the Search for Dark and Light Colors option in which I chose the Shadows and Lights with the eyedropper, any dark part of the background image for the shadows and any light part of it for the highlights.
Luego haciendo Alt + Clic en el botón de Automático en la parte superior derecha de la ventana, hará que salga una ventana de corrección de color. Hice clic en la opción Buscar colores oscuros y claros en ella escogí las Sombras y Iluminaciones con el gotero, cualquier parte oscura de la imagen de fondo para las sombras y cualquier parte clara de esta misma para las iluminaciones.
Usually this error occurs because when we change the color of the image it changes completely and becomes white or black. This happens because we are working on the mask layer and not on the adjustment as such, but it is important to see that we are not working on the mask layer adjustment.
Usualmente suele ocurrir este error que cuando cambiamos el color de la imagen esta cambia totalmente y se pone blanca o negra, esto sucede porque estamos trabajando sobre la mascara de la capa y no sobre el ajuste como tal, pero eso es importante ver que no estemos trabajando en la mascara de la capa de ajuste.

Finally, after changing the color of the photo, in the curves panel, increase the level of the shadows a little bit to give a darker touch to the photo and make it look more natural to your new environment.
Por ultimo después de cambiar el color de la fotografía, en el panel de las curvas aumente un poco el nivel de las sombras para darle un toque mas oscuro a la fotografía y que parezca mas natural de su nuevo ambiente.
And that's it, as you can see the picture has this equal to the background colors.
Y listo, como pueden ver la fotografía esta igualada con los colores de fondo.

But the photo is still far from looking really natural from the background, and for this I added several more white layers under the curve adjustment layer, to give new highlights and shadows to the photo with the black and white brushes, I also changed the eye color to give a more surreal detail.
Pero aun esta lejos la fotografía de verse realmente natural del fondo, y para esto añadí varias mas capas en blanco debajo de la capa de ajuste de curvas, para darle nuevas iluminaciones y sombras a la foto con los pinceles blancos y negros, también cambie el color de los ojos para darle un detalle mas surrealista.

As the layers are under the curve fit automatically the layers will also be created with the layer cut out, this will make the other layers we create also under the color matching and only affect the photograph and not the image in general. (Everything but the last shadow layer that would be her shadow on the dock, which adds a motion blur to make it look more natural.)
Al estar las capas debajo del ajuste de curvas automáticamente las capas también se crearan con el recorte de capa, esto hará que las demás capas que creemos también estén bajo la igualación de colores y solo afecte a la fotografía y no a la imagen en general. (Todo menos la ultima capa de sombra que vendría siendo la sombra de ella en el muelle, la cual agregue un desenfoque de movimiento para que sea mas natural.)
Finally I added several more details. The particles by duplicating the image, adjusting the size, changing the diffusion mode and erasing the center to give the effect that they come from the water and that they look transparent and bright, add a radial blur effect on the background image and limit it to the edges with the layer mask, then add a light bulb to the coastal lighthouse with a dark layer and press Ctrl + T to adjust it to lighthouse level, erasing the dark edges with the eraser and changing the scatter mode to give it full transparency without losing the brightness of the bulb.
Por ultimo agregue varios detalles mas. Las partículas duplicando la imagen, ajustando el tamaño, cambiando el modo de difusión y borrando el centro para darle efecto que provienen del agua y que estas se vean transparentes y brillantes, agregue un efecto de desenfoque radial en la imagen de fondo y la limite a los bordes con la mascara de capa, luego agregue un foco de luz al faro de la costa con una capa oscura y presione Ctrl + T para ajustarla a ras de faro, borrando con el borrador los bordes oscuros y cambiando el modo de difusión tramado para darle una transparencia total sin perder el brillo del foco.

The final details I gave you in Lightroom, I changed the tone of the colors to give a bluer sky and a more vivid color to the orange of the sunset and the colors of the water, I increased a little the sharpness, the shadows, the high lights and also increased a little the contrast, I softened the noise, I added a gray mask with almost complete transparency to give it a matte tone and this will totally mix all the effects of the image. The result was as follows.
Los detalles finales se los di en Lightroom, cambie la tonalidad de los colores para darle un cielo mas azulado un color mas vivo al naranja del atardecer y los colores del agua, aumente un poco la nitidez, las sombras, las altas luces y también aumente un poco el contraste, suavice el ruido, añadí una mascara gris con una transparencia casi completa para darle una tonalidad mate y que esta mezclara totalmente todos los efectos de la imagen. El resultado fue el siguiente.

Well friends, I hope you liked this little edition and that it helped you if you want to try to match the colors of any photograph you want to edit with any image you like. There are many ways to match the colors of two photographs but this is one of the simplest. Just tell them until the next one!
Bueno amigos, espero que les haya gustado esta pequeña edición y que les haya servido de ayuda si quieren intentar igualar los colores de alguna fotografía que quieran editar con alguna imagen que les guste. Existen muchas formas de igualar los colores de dos fotografías pero esta es una de las mas sencillas. Sin mas que comentarles hasta la próxima!!


Discord: lowlifevzla08#1400


