
Hello beautiful people.
How are you? I hope you are well. I am very happy today because I also have a bonsai plant. I have wanted to buy it for a long time, but the prices of bonsai plants are very expensive here. I was constantly delaying the idea of buying. The other day, when my neighbor told him that he wanted to give the bonsai plant to someone, I wanted to buy it. I took my plant and returned to my house with great joy.

My neighbor used the plant in the pot where it was purchased. Actually, it is wrong to use it in this pot. I was seeing bonsai plants in shallow pots on the internet. Since I had no experience in this field, I started researching on the internet. Indeed, all the bonsai were in shallow pots. I searched the internet to buy flower pots, but the prices were too high. I didn't have that much money to buy it. So I sat and thought to find a solution.

There were pottery bowls in which we cooked dessert at home. I thought I could make myself a flower pot using it. I drilled two holes with the help of a screwdriver by wetting the bowl you see above. Because I forgot to shoot that stage, I had to get the picture from the internet. It is absolutely necessary to use water when drilling the ceramic type material, otherwise there may be cracks and breaks. I poured water and drilled the holes by making back and forth movements with the pointed tip of the screwdriver. This was a bit of a challenge, but the result was successful. If you have one, you can do it with a cordless screwdriver. So your hands will not hurt like me.

I couldn't decide on the color for a while. I saw on the internet that pots are painted in an aged type. I also used red and black color paints belonging to the Art Deco brand because I love to paint.

I chose red for the base of my pot. I applied the paint with the help of a brush. Since the paint I used has high coverage, it was enough to paint in one coat.

After the outer part dried, I turned it over and painted the inner part. Actually, I realized afterwards that I didn't have to paint this place. Somehow land and plants would be added here. Do not paint the inside of the pot if you wish. It will be enough to just paint the mouth part.

After the paint dries, I started to wear it. We will not apply the black paint with care. Our aim is to give a worn-out look. So don't load too much black paint on your brush.
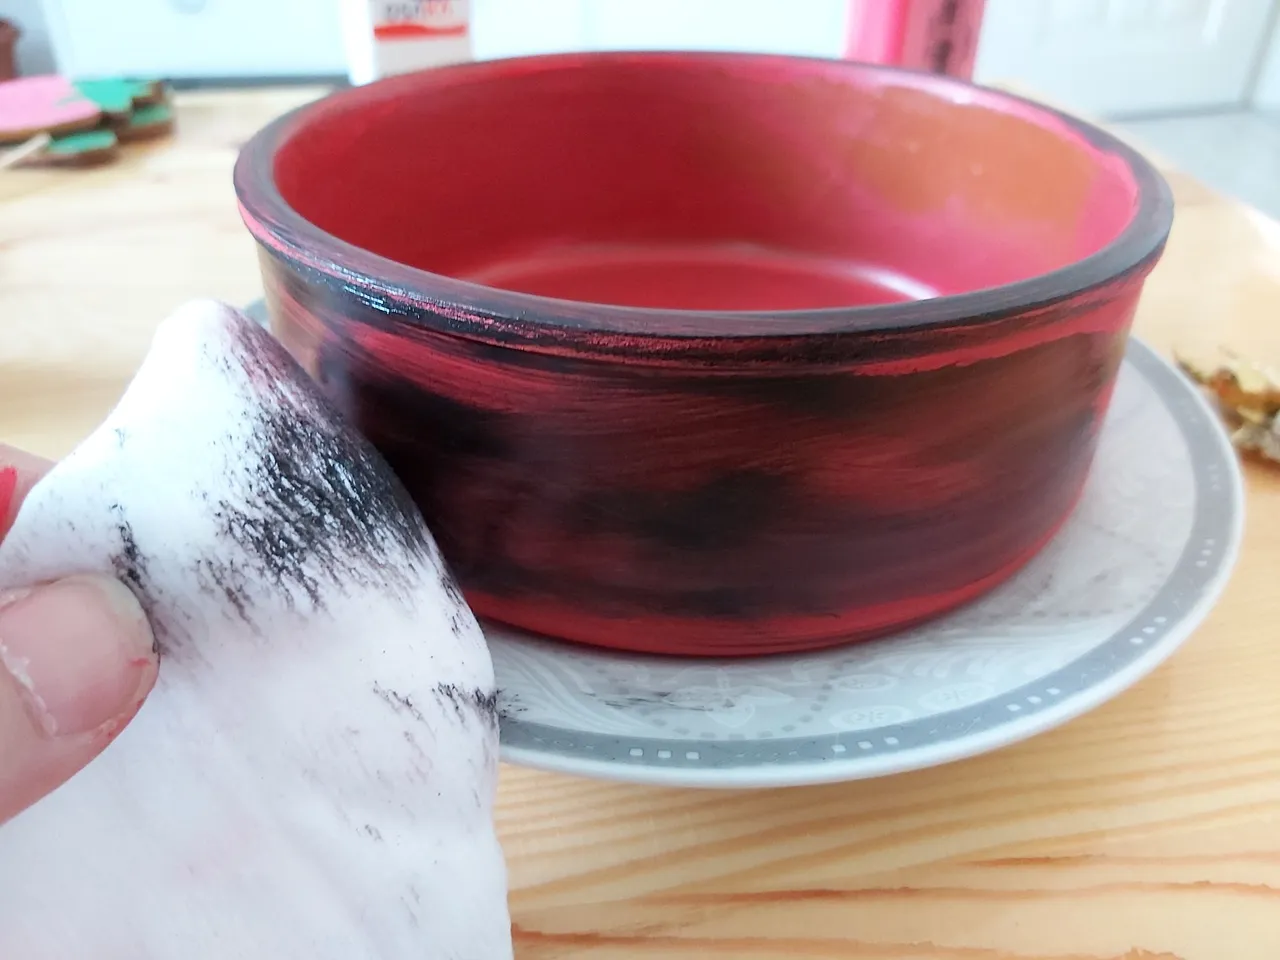

Immediately after applying the paint randomly, I wiped it over with a wet wipe. I did not press too much while doing this. When we press too much, we erase all the paint. It is enough to wipe the tissue with a gentle touch.

As you can see, I distributed the paint to the whole surface with the help of a handkerchief without having to apply it all over.

As we erased the red tone we used at the bottom, it started to appear from the middle. Since this is exactly the image I wanted, I ended the process here and let it dry. If you want it more intense, you can apply the paint more intensely. You can even apply a different color to the ground color. This place is entirely up to you.

My pot is ready, but there were some things that did not satisfy me. I drilled the drainage holes, but I have to raise their bottom so that it fulfills its purpose. First, I thought of making legs out of wooden beads, but there was no more left of them in the house. While I was thinking about what to do, it occurred to me that I had changed my furniture handles before. I hadn't thrown out the old handles. Here I could use them. Smart myself! Good thing I kept them. Now they will be of great use to me.

I used the method I applied to them in pots. I applied red paint and aged with black paint. Then I let it dry.

Despite all the procedures, my pot still does not seem finished to my eye. I had very little gold reflective spray paint left. I thought we could use it in this pot.

I sprayed the paint in a small container. With the help of a tiny brush, I applied it to the parts I wanted to reflect. I first started by applying it to the mouth of the pot.

Then I applied gold paint with brush strokes on the surface of the pot to give an aged appearance. While doing this, I applied it by touching the brush very lightly. If I did it vigorously, there would be sharp brush marks. Since I didn't want it, I applied it with gentle movements.

Finally, the process of fixing the feet remained for the pot to be completely finished. I preferred gluing the drawer handles with liquid glue. I used this because I trust the glue I use is strong. If you want, you can do it with different adhesives. The only thing you should be careful about is that you don't use hot silicone. I don't think they are too durable.
Here is the fully transformed flower pot.

I made my own bonsai pot without paying huge money. I am very happy to have achieved this. I shot the view for you in different lights.

How do you think my pot was?

I could not stand it and immediately planted my bonsai in the new pot. It is impossible not to admire its appearance. It's like there's a tiny tree in my room. By the way, I am very inexperienced in looking at bonzai. I would be very happy if those of you who have experience in this field enlighten me. I will be waiting for the suggestions of experienced bonsai growers.

Thank you in advance for reading and supporting.
With my love