
Buenas tardes amigos de #Jewelry espero se encuentren bien gracias por darme la oportunidad de permitirme compartir con ustedes nuevamente mis manualidades, en este caso vamos a realizar una pulcera de ojo turco, con cristales e hilo chino..
Good afternoon friends of #Jewelry, I hope you are well, thank you for giving me the opportunity to allow me to share my crafts with you again, in this case we are going to make a Turkish eye bracelet, with crystals and Chinese thread..
Materiales:📝
💠50 cm de hilo chino (Color de su preferencia).
💠1 Ojo turco.
💠4 Balines pequeños.
💠34 Cristales N° 4 Rombo o Redondo.
💠 Tijera.
💠 Encendedor.
💠 Palito de chupeta.
💠 Cinta métrica.
Materials:📝
💠 50 cm of Chinese thread (Color of your preference).
💠 1 Turkish eye.
💠 4 small pellets.
💠34 Crystals No. 4 Rhombus or Round.
💠 Scissor.
💠 Lighter.
💠 Lollipop stick.
💠 Tape measure.

TUTORIAL:
TUTORIAL:
✓Paso 1.2.3.4:
Iniciamos midiendo 36cm de hilo chino y cortamos, luego los 12cm de hilo chino que en este caso ya sería para hacer el nudo corredizo de nuestra pulcera, luego iniciamos haciendo un nudo dejando 10cm para así comenzar a introducir primero un balín pequeño y seguido los 16 cristales .
✓Step 1.2.3.4: We start by measuring 36cm of Chinese thread and cut, then the 12cm of Chinese thread, which in this case would be to make the sliding knot of our bracelet, then we start making a knot leaving 10cm to start introducing first a small ball and then the 16 crystals.

✓Paso 5.6.7.8:
Colocamos otro balín pequeño y así introducimos el ojo turco y nuevamente el otro balín más el restante de los cristales que en este caso vendrían siendo los 16 cristales más y luego el otro balín pequeño..
✓Step 5.6.7.8: We place another small pellet and thus we introduce the Turkish eye and again the other pellet plus the rest of the crystals, which in this case would be the 16 more crystals and then the other small pellet.

✓Paso 9.10.11.12:
En este paso ya colocado el balín realizamos el nudo luego para el cierre de la pulcera realizamos un nudo Corredizo..
✓Step 9.10.11.12: In this step, once the ball is placed, we make the knot, then to close the bracelet we make a sliding knot.

✓Paso 13.14.15 16:
Para realizar el nudo utilizamos un palito de chupeta unimos los 2 hilos hacia lados distintos, que en este caso sería uno hacía la derecha y otro hacía la izquierda arriba colocamos el palito de la chupeta damos de 3 a 4 vueltas con el hilo de los 12cm hacia atrás luego metemos la punta por dentro de el palito y comenzamos a halar sacando el palito comenzamos dándole la forma a el nudo sin que se monte un hilo enzima de otro tratemos que quede bien definido.
✓Step 13.14.15 16: To make the knot, we use a lollipop stick, join the 2 threads to different sides, which in this case would be one to the right and the other to the left above, we place the lollipop stick, we make 3 to 4 turns with the 12cm thread backwards then we put the tip inside the stick and we begin to pull pulling out the stick we begin by shaping the knot without mounting an enzyme thread from another let's try to make it well defined.

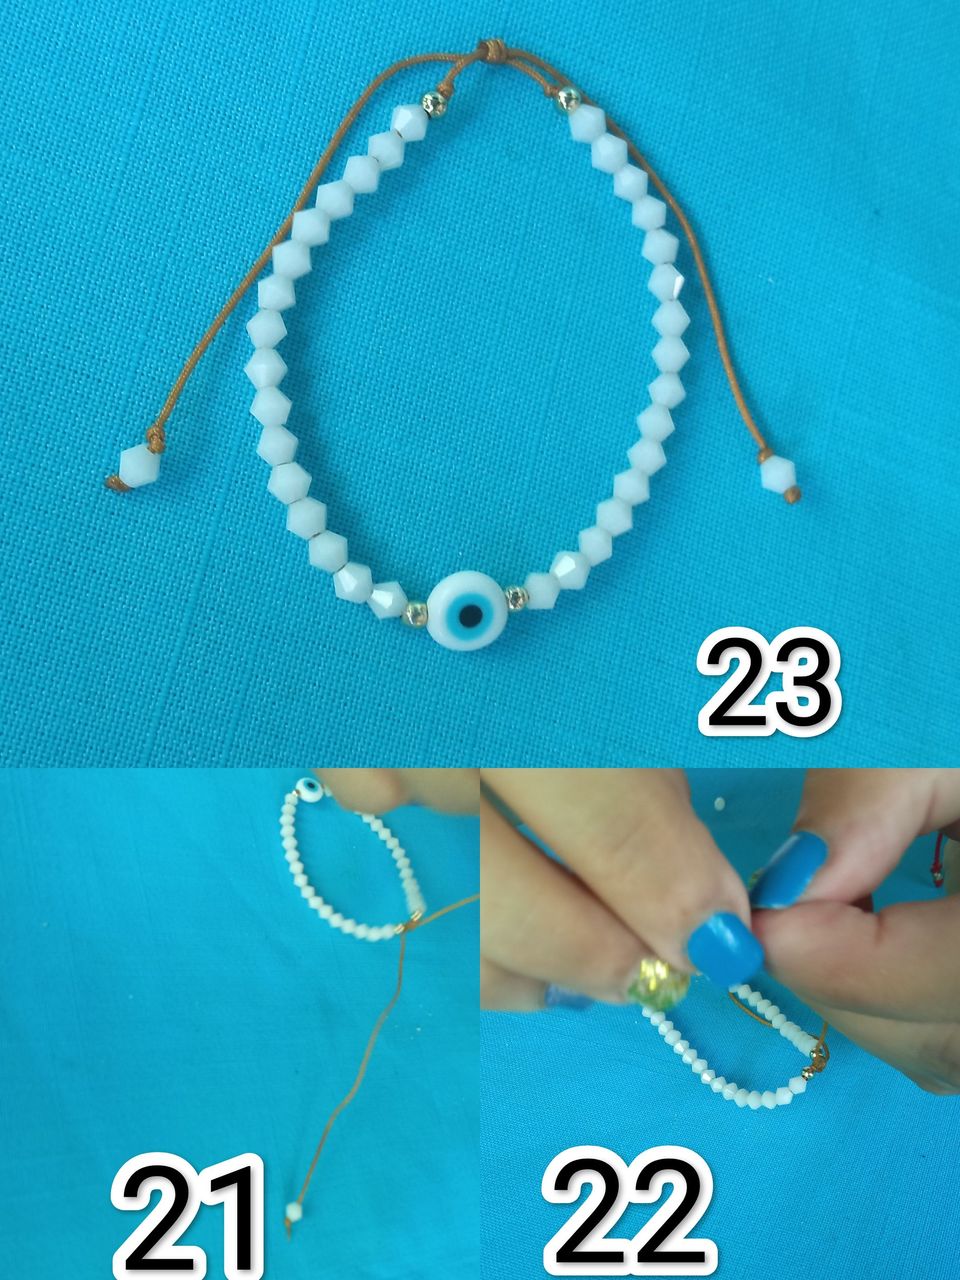
✓Paso 17.18.19.20.21.22.23:
Una vez ya listo el nudo picamos el sobrante del hilo que utilizamos para el nudo y sellamos quemando con el encendedor con mucho cuidado y en las puntas colocamos 1 cristal y se realiza 1 nudo seguidamente realizamos el mismo paso en la otra punta.. Así mismo hacemos un nudo en la parte de atrás de el cristal para haci dejarlo estándar y se queman las puntas luego de terminar..
✓Step 17.18.19.20.21.22.23: Once the knot is ready, we chop the excess of the thread that we use for the knot and seal it by burning with the lighter very carefully and in the ends we place 1 crystal and make 1 knot, then we carry out the same step in the other end.. Likewise we make a knot in the back of the glass to make it standard and burn the ends after finishing..

Y listo ya terminamos nuestra pulcera de ojo turco cristales e hilo chino, Espero les halla gustado mi tutorial y les sirva de guía a todo aquel que quiera iniciar este arte.
And that's it, we finished our crystals and Chinese thread Turkish eye bracelet, I hope you liked my tutorial and it will serve as a guide to anyone who wants to start this art.

Gracias por leerme Hasta otra próxima oportunidad síganme para más en 
Estás fotos son de mi propiedad..
Thanks for reading. Until another next opportunity, follow me for more @ lupasbra21 .. These photos are my property .. @ lupasbra21 .