
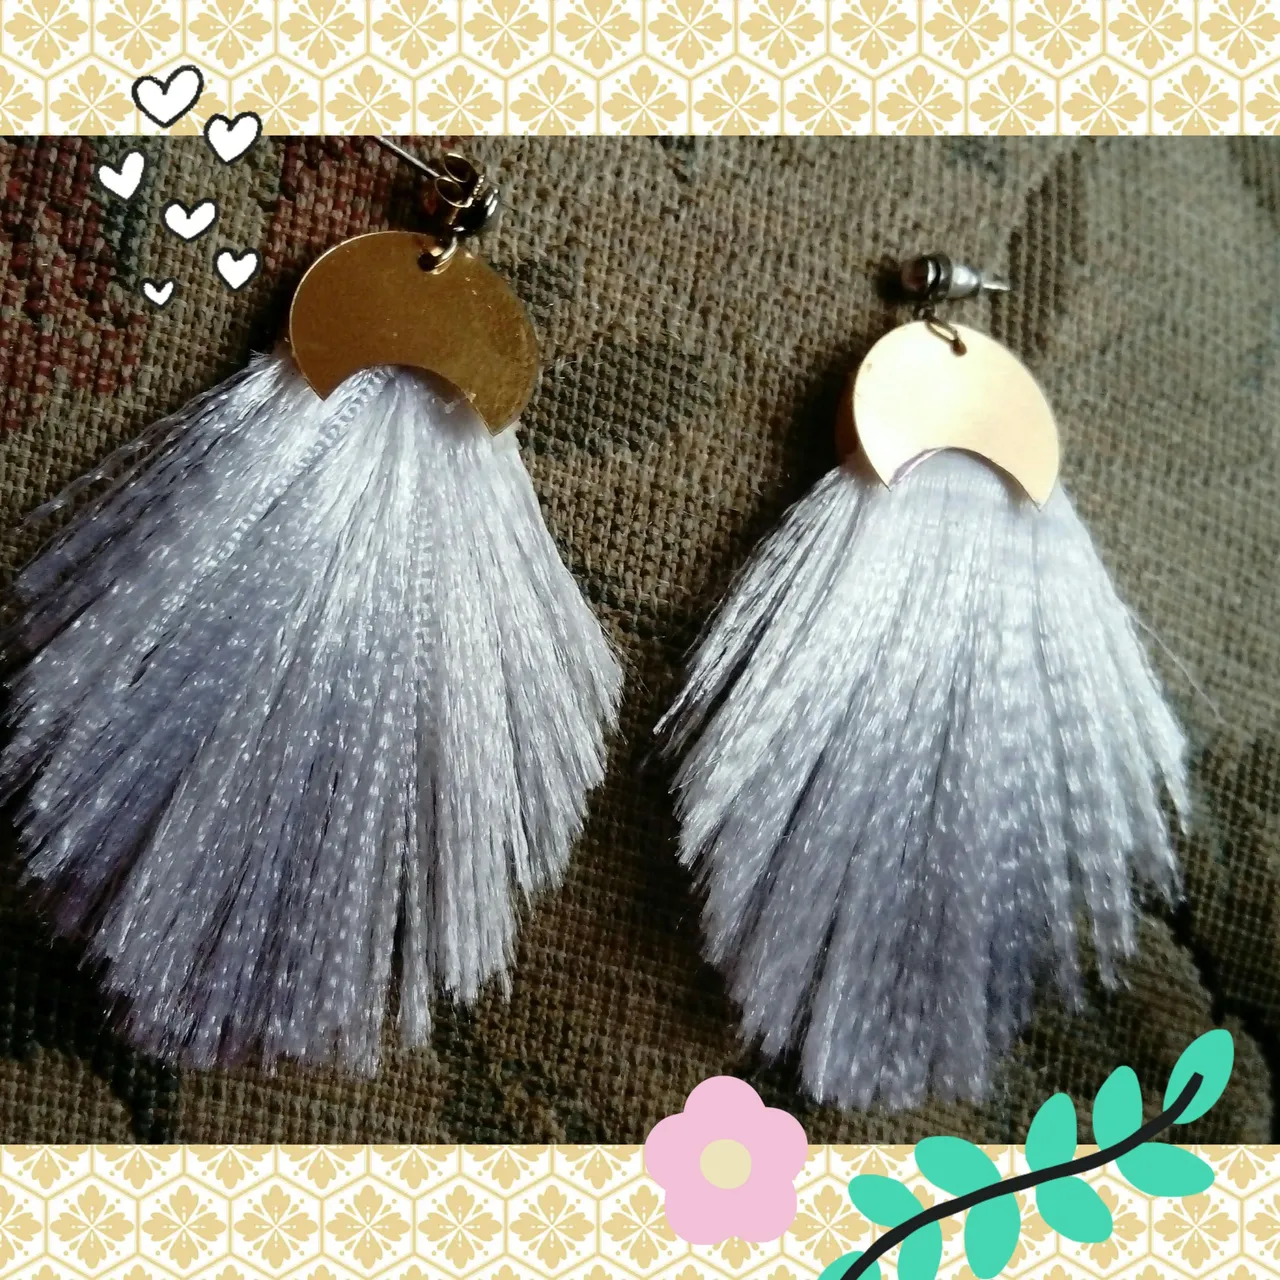
Como están? amigos de esta creativa comunidad de Jewelry, deseándoles a todos un feliz día, y que se encuentren bien junto a sus familias, en esta oportunidad me encuentro por aquí contándoles de la elaboración de unos zarcillos muy lucidos, están elaborados de hebras que provienen de las cintas de raso de un brillo particular y una textura muy suave por ser característico de este material.
Estos se elaboran deshilachando la cinta, el cual, debe ser con cuidado para ir sacando estos hilitos, este proceso bien vale la pena ya que, el resultado es encantador, haciendo alusión a la delicadeza y al glamour, para complementar nuestra imagen más si queremos sentirnos especiales.
💮💮💮💮💮💮💮💮💮💮💮💮💮💮💮💮
Este es un deseo que parte de nuestra naturaleza sentirnos relucientes, a través de un llamativo accesorio, por eso estamos en constante búsqueda de lucir variados modelos, con diversos materiales y de diferentes colores, y texturas, donde innovar es tan necesario y más, si es de manera fácil con un adorable resultado.
Siendo justo lo que les vengo a mostrar, los cuales son unos zarcillos compuesto de muchos hilitos que se extraen del deshilachado de la cinta, para luego definir alguna forma que se desee materializar. En este caso lo hice de una forma redondeada. También es un acierto de otras ideas como hojitas, plumas u otras que se nos pudieran ocurrir.
A continuación los materiales a utilizar:
❄Cinta de raso blanca
❄4 Mostacillon color dorado ( este es más grande que la habitual)
❄Dos topos puya para zarcillos
❄Dos argollas pequeñas
❄Silicon
Iniciamos cortando cuatro pedazos de cinta de ocho centímetros cada una , se sella con un yesquero uno de sus extremos, y se continua realizando un corte a lo largo de la cinta por ambos lados, dejando un pedacito sin recortar con el fin de marcar hasta donde se va a deshilachar la cinta.


Se procede a separar los hilitos de la cinta por pequeñas partes hasta terminar.

Se pegan con el silicon dos cintas ya deshilachada, a modo que sea abundante en hilitos. Aparte se realiza un corte a la lentejuela, en forma de luna, para esto la marque utilizando una lima de uña.


En una de la lentejuelas se pega con silicon las cintas deshilachadas, pegando del otro lado la otra, hay que asegurarse qué los huequitos coincidan, para que las argollas se coloquen sin problema.


A parte se dobla un papel y se recorta la forma que le vamos a dar a los hilitos, como se muestra en la siguiente foto.


Este quedará en forma de estuche en él se colocará la cinta deshilachada ubicando la lentejuela por el círculo pequeño y se esparcen los hilitos por el papel .

Se cubre con la tapa de papel y se recorta por toda la orilla los hilos qué sobresalen y así darle la forma deseada.

Luego se va corrigiendo algún detalle que pueda tener la pieza fuera de este molde, y así conseguir que queden delineados. Para finalizar se le coloca una argollita al huequito de la lentejuela para colocarle el topo puya, qué nos ayudara en llevarlo puesto.


Algo que me fascinó fue el brillo y la suavidad qué tienen estos zarcillos son tan cautivantes que fue de inspiración para otros modelos de este mismo estilo, que pronto les estaré compartiendo, espero les haya gustado y se entusiasmen en realizarlos. Hasta otra ocasión amigos 🍃🍃. Bendiciones ✨ ✨

🍃🍃CONTENT IN ENGLISH🍃🍃
Hello hivers friends of this creative community of Jewelry, wishing you all a happy day, and that you are well with your families, this time I am here telling you about the development of a very lucid tendrils, they are made of strands that come from satin ribbons of a particular brightness and a very soft texture to be characteristic of this material.
These are elaborated by unraveling the ribbon, which must be carefully to remove these threads, this process is well worth it because the result is charming, alluding to the delicacy and glamor, to complement our image more if we want to feel special.
💮💮💮💮💮💮💮💮💮💮💮💮💮💮💮💮
And as we often want to feel shiny, it is a constant search to wear different models of accessories, with different materials, different colors and textures, where innovation is so necessary to highlight our appearance and be adorned with the help of a beautiful accessory.
And that's just what brings me today in this step by step, which are some tendrils composed of many threads that are extracted from the frayed ribbon, and then define some form that you want to materialize. In this case I did it in a rounded shape. It is also a success of other ideas such as leaves, feathers or others that we could think of.
The following are the materials to be used:
❄White ribbons
❄4 Gold colored mostacillon ( this one is bigger than usual).
❄Two polka dots for tendrils.
❄Two small rings
❄Silicon
We start by cutting four pieces of tape of eight centimeters each, sealing one of its ends with a tinder, and continue making a cut along the tape on both sides, leaving a little piece without cutting in order to mark where the tape will be frayed.
We proceed to separate the threads of the ribbon by small parts until the ribbon is finished.
Glue with the silicon two ribbons already frayed, so that it is abundant in yarns. Besides, a cut is made on the sequin, in the shape of a moon, for this I marked it using a nail file.
On one of the sequins glue the frayed ribbons with silicone, gluing the other side of the other side, make sure that the holes match, so that the rings are placed without problem.
A piece of paper is folded and cut out the shape that we are going to give to the yarns, as shown in the following photo.
This will be in the form of a case in which the frayed ribbon will be placed by placing the sequin in the small circle and spread the threads on the paper.
It is covered with the paper cover and the protruding threads are trimmed around the edge to give it the desired shape.
Then correct any detail that the piece may have out of this mold, and thus achieve that they are delineated. Finally, a small ring is placed in the hole of the sequin to place the puya mole, which will help us to wear it.
Something that fascinated me was the brightness and softness that have these tendrils are so captivating that was inspiration for other models of the same style, which soon I will be sharing, I hope you liked it and get excited to make them. Until another time friends 🍃🍃. Blessings ✨ ✨ ✨
Fotos tomadas por | Photos taken by

Dispositivo | Device | SONY XPERIA
Fotos editadas en: |Photos edited in | App InShot
Gig creado en| Gif created in |Adobe Express
Traducción con | Translation with| DeepL