Bienvenidos || Welcome


Feliz martes a todos, querida familia de #Hive y #Jewelry tenía días queriendo estar y compartir aquí y fue ayer que se me presento la oportunidad y el tiempo para poder crear una linda pulsera y estar hoy acá compartiendo con todos ustedes la elaboración de la misma, la técnica utilizada es la que conocemos como miyuki, la temática elegida para esta ocasión son las mariposas y decidí utilizar mis dos colores predilectos que son el negro y el rosa para la elaboración de la misma utilice los siguientes materiales:
Happy Tuesday to all, dear family of #Hive and #Jewelry had days wanting to be and share here and it was yesterday that I had the opportunity and time to create a nice bracelet and be here today sharing with you all the development of the same, the technique used is known as miyuki, the theme chosen for this occasion are the butterflies and decided to use my two favorite colors which are black and pink for the development of the same use the following materials:
Materiales || Materials
🦋 Mostacillas de color negro.
🦋 Mostacillas de color rosa.
🦋 Hilo nailon negro.
🦋 Tijera.
🦋 Aguja.
🦋 Black beads.
🦋 Pink beads.
🦋 Black nylon thread.
🦋 Scissors.
🦋 Needle.
Pasos ||Steps
🦋 Paso 1. Lo primero que hice fue fijar y ajustar los hilos en mi bol ya que este hará las veces de telar, está pulsera a diferencia de la última que realice es un diseño delgado por qué utilice 8 hilera de hilos, recordemos que los hilos de los extremos son doble, con todos estos detalles listo ahora así manos a la obra.
🦋 Step 1. The first thing I did was to fix and adjust the threads in my bowl as this will serve as a loom, this bracelet unlike the last one I made is a thin design because I used 8 rows of threads, remember that the threads at the ends are double, with all these details ready now so let's get to work.

🦋 Paso 2. Tome 2 metros de hilo nailon y ensarte la aguja, seguidamente procedí amarrar el extremo del hilo de la aguja en la primera hilera del telar para así comenzar a realizar la pulsera.
🦋 Step 2. Take 2 meters of nylon thread and thread the needle, then proceed to tie the end of the needle thread in the first row of the loom to start making the bracelet.

🦋 Paso 3. Iniciaremos tomando 7 mostacillas negras y las vamos a posicionar entre los espacios existentes entre cada hilo, esto por la parte inferior de los hilos del telar, seguidamente vamos atravesar todas las mostacillas con nuestra aguja y al llegar al otro extremo, vamos atravesar de nuevo las mostacillas con nuestra aguja de regreso, pero asegurándonos que la aguja pase por encima de los hilos del telar, este paso es la esencia de la técnica hoy implementada así que en cada hilera de mostacilla la vamos a realizar.
🦋 Step 3. We will start by taking 7 black beads and we will position them between the existing spaces between each thread, this at the bottom of the loom threads, then we will go through all the beads with our needle and when we reach the other end, we will go through the beads again with our needle back, but making sure that the needle passes over the loom threads, this step is the essence of the technique implemented today so in each row of beads we are going to perform it.

🦋 Paso 4. Para la próxima hilera vamos usar 4 mostacillas negras, 2 rosas y 1 negra.
🦋 Step 4. For the next row we will use 4 black, 2 pink and 1 black beads.

🦋 Paso 5. Para la próxima hilera vamos usar 1 mostacilla negra, 1 mostacilla rosa, 1 mostacilla negra y 4 mostacillas rosas.
🦋 Step 5. For the next row we will use 1 black bead, 1 pink bead, 1 black bead and 4 pink beads.

🦋 Paso 6. Para la próxima hilera vamos usar 7 mostacillas rosas.
🦋 Step 6. For the next row we will use 7 pink beads.

🦋 Paso 7. Para la próxima hilera vamos usar 6 mostacilla rosas y 1 mostacilla negra.
🦋 Step 7. For the next row we will use 6 pink mustard and 1 black mustard.

🦋 Paso 8. Para la próxima hilera vamos usar 1 mostacilla negra, 4 mostacillas rosas y 2 mostacillas negras.
🦋 Step 8. For the next row we will use 1 black bead, 4 pink beads and 2 black beads.

🦋 Paso 9. Para la próxima hilera vamos usar 2 mostacillas negras, 2 mostacillas rosas y 3 mostacillas negras, de eta manera ya habremos realizado la mita del diseño de la mariposa.
🦋 Step 9. For the next row we will use 2 black beads, 2 pink beads and 3 black beads, this way we will have already made half of the butterfly design.

🦋 Paso 10. Para la próxima hilera vamos usar 1 mostacilla negra, 4 mostacillas rosas y 2 mostacillas negras.
🦋 Step 10. For the next row we will use 1 black bead, 4 pink beads and 2 black beads.

🦋 Paso 11. Para la próxima hilera vamos usar 6 mostacilla rosas y 1 mostacilla negra.
🦋 Step 11. For the next row we are going to use 6 pink mustard and 1 black mustard.

🦋 Paso 12. Para la próxima hilera vamos usar 7 mostacillas rosas.
🦋 Step 12. For the next row we will use 7 pink beads.

🦋 Paso 13. Para la próxima hilera vamos usar 1 mostacilla negra, 1 mostacilla rosa, 1 mostacilla negra y 4 mostacillas rosas.
🦋 Step 13. For the next row we will use 1 black bead, 1 pink bead, 1 black bead and 4 pink beads.

🦋 Paso 14. Para la próxima hilera vamos usar 4 mostacillas negras, 2 rosas y 1 negra.
🦋 Step 14. For the next row we will use 4 black, 2 pink and 1 black beads.

🦋 Paso 15. Realizaremos 2 hileras cada una de 7 mostacillas negras,.de eta forma habremos culminado nuestra mariposa y podremos continuar realizando la siguiente.
🦋 Step 15. We will make 2 rows of 7 black beads each. In this way we will have finished our butterfly and we will be able to continue making the next one.

🦋 Paso 16. Aquí visualizamos como la pulsera va tomando forma mediante vamos avanzando, en mi caso decide realizar 3 mariposas.
🦋 Step 16. Here we visualize how the bracelet takes shape as we move forward, in my case I decided to make 3 butterflies.


🦋 Paso 17. Para ambos extremos de la pulsera decidí relaizar 6 hileras de 7 mostacilla negras cada una.
🦋 Step 17. For both ends of the bracelet I decided to make 6 rows of 7 black beads each.

🦋 Paso 18. Procedí a cortar los hilos de los extremos de la pulsera, hacer un nudo clásico en cada costado y realizar un trenzado de 3 con los hilos de cada extremo.
🦋 Step 18. I proceeded to cut the strands at the ends of the bracelet, make a classic knot on each side and make a braid of 3 with the strands at each end.

🦋 Paso 19. por último realice un nudo plano entre los trenzados de ambos extremos.
🦋 Step 19. finally tie a flat knot between the braids at both ends.

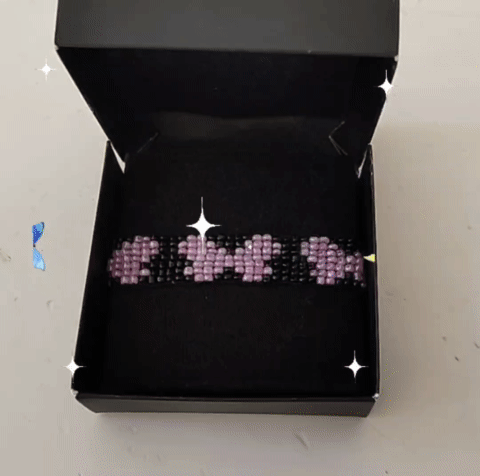
De esta manera culminamos la pulsera un diseño muy encantado y sutil a la vez ¿Que le ha parecido a ustedes?
This way we finish the bracelet, a very charming and subtle design at the same time. What do you think of it?
Resultado || Result


Para mayor comprensión o guía en caso que deseen recrear este hermoso diseño les dejo una foto macro del diseño donde se visualiza mejor el conteo de las Mostacillas.
For further understanding or guidance in case you wish to recreate this beautiful design I leave a macro photo of the design where you can better visualize the counting of the beads.

Feliz totalmente agradecida con cada uno por su tiempo, atención, apoyo y lindos comentarios, espero que este proyecto haya sido de su agrado sin más será hasta un próximo post estimados amigos y lectores desde Ecuador les envío un fuerte abrazo.
Happy totally grateful to everyone for their time, attention, support and nice comments, I hope this project has been to your liking without further ado will be until a next post dear friends and readers from Ecuador I send you a big hug.
La creatividad no tiene límite. || There is no limit to creativity. ✨💎🎉🌷


🎥Imágenes y vídeo creados con: |Images and video created with: Youcut video| Giphy | Canva |
🇪🇸 Traducido con DeepL